
OmniLab ATS 是一款测试工具,通过使用此工具,Android 开发者和测试工程师可以借助其界面来运行标准 Android 测试套件,例如 Android 兼容性测试套件 (CTS)。此工具可以充当各种测试框架(例如 Trade Federation [TF] 和 Google Mobly)的网页界面,让您只需进行极少的设置即可在一组测试设备上运行 CTS 和多设备测试,以及制定时间表以持续运行测试。
设置 OmniLab ATS
本部分介绍了如何安装和设置 OmniLab ATS。
OmniLab ATS 使用的源代码来自以下位置:
- OmniLab ATS 源代码
- TradeFed Cluster 源代码
安装 OmniLab ATS
请遵循与您运行的测试套件相关的各项硬件和软件要求。
您可以在 source.android.com 上找到与 CTS 有关的要求。
OmniLab ATS 没有额外的硬件要求,但建议您以 CTS 主机要求为最低要求。
您可以通过以下两种方式安装 OmniLab ATS:
使用安装程序进行安装
在 Ubuntu 20.04+ 上,安装程序会安装并配置运行 OmniLab ATS 所需的所有程序和资源。
如需使用安装程序,请执行以下操作:
运行安装程序:
curl https://storage.googleapis.com/android-mtt.appspot.com/prod/install.sh | bash
运行
mtt version以检查所安装 OmniLab ATS CLI 的版本。
手动安装
安装 Docker
请按照在 Linux 计算机上安装 Docker 社区版 (CE) 的说明进行操作。
您可能需要重启终端窗口,或退出后重新登录,才能使权限更改生效。
安装 Python 3
OmniLab ATS CLI 针对 Python 3.7 至 3.11 版进行了验证。
对于 Ubuntu 16.04 或更低版本,请先通过执行以下任一操作来为 Python 3 添加仓库:
运行以下命令:
sudo add-apt-repository ppa:deadsnakes/ppa
使用源代码构建和安装该仓库。
如需安装 Python 3,请运行以下命令:
sudo apt-get updatesudo apt install python3 python3-distutils
如需安装特定的 Python 3 版本(例如 3.10),请改为运行以下命令:
sudo apt-get updatesudo apt install python3.10 python3.10-distutils
获取 OmniLab ATS CLI
启动 OmniLab ATS
使用以下命令启动 OmniLab ATS:
mtt start
首次启动界面时,可能需要几分钟才能显示。CLI 会显示一个用于在浏览器中访问界面的网址。默认情况下,网址为 localhost:8000。您可以视需要使用 --port 标志在启动时更改默认端口。
如果有新版本可用,您可以更新为最新版本。您可以查看版本说明,了解最新版本。
如需更新到最新版本,请运行以下命令:
mtt start --force_update
如需停止应用,请运行以下命令:
mtt stop
如需查看其他命令列表,请使用以下命令:
mtt --help
备份和恢复数据库
如需备份 OmniLab ATS 数据库,请停止应用并运行以下命令。该命令会将当前数据库备份到主目录内一个名为 mtt-backup.tar 的 TAR 文件中:
docker run --rm --mount source=mtt-data,target=/data -v ~:/out ubuntu bash -c "cd /data && tar cvf /out/mtt-backup.tar ."
如需恢复,请在启动应用之前运行以下命令:
docker run --rm --mount source=mtt-data,target=/data -v ~:/out ubuntu bash -c "cd /data && tar xvf /out/mtt-backup.tar"
设置向导
首次安装并运行 OmniLab ATS 后,设置向导会引导您完成一些步骤,从而帮助您为自己的环境自定义此工具。您在此处所做的任何更改,稍后都可以通过“Settings”页面重新配置。
恢复配置备份
如果您有从另一 OmniLab ATS 主机备份的配置文件,可以通过点击 Upload File 按钮上传文件,从该主机复制所有修改的配置。

图 1. 恢复配置备份。
设置默认服务账号
您可以设置一个服务账号,作为 OmniLab ATS 访问您的资源(例如 Google Cloud Storage、Google 云端硬盘)时使用的默认服务账号。如需对您的服务账号进行身份验证,请点击 Upload Service Account Key,然后选择您的服务账号的 JSON 密钥文件。

图 2. 设置服务账号。
成功对服务账号进行身份验证后,页面右上角会显示账号的电子邮件地址。如需更改服务账号,请点击账号名称,移除当前默认账号,然后上传新的服务账号密钥。

图 3. 更改服务账号。
导入配置集
配置集是一组用于运行测试套件的配置,包括相关设备操作、build 版本等。配置集托管在一个特定的 Google Cloud Storage (GCS) 存储分区中。使用您的 Google 账号对 GCS build 版本进行身份验证后,您会看到自己可以使用的所有配置集的列表。
选择您想要添加到 Test Station 主机的任何配置集,然后点击 Import Selected。

图 4. 导入配置集。
包含 Wi-Fi 设置
某些 CTS 测试要求您的设备连接到 Wi-Fi 热点。如需选择 Wi-Fi 网络,请输入 WiFi SSID 与可选的 WiFi PSK。

图 5. Wi-Fi 热点设置。
设置向导完成后,页面将重新加载,使新的设置生效。
连接设备
必须启用 USB 调试才能使用设备进行测试。如需启用调试,请执行以下操作:
按照启用开发者选项和调试功能中的说明进行操作。
如果您打算使用已预加载自定义 adb 密钥的测试 Android build,请将自定义
.adb_key文件放到~/.android/目录下。这些文件会自动加载并传递给 adb,以便在运行这些 build 的设备刷机后自动启用 USB 调试。
使用 USB 将设备连接到主机。
刷新网页界面后,设备会在一分钟内显示在 OmniLab ATS 的“Devices”标签页中。您还可以在此标签页上查看设备的状态。

图 6. 连接设备。
不同的设备状态包括:
- “Available”- 设备已经连接,可以运行测试了。
- “Allocated”- 设备已经连接并且正在运行测试。每台设备一次只能运行一项测试,因此设备必须完成当前测试后才能运行新的测试。
运行测试
选择测试
OmniLab ATS 附带一组预捆绑的 CTS 配置。如需运行其中一项测试,请转到“Test Suites”标签页,然后针对所选测试,点击 Run test。

图 7. 选择测试。
如需修改或添加新测试,请参阅添加测试。
配置测试运行
修改用于本次特定测试运行的参数。大多数参数预填充了选定测试配置中定义的值。
您可以使用默认值完成该步骤,但您也可以根据需要更改任何参数,例如“Max Retry”和“Command”。

图 8. 配置测试运行。
测试运行参数包括:
- “Name”- 您想要运行的测试套件的名称。
- “Run Count”- 在安排此测试运行后,此测试运行应该执行的次数。测试运行使用 Trade Federation 来安排,如果容量足够,最多可以同时执行 20 个测试运行。
- “Max Retry”- 在至少一项测试失败时,最多可以重试测试运行的次数。对于一次完整的 CTS 运行,此值通常设置为 4–6 次重试,从而应对不稳定的测试。
- “Queue Timeout”- 如果测试运行长时间处于"Queued"状态,就会自动取消。在此处指定取消前应等待多久。默认值为 24 个小时。
“Command”- 用于运行测试套件的命令。您可以在此输入其他命令行参数。例如,使用以下命令运行 CTS 8.1 中的一个特定模块:
cts-suite -m ShortModuleName“Retry Command”- 用于重试测试套件的命令。您可以在此处添加其他命令行参数。例如,如需仅重试 CTS 8.1 中的一个特定模块,请使用以下命令:
cts --retry 0 -m ShortModuleName重试参数可能与初始命令提供的参数不同,因此请在官方网站上检查选定测试套件支持的参数。
“Previous Test Run”- 如果您想要重新执行以前的测试运行,请执行以下操作:
“Local”- 如果测试运行是在当前主机上启动的,请输入查看测试运行详情时显示的测试运行 ID。

图 9. 本地的上一次测试运行。
“Remote”- 如果测试运行是在其他主机上启动的,请选择“Remote”,点击 Upload Test Results File,从本地存储空间选择一个测试结果文件进行上传。

图 10. 远程的上一次测试运行。
选择设备
点击相应复选框,选择为运行测试套件分配的设备。分片数量应该会自动变化,从而匹配所选设备的数量。

图 11. 选择设备。
如需按设备序列号以外的属性选择设备,可以手动输入“设备规格”。例如,如需选择产品名称为“bramble”的 3 台设备,请输入以下内容:
product:bramble;product:bramble;product:bramble
支持的属性包括:
- build_id
- device_serial
- device_type
- hostname
- 产品
- product_variant
- sim_state
选定的所有设备都必须处于“Available”状态才能执行测试运行,执行测试运行时,这些设备都会切换到“Allocated”状态。测试运行在等待设备可用期间会处于“Queued”状态。
添加设备操作
设备操作是可在每个测试运行之前执行的脚本。系统已预先配置部分设备操作,如刷机和重新启动。如需创建新的设备操作,请参阅创建新的设备操作。

图 12. 设备操作。
如需将设备操作添加到测试运行,请点击 Add new action,选中要添加的操作对应的复选框,然后点击 Add Action(s)。设备操作将按顺序执行。您可以通过拖动来对操作重新排序。

图 13. 对操作重新排序。
设置测试资源
测试资源是执行测试运行所需的文件。例如,运行 CTS 需要有 android-cts*.zip 文件,而设备刷机需要提供 build 映像。
测试套件 ZIP 文件的下载网址应默认为提供给合作伙伴的 Google 云端硬盘链接。您可以点击 browse,选择其他文件。您可以在弹出式窗口中输入文件下载链接、使用已通过身份验证的 build 版本的文件,或从本地存储空间上传文件。

图 14. 测试资源。
以下是用于按网址选择测试资源的弹出式窗口。输入下载网址链接,然后点击 Select 按钮即可确认选择。

图 15. 测试资源选择器 - 网址。
如果您已将资源上传到 Google 云端硬盘、Google Cloud Storage (GCS) 或其他渠道,还可以导航到特定渠道的标签页,然后从中选择资源。以下是从 Google 云端硬盘中选择资源的示例。

图 16. 测试资源选择器 - Google 云端硬盘。
除选择文件外,Filename 字段还支持通配符。您可以在此处找到相关文档。

图 17. 测试资源选择器 - 支持通配符模式。
您还可以从 OmniLab ATS 的本地文件存储空间中选择文件。您可以将文件上传到此存储空间,或直接使用本地文件和目录。

图 18. 测试资源选择器 - 本地文件存储区。
添加重新运行配置
您可以安排重新运行,重新运行将在主运行完成后开始并加载其结果,但可以使用不同的设备、操作或资源。

图 19. 添加重新运行配置。
启动测试运行
输入测试运行所需的信息后,点击 Start Test Run。如果所有信息均有效,您会被重定向到一个可以查看测试运行的详细信息和进度的页面。

图 20. 启动测试运行。
创建测试计划
测试计划用于创建按照定期时间表执行的测试运行。例如,每天下午 5 点运行 CTS 9.0。如需创建新的测试计划,请点击 Create a new test plan。

图 21. 创建测试计划。
配置测试计划
输入测试计划的名称以及您要添加的任何标签。然后选择要使用的时间表。
- “Manual”- 仅在用户点击测试计划列表页面中的 Run test plan 时,该测试计划才会创建测试运行。
- “Periodic”- 该测试计划将按照所选的定期时间表,自动安排测试运行。例如,安排每天下午 5:00 运行测试。
- “Custom”- 该测试计划将基于输入的 cron 表达式,自动安排测试运行。例如,如需安排每天下午 5:00 运行测试,cron 表达式应为
0 17 * * *。

图 22. 配置测试计划。
添加测试套件
点击 + Add test run configuration,添加您希望由测试计划安排的测试套件。从“Name”下拉列表中选择一个测试套件,然后点击 Next step。然后,选择您想要运行测试的设备,并点击 Add Configuration。您可以为每个测试计划添加多个配置。

图 23. 配置测试运行。
添加设备操作
添加您想要在每次测试运行之前执行的设备操作。如需了解详情,请参阅添加设备操作部分。

图 24. 添加设备操作。
设置测试资源
将测试资源添加到测试计划的方法与将测试资源添加到各个测试运行的方法相同。如需了解详情,请参阅设置测试资源部分。

图 25. 设置测试资源。
查看测试运行
测试运行列表
在“Test Runs”页面查看已经安排的测试运行列表。点击 View 即可查看关于测试运行的更多详情。
您还可以通过在“Filter”栏中输入字符串并按 Enter 键来过滤列表。您可以使用多个过滤条件,只需用英文逗号隔开即可。过滤器会返回任何列(“Status”列和“Created”列除外)中包含您所输入的确切文字的所有行(不含子字符串匹配)。
如果过滤条件为空,系统会返回所有行。目前,无法过滤包含空值的行。

图 26. 测试运行列表。
测试运行详细信息
您可以在此处查看有关测试运行的详细信息,例如状态、日志和结果。

图 27.测试运行详细信息。
测试运行状态
测试运行的进度显示在“Status”部分中。如果存在下载进度、取消原因或错误消息等相关消息,也会显示在此处。

图 28.测试运行状态。
测试运行状态包括:
- “Pending”- 正在下载所需资源。
- “Queued”- 设备可用时即可运行测试。
- “Running”- 测试正在分配的设备上运行。
- “Completed”- 测试已完成并报告了结果。
- “Canceled”- 测试已被用户取消,或在尝试查找可用设备时超时。
- “Error”- 发生了错误,导致无法运行测试。
取消测试运行
如果测试运行尚未完成,您可以点击 Cancel,然后在确认对话框中点击 Yes,以取消该测试。如果测试运行保持“Queued”状态的时长超过“queue_timeout_seconds”字段中的值,也会自动取消。取消处于“Running”状态的测试运行可能需要过几分钟才能生效。

图 29.取消测试运行。
测试运行结果
测试运行完成后,系统会收集并显示结果。您可以通过点击每项运行旁边的箭头,查看其他详细信息。点击 View Output Files,查看收集的测试工件,例如 test_result.xml 和 test_result_failures.html。

图 30. 测试运行结果。
您可以在“Logs”标签页中查看实时主机和 Tradefed 日志。

图 31. “Logs”标签页。
单个模块的测试结果位于“Test Results”标签页中。

图 32. “Test Results”标签页。
您可以点击“Test Resources”标签页中的 Open,下载用作测试资源的文件。

图 33. “Test Resources”标签页。
如需查看测试运行的详细信息(例如“create_time”),请转到“Config”标签页。create_time

图 34. “Config”标签页。
高级功能
管理配置文件
OmniLab ATS 使用以 YAML 格式编写的配置文件加载预定义的选项,例如测试、build 版本和设备操作。下面是一个示例配置文件:
// example_file.yaml
tests:
- id : android.cts.9_0.arm
  name: CTS 9.0 (ARM)
  test_resource_defs:
  - name: android-cts.zip
    default_download_url: https://dl.google.com/dl/android/cts/android-cts-9.0_r7-linux_x86-arm.zip
    test_resource_type: TEST_PACKAGE
  command: cts
  env_vars:
  - name: TF_PATH
    value: ${TF_WORK_DIR}/android-cts/tools:${TF_WORK_DIR}/android-cts/testcases
  - name: LD_LIBRARY_PATH
    value: ${TF_WORK_DIR}/android-cts/lib:${TF_WORK_DIR}/android-cts/lib64
  setup_scripts:
  output_file_patterns:
  - android-cts/logs/latest/.*
  - android-cts/results/latest/.*\.html
  - android-cts/results/latest/compatibility_result\..*
  - android-cts/results/latest/logo.png
  - android-cts/results/latest/test_result.xml
  result_file: test_result.xml
  java_properties:
  - name: CTS_ROOT
    value: ${TF_WORK_DIR}
  context_file_dir: android-cts/results/
  context_file_pattern: '[\d_\.]+\.zip'
  retry_command_line: retry --retry 0
  runner_sharding_args: --shard-count ${TF_SHARD_COUNT}

build_channels:
- id: google_drive
  name: Google Drive
  provider_name: Google Drive

device_actions:
- id: flash
  name: Flash
  test_resource_defs:
  - name: bootloader.img
    test_resource_type: DEVICE_IMAGE
  - name: radio.img
    test_resource_type: DEVICE_IMAGE
  - name: img.zip
    test_resource_type: DEVICE_IMAGE
  tradefed_target_preparers:
  - class_name: com.android.tradefed.targetprep.RunHostCommandTargetPreparer
    option_values:
    - name: work-dir
      values:
      - ${TF_WORK_DIR}
    - name: host-setup-command
      values:
      - adb -s $SERIAL reboot-bootloader
      - fastboot -s $SERIAL flash bootloader bootloader.img
      - fastboot -s $SERIAL flash radio radio.img
      - fastboot -s $SERIAL reboot-bootloader
      - fastboot -s $SERIAL -w update img.zip
      - adb -s $SERIAL wait-for-device
    - name: host-cmd-timeout
      values:
      - 10m
设置 OmniLab ATS 实例时,可以通过将配置导出为一个文件来与其他用户共享配置。如需共享配置,请转到“Settings”页面,然后点击右上角的 Export。

图 35. 配置文件管理。
下载配置文件后,与其他用户共享该文件。点击 Import 并选择配置文件,即可将配置文件添加到其 OmniLab ATS 实例中。
创建新的设备操作
设备操作用于自动执行设备设置过程。操作指的是在每次测试运行之前,包括在重试之前,在每台设备上执行的脚本。如需查看可用设备操作列表,请转到“Settings”页面,然后点击“Device Actions”标签页。系统已预先配置多项设备操作,如重新启动和刷机。

图 36.“Device Actions”标签页。
添加新的设备操作
点击 New device action。

图 37. “New device action”按钮。
输入名称和说明。

图 38. 设备操作名称。
点击 Add Target Preparer。
输入 Trade Federation 目标准备器的完整类名,例如,
com.android.tradefed.targetprep.RunHostCommandTargetPreparer。
图 39. 添加目标准备器。
您可以在 com.android.tradefed.targetprep 参考文档中找到可用目标准备器列表。

图 40. 目标准备器列表。
添加可与目标准备器结合使用的各个选项。如需查看可用选项,请查看 targetprep,了解 AOSP 中每个目标准备器的源代码:

图 41. 操作选项示例。
如需添加选项,请点击 Add Target Preparer Option,然后输入必填值。

图 42. 操作命令示例。
定义执行设备操作所需的测试资源,例如,用来刷机的 build 映像。如需添加资源定义,请点击 Add Test Resource 并填写必填字段。如果您知道文件的位置,可以点击 browse 提供默认下载网址。如果目标准备器接受目录作为测试资源,请选择 Decompress。然后指定临时工作目录下的相对 Destination 目录,并指定要解压缩的 File Names。如果未指定文件名,系统会将测试资源中的所有文件都解压缩。

图 43. 操作测试资源。
点击更新。

图 44. 操作保存更改。
管理测试
修改测试
如需修改已保存的测试,请转到“Tests”页面,然后在您想要修改的测试行上点击对应的 Edit。更改测试配置后,请点击 Update。

图 45. 修改测试。
添加新测试
如需添加新测试,请转到“Tests”页面,然后点击 Create a New Test。输入相应信息,然后点击 Create。

图 46. 创建测试。

图 47. 复制测试。
导出主机配置
配置主机后,您可以将主机的配置导出到一个文件中。您可以将此文件上传到其他主机,复制已保存的配置。
如需导出主机的配置,请前往“Settings”页面,然后点击右上角的 Export。
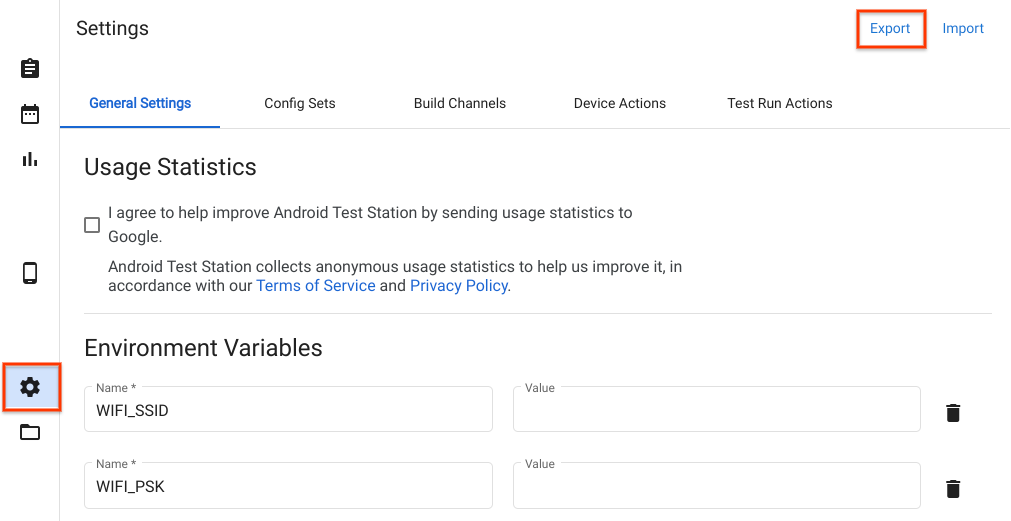
图 48. 导出主机配置。
如需导入一个主机配置文件,请转到“Settings”页面,然后点击右上角的 Import。
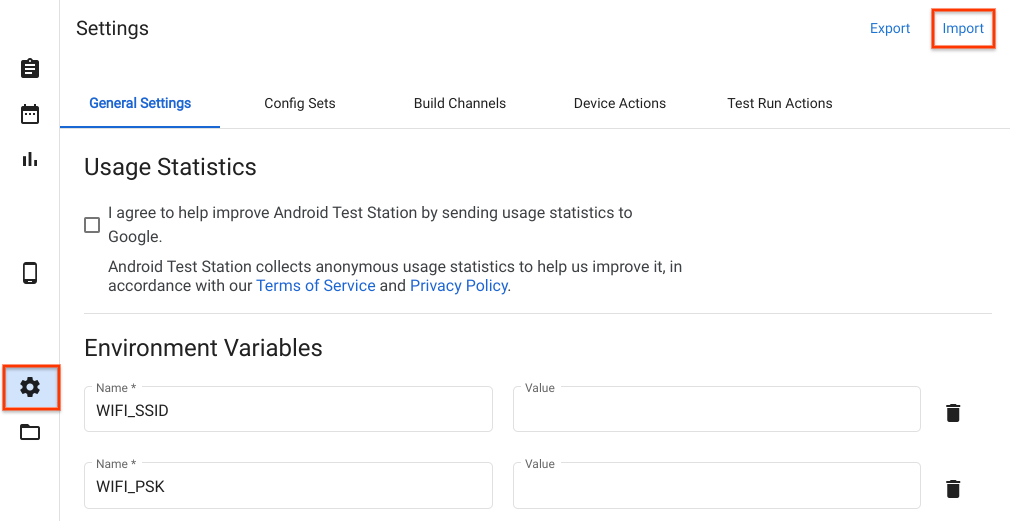
图 49. 导入主机配置。
使用本地文件和目录
从版本 R11 开始,在 OmniLab ATS 中可自动访问 $HOME/.ats_storage 目录中的文件。将文件复制或移动到该目录中,然后您就可以在安排运行测试时从 Local File 标签页中选择该文件。
cp /path/to/file $HOME/.ats_storage

图 50. 从 $HOME/.ats_storage 目录中选择一个文件。
您可以使用 --mount_local_path 标记,将其他目录装载到本地文件存储区。
mtt start --mount_local_path=/path/to/dir1 --mount_local_path=/path/to/dir2:renamed_dir2

图 51. 本地文件存储区中装载的其他目录。
启用多主机模式
在多主机模式下,用户可以使用单个 ATS 控制器主机在多个 ATS 工作器主机上管理设备和测试。

图 52. 多主机模式架构。
如需启动 ATS 控制器,请使用以下命令:
mtt start --operation_mode=ON_PREMISE前往
http://${CONTROLLER_HOSTNAME}:8000检查是否可以访问控制器。如需启动工作器,请使用以下命令:
mtt start --control_server_url=http://CONTROLLER_HOSTNAME:8000 --operation_mode=ON_PREMISE
如果您的网络不允许主机相互通信,您需要在 ATS worker 上按照下面的更高级设置说明进行操作。
使用 SSH 隧道连接这两个主机。选择主服务器端口和文件服务器端口,例如 9000 和 9006。
ssh -L ATS_PORT:localhost:8000 -L FS_PORT:localhost:8006 CONTROLLER_HOSTNAME配置并启动 ATS。
DOCKER_GATEWAY_IP_ADDRESS=$(ip -4 addr show dev docker0 | grep -Eo 'inet [.0-9]+/' | grep -Eo '[.0-9]+')socat tcp-listen:ATS_PORT,bind="${DOCKER_GATEWAY_IP_ADDRESS}",reuseaddr,fork tcp-connect:127.0.0.1:ATS_PORT &socat tcp-listen:FS_PORT,bind="${DOCKER_GATEWAY_IP_ADDRESS}",reuseaddr,fork tcp-connect:127.0.0.1:FS_PORT &mtt start --control_server_url=http://${DOCKER_GATEWAY_IP_ADDRESS}:ATS_PORT \ --control_file_server_url=http://${DOCKER_GATEWAY_IP_ADDRESS}:FS_PORT \ --operation_mode=ON_PREMISE
文件清理器
文件清理器是一项 Cron 作业,每小时运行一次,旨在根据用户所定义的配置清理文件。ATS 有两种归档测试运行结果和删除临时文件的默认配置。本指南介绍了如何自定义政策及配置以便有效管理文件。
政策
政策用于定义要对文件或目录执行的操作,以及据以选择目标的条件。下表中显示了可用的操作:
| 操作类型 | 参数 |
|---|---|
ARCHIVE | remove_file:如果值为 true,在归档后移除文件。 |
DELETE |
条件取决于文件属性和系统信息。下表中显示了可用的条件:
| 条件类型 | 说明 | 参数 |
|---|---|---|
LAST_MODIFIED_TIME | 根据文件的最后修改日期和时间过滤文件。 | ttl:支持各种类型的时间表达式,例如 10m、2h、7 days、4w。如需了解支持的格式,请参阅 pytimeparse。 |
LAST_ACCESS_TIME | 根据文件上次访问日期和时间过滤文件。 | 与 LAST_MODIFIED_TIME 相同。 |
NAME_MATCH | 使用正则表达式根据名称过滤文件。 | pattern:正则表达式,例如 [a-f0-9]{8}-([a-f0-9]{4}-){3}[a-f0-9]{12}\.zip,用于匹配结果 zip 文件。 |
SYSTEM_AVAILABLE_SPACE | 根据系统上的可用空间触发操作。 | threshold:在可用空间低于阈值 [例如 200(B)、200KB、200MB、200GB、2TB] 时触发操作。 |

图 53. 添加新的文件清理器政策。
配置
配置用于将一项或多项政策与特定目录结合起来。系统会根据定义的政策处理指定目录下的文件和目录。系统会按照政策在配置中显示的顺序来应用政策。
所有目标目录都必须位于 /data 目录下。如果您的配置将目标目录指定为 logs,系统会将其解释为 /data/logs。

图 54. 修改文件清理器配置。
重置
点击重置设置会将文件清理器配置还原为其默认状态。此操作会清除所有自定义内容。

图 55. 重置文件清理器设置。
支持
错误报告
您对 OmniLab ATS 的贡献可以帮助完善这款工具,我们期待收到您的反馈!有关最新版本的详细信息,请参阅 OmniLab ATS 版本说明。如需报告 bug 或提供建议,请提交 bug 报告。合作伙伴应通过合作伙伴渠道报告 bug 或提出建议。