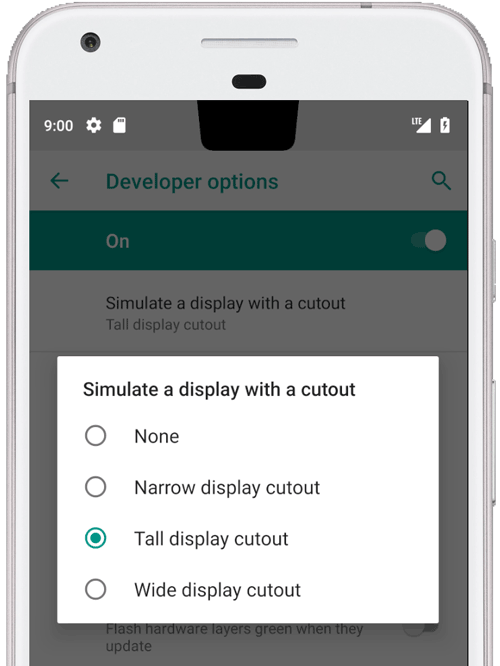
Android 9 には、さまざまな種類のディスプレイ カットアウトをデバイスに実装するためのサポートが追加されています。ディスプレイ カットアウトにより、デバイスの前面に重要なセンサーのスペースを確保しながら、臨場感あふれるエッジ ツー エッジのエクスペリエンスを作成できます。

図 1:上部中央のディスプレイ カットアウト
Android 9 では、次のタイプのカットアウトがサポートされています。
- 上部中央: 上端の中央のカットアウト
- 中央揃えでない上部: 端に寄せられているか、中央から少しずれているカットアウト
- 下部: 下部のカットアウト
- デュアル: 上部に 1 つ、下部に 1 つのカットアウト
例とソース
PhoneWindowManager.java の以下のウィンドウ マネージャー コードでは、LAYOUT_IN_DISPLAY_CUTOUT_MODE_ALWAYS が設定されていないときに表示フレームがセーフエリアに挿入される仕組みを示しています。
// Ensure that windows with a DEFAULT or NEVER display cutout mode are laid out in
// the cutout safe zone.
if (cutoutMode != LAYOUT_IN_DISPLAY_CUTOUT_MODE_ALWAYS) {
    final Rect displayCutoutSafeExceptMaybeBars = mTmpDisplayCutoutSafeExceptMaybeBarsRect;
    displayCutoutSafeExceptMaybeBars.set(displayFrames.mDisplayCutoutSafe);
    if (layoutInScreen && layoutInsetDecor && !requestedFullscreen
            && cutoutMode == LAYOUT_IN_DISPLAY_CUTOUT_MODE_DEFAULT) {
        // At the top we have the status bar, so apps that are
        // LAYOUT_IN_SCREEN | LAYOUT_INSET_DECOR but not FULLSCREEN
        // already expect that there's an inset there and we don't need to exclude
        // the window from that area.
        displayCutoutSafeExceptMaybeBars.top = Integer.MIN_VALUE;
    }
    if (layoutInScreen && layoutInsetDecor && !requestedHideNavigation
            && cutoutMode == LAYOUT_IN_DISPLAY_CUTOUT_MODE_DEFAULT) {
        // Same for the navigation bar.
        switch (mNavigationBarPosition) {
            case NAV_BAR_BOTTOM:
                displayCutoutSafeExceptMaybeBars.bottom = Integer.MAX_VALUE;
                break;
            case NAV_BAR_RIGHT:
                displayCutoutSafeExceptMaybeBars.right = Integer.MAX_VALUE;
                break;
            case NAV_BAR_LEFT:
                displayCutoutSafeExceptMaybeBars.left = Integer.MIN_VALUE;
                break;
        }
    }
    if (type == TYPE_INPUT_METHOD && mNavigationBarPosition == NAV_BAR_BOTTOM) {
        // The IME can always extend under the bottom cutout if the navbar is there.
        displayCutoutSafeExceptMaybeBars.bottom = Integer.MAX_VALUE;
    }
    // Windows that are attached to a parent and laid out in said parent already avoid
    // the cutout according to that parent and don't need to be further constrained.
    // Floating IN_SCREEN windows get what they ask for and lay out in the full screen.
    // They will later be cropped or shifted using the displayFrame in WindowState,
    // which prevents overlap with the DisplayCutout.
    if (!attachedInParent && !floatingInScreenWindow) {
        mTmpRect.set(pf);
        pf.intersectUnchecked(displayCutoutSafeExceptMaybeBars);
        parentFrameWasClippedByDisplayCutout |= !mTmpRect.equals(pf);
    }
    // Make sure that NO_LIMITS windows clipped to the display don't extend under the
    // cutout.
    df.intersectUnchecked(displayCutoutSafeExceptMaybeBars);
}
SystemUI は、カットアウト領域でレンダリングし、描画できる場所を決定する必要があります。 PhoneStatusBarView.java は、ディスプレイ カットアウトの位置、大きさ、およびナビゲーション バーからの挿入がカットアウト領域を回避するかどうかを指定するビューの例を提供しています。
onApplyWindowInsets() をオーバーライドすることにより、ビューはカットアウトがどこにあるかを判断し、そのレイアウトをそれに応じて更新できます。
@Override
    public WindowInsets onApplyWindowInsets(WindowInsets insets) {
        if (updateOrientationAndCutout(mLastOrientation)) {
            updateLayoutForCutout();
            requestLayout();
        }
        return super.onApplyWindowInsets(insets);
    }
上に示したメソッドでは、あらゆる状況(すべての画面の向きでの上部中央、中央揃えでない上部、下部、デュアル カットアウト)において、カットアウトがステータスバーでどのように処理されるのかを示します。
要件
アプリがカットアウトによる悪影響を受けないようにするには、次のことを確認してください。
- 縦表示の場合、ステータスバーがカットアウトの高さ以上に拡張される
- 全画面表示と横表示の場合、カットアウト領域がレターボックス表示される
デバイスの各短辺(上部と下部)には、カットアウトをそれぞれ 1 つまで設定できます。
詳細については、CDD をご覧ください。
実装
デバイスでディスプレイ カットアウトを実装するには、システム UI に次の値を設定する必要があります。
| 値 | 説明 |
|---|---|
quick_qs_offset_height
|
クイック設定パネルの上マージンを定義します。パネルの上のスペースに時計と電池が表示されます。 values-land の場合は |
quick_qs_total_height
|
通知シェードを展開したときのクイック クイック設定パネル(折りたたまれたクイック設定パネル)の合計の高さ。パネル上の時計が表示されるスペースを含む。
クイック設定のレイアウトとの関係で、(オフセットを含む)クイック設定パネルの合計の高さには、あらかじめ静的な値を設定しておく必要があります。したがって、この値は同じデルタ |
status_bar_height_portrait
|
フレームワークの観点からのステータスバーのデフォルトの高さ。 ほとんどのデバイスで、デフォルト値は 24 dp に設定されます。カットアウトがある場合は、この値をカットアウトの高さに設定します。必要に応じてカットアウトより大きくすることも可能です。 |
status_bar_height_landscape
|
横表示の場合のステータスバーの高さ。カットアウトはデバイスの短辺でのみサポートされるため、ステータスバーの高さは常に不変です。 カットアウトのないデバイスでは |
config_mainBuiltInDisplayCutout
|
カットアウトの形を定義するパス。これは、 パスで |
config_fillMainBuiltinDisplayCutout
|
上記で定義されたカットアウト パスをソフトウェアで描画するかどうかを指定するブール値。カットアウトをエミュレートしたり、実際のカットアウトを埋め込んだりする際に使用してアンチ エイリアスを作成できます。 true の場合、 |
デフォルトの定義については、以下の dimens ファイルをご覧ください。
エミュレートされたカットアウトのオーバーレイの例:
<resources xmlns:xliff="urn:oasis:names:tc:xliff:document:1.2">

    <!-- The bounding path of the cutout region of the main built-in display.
         Must either be empty if there is no cutout region, or a string that is parsable by
         {@link android.util.PathParser}.

         The path is assumed to be specified in display coordinates with pixel units and in
         the display's native orientation, with the origin of the coordinate system at the
         center top of the display.

         To facilitate writing device-independent emulation overlays, the marker `@dp` can be
         appended after the path string to interpret coordinates in dp instead of px units.
         Note that a physical cutout should be configured in pixels for the best results.
         -->
    <string translatable="false" name="config_mainBuiltInDisplayCutout">
        M 0,0
        L -48, 0
        L -44.3940446283, 36.0595537175
        C -43.5582133885, 44.4178661152 -39.6, 48.0 -31.2, 48.0
        L 31.2, 48.0
        C 39.6, 48.0 43.5582133885, 44.4178661152 44.3940446283, 36.0595537175
        L 48, 0
        Z
        @dp
    </string>

    <!-- Whether the display cutout region of the main built-in display should be forced to
         black in software (to avoid aliasing or emulate a cutout that is not physically existent).
     -->
    <bool name="config_fillMainBuiltInDisplayCutout">true</bool>

    <!-- Height of the status bar -->
    <dimen name="status_bar_height_portrait">48dp</dimen>
    <dimen name="status_bar_height_landscape">28dp</dimen>
    <!-- Height of area above QQS where battery/time go (equal to status bar height if > 48dp) -->
    <dimen name="quick_qs_offset_height">48dp</dimen>
    <!-- Total height of QQS (quick_qs_offset_height + 128) -->
    <dimen name="quick_qs_total_height">176dp</dimen>

</resources>
検証
ディスプレイ カットアウトの実装を検証するには、tests/framework/base/windowmanager/src/android/server/wm にある CTS テストを実行します。
