本頁說明如何以可擴充且易於維護的方式,在 Android Automotive 硬體裝置上模擬不同網路狀況。這項與環境無關的網路模擬作業使用常見的 Linux 工具,可在 Android Automotive 硬體裝置上執行。
以下各節說明如何在 Android Automotive 硬體裝置上設定及執行網路模擬。
核心需求
如要在受測裝置 (DUT) 上啟用網路模擬功能,必須在核心設定檔中設定 Linux ifb 和 netem 模組,如下所示:
# Network simulation config fragment start
CONFIG_NET_SCH_NETEM=y
CONFIG_IFB=y
CONFIG_NET_ACT_MIRRED=y
# Network simulation config fragment end
設定模擬
所有網路模擬或節流模擬都必須在受測裝置 (DUT) 上進行。這項模擬作業會使用 Linux tc 和 NetEm 公用程式,根據控制政策和規則,控管網路介面控制器 (NIC) 上的網路流量。
如要設定模擬,請按照下列步驟操作:
- 將 DUT 和主機伺服器連上網際網路。
- 從「
NetworkSimulation.sh指令碼」NetworkSimulation.sh部分提供的程式碼複製指令碼,然後在主機伺服器上建立並下載指令碼。 - 將主機伺服器連線至 DUT。執行
adb devices -l,確認 DUT 出現在已連線裝置清單中。
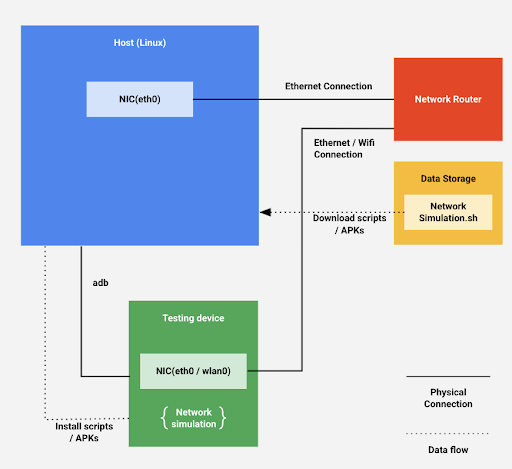
如要查看設定架構的圖示,請參閱下圖:

圖 1. 設定架構。
NetworkSimulation.sh 指令碼
NetworkSimulation.sh 指令碼檔案包含執行網路模擬的 adb 指令。將下列內容複製到名為 NetworkSimulation.sh 的檔案:
  #!/bin/bash

  latency=$1
  bandwidth=$2
  packetloss=$3

  # root device and set it to permissive mode
  adb root
  adb shell setenforce 0

  #Clear the current tc control
  adb shell tc qdisc del dev ifb0 root
  adb shell ip link set dev ifb0 down
  adb shell tc qdisc del dev wlan0 ingress
  adb shell tc qdisc del dev wlan0 root

  # Create a virtual device for ingress
  adb shell ip link set dev wlan0 up
  adb shell ip link set dev ifb0 up
  adb shell tc qdisc del dev wlan0 clsact
  adb shell tc qdisc add dev wlan0 handle ffff: ingress
  adb shell tc filter add dev wlan0 parent ffff: protocol all u32 match u32 0 0 action mirred egress redirect dev ifb0

  # Throttle upload bandwidth / latency / packet loss
  adb shell tc qdisc add dev wlan0 root handle 1: htb default 11
  adb shell tc class add dev wlan0 parent 1: classid 1:1 htb rate "$bandwidth"
  adb shell tc class add dev wlan0 parent 1:1 classid 1:11 htb rate "$bandwidth"
  adb shell tc qdisc add dev wlan0 parent 1:11 handle 10: netem delay "$latency" loss "$packetloss"

  # Throttle download bandwidth
  adb shell tc qdisc add dev ifb0 root handle 1: htb default 10
  adb shell tc class add dev ifb0 parent 1: classid 1:1 htb rate "$bandwidth"
  adb shell tc class add dev ifb0 parent 1:1 classid 1:10 htb rate "$bandwidth"
執行模擬
如要執行網路模擬,NetworkSimulation.sh 指令碼檔案中的 adb 指令會使用指令列引數設定值。
如要指定要模擬的延遲時間、頻寬和封包遺失率,請使用下列指令列引數執行 NetworkSimulation.sh 指令碼:
- 延遲時間,以毫秒為單位。
- 頻寬,以 kbit 或 mbit 為單位。
- 封包遺失率 (百分比)。
舉例來說,如要設定 300 毫秒的延遲時間、100 kbit 的頻寬和 50% 的封包遺失率,請執行下列指令:
bash NetworkSimulation.sh 300ms 100kbit 50%
如要設定 100 毫秒的延遲時間、1 Mbit 的頻寬和 0% 的封包遺失率,請執行下列指令:
bash NetworkSimulation.sh 100ms 1mbit 0%
驗證模擬
執行 NetworkSimulation.sh 指令碼後,請使用 Linux ping 和 curl 指令,確認網路模擬設定正確無誤,且運作正常。請使用 ping 指令驗證延遲時間,並使用 curl 指令驗證頻寬。
舉例來說,以下是使用 bash NetworkSimulation.sh 100ms 500kbit 10% 執行的模擬作業,其 ping 的預期輸出內容:
BUILD:/ # ping -c 20 www.google.com
PING www.google.com (172.217.5.100) 56(84) bytes of data.
64 bytes from sfo03s07-in-f4.1e100.net (172.217.5.100): icmp_seq=1 ttl=119 time=103 ms
64 bytes from sfo03s07-in-f4.1e100.net (172.217.5.100): icmp_seq=2 ttl=119 time=105 ms
64 bytes from sfo03s07-in-f4.1e100.net (172.217.5.100): icmp_seq=3 ttl=119 time=103 ms
64 bytes from sfo03s07-in-f4.1e100.net (172.217.5.100): icmp_seq=5 ttl=119 time=103 ms
64 bytes from sfo03s07-in-f4.1e100.net (172.217.5.100): icmp_seq=6 ttl=119 time=103 ms
64 bytes from sfo03s07-in-f4.1e100.net (172.217.5.100): icmp_seq=7 ttl=119 time=103 ms
64 bytes from sfo03s07-in-f4.1e100.net (172.217.5.100): icmp_seq=9 ttl=119 time=103 ms
64 bytes from sfo03s07-in-f4.1e100.net (172.217.5.100): icmp_seq=10 ttl=119 time=103 ms
64 bytes from sfo03s07-in-f4.1e100.net (172.217.5.100): icmp_seq=11 ttl=119 time=185 ms
64 bytes from sfo03s07-in-f4.1e100.net (172.217.5.100): icmp_seq=12 ttl=119 time=103 ms
64 bytes from sfo03s07-in-f4.1e100.net (172.217.5.100): icmp_seq=13 ttl=119 time=103 ms
64 bytes from sfo03s07-in-f4.1e100.net (172.217.5.100): icmp_seq=14 ttl=119 time=103 ms
64 bytes from sfo03s07-in-f4.1e100.net (172.217.5.100): icmp_seq=15 ttl=119 time=103 ms
64 bytes from sfo03s07-in-f4.1e100.net (172.217.5.100): icmp_seq=16 ttl=119 time=103 ms
64 bytes from sfo03s07-in-f4.1e100.net (172.217.5.100): icmp_seq=17 ttl=119 time=103 ms
64 bytes from sfo03s07-in-f4.1e100.net (172.217.5.100): icmp_seq=18 ttl=119 time=103 ms
64 bytes from sfo03s07-in-f4.1e100.net (172.217.5.100): icmp_seq=19 ttl=119 time=103 ms
64 bytes from sfo03s07-in-f4.1e100.net (172.217.5.100): icmp_seq=20 ttl=119 time=103 ms

--- www.google.com ping statistics ---
20 packets transmitted, 18 received, 10% packet loss, time 19040ms
rtt min/avg/max/mdev = 103.394/108.307/185.756/18.791 ms
這個範例顯示 ping 報告的封包遺失率為 10%,平均延遲時間接近 108 毫秒,這與模擬中指定的 100 毫秒值相符。回報的延遲時間與指定值略有差異是正常現象。
以相同範例來說,執行 curl 指令後,預期會得到下列輸出內容。
BUILD:/sdcard/DCIM # curl https://images-assets.nasa.gov/image/PIA15416/PIA15416~orig.jpg -o foo.jpg
  % Total    % Received % Xferd  Average Speed   Time    Time     Time  Current
                                 Dload  Upload   Total   Spent    Left  Speed
100 6598k  100 6598k    0     0  49220      0  0:02:17  0:02:17 --:--:-- 47574
這個範例顯示 curl 報告的平均下載速度為 49220 Bps,這與模擬中指定的 500kbit 速度相符。回報的頻寬與指定值略有差異是正常現象。

