2025년 3월 27일부터 AOSP를 빌드하고 기여하려면 aosp-main
대신 android-latest-release
를 사용하는 것이 좋습니다. 자세한 내용은 AOSP 변경사항을 참고하세요.
CTS 인증 도구 MIDI 테스트
컬렉션을 사용해 정리하기
내 환경설정을 기준으로 콘텐츠를 저장하고 분류하세요.
다음 테스트는 MIDI(Musical Instrument Digital Interface) 시스템과 연결된 C 또는 C++ API(네이티브 MIDI 테스트용) 및 Java language API(JAVA MIDI 테스트용)가 예상대로 작동하는지 확인합니다. 이 테스트의 요구사항은 다음과 같습니다.
- 필수 주변기기: 연결된 루프백 케이블이 있는 MIDI 주변기기
다음 그림은 연결된 루프백 케이블이 있는 MIDI 주변기기를 보여줍니다.
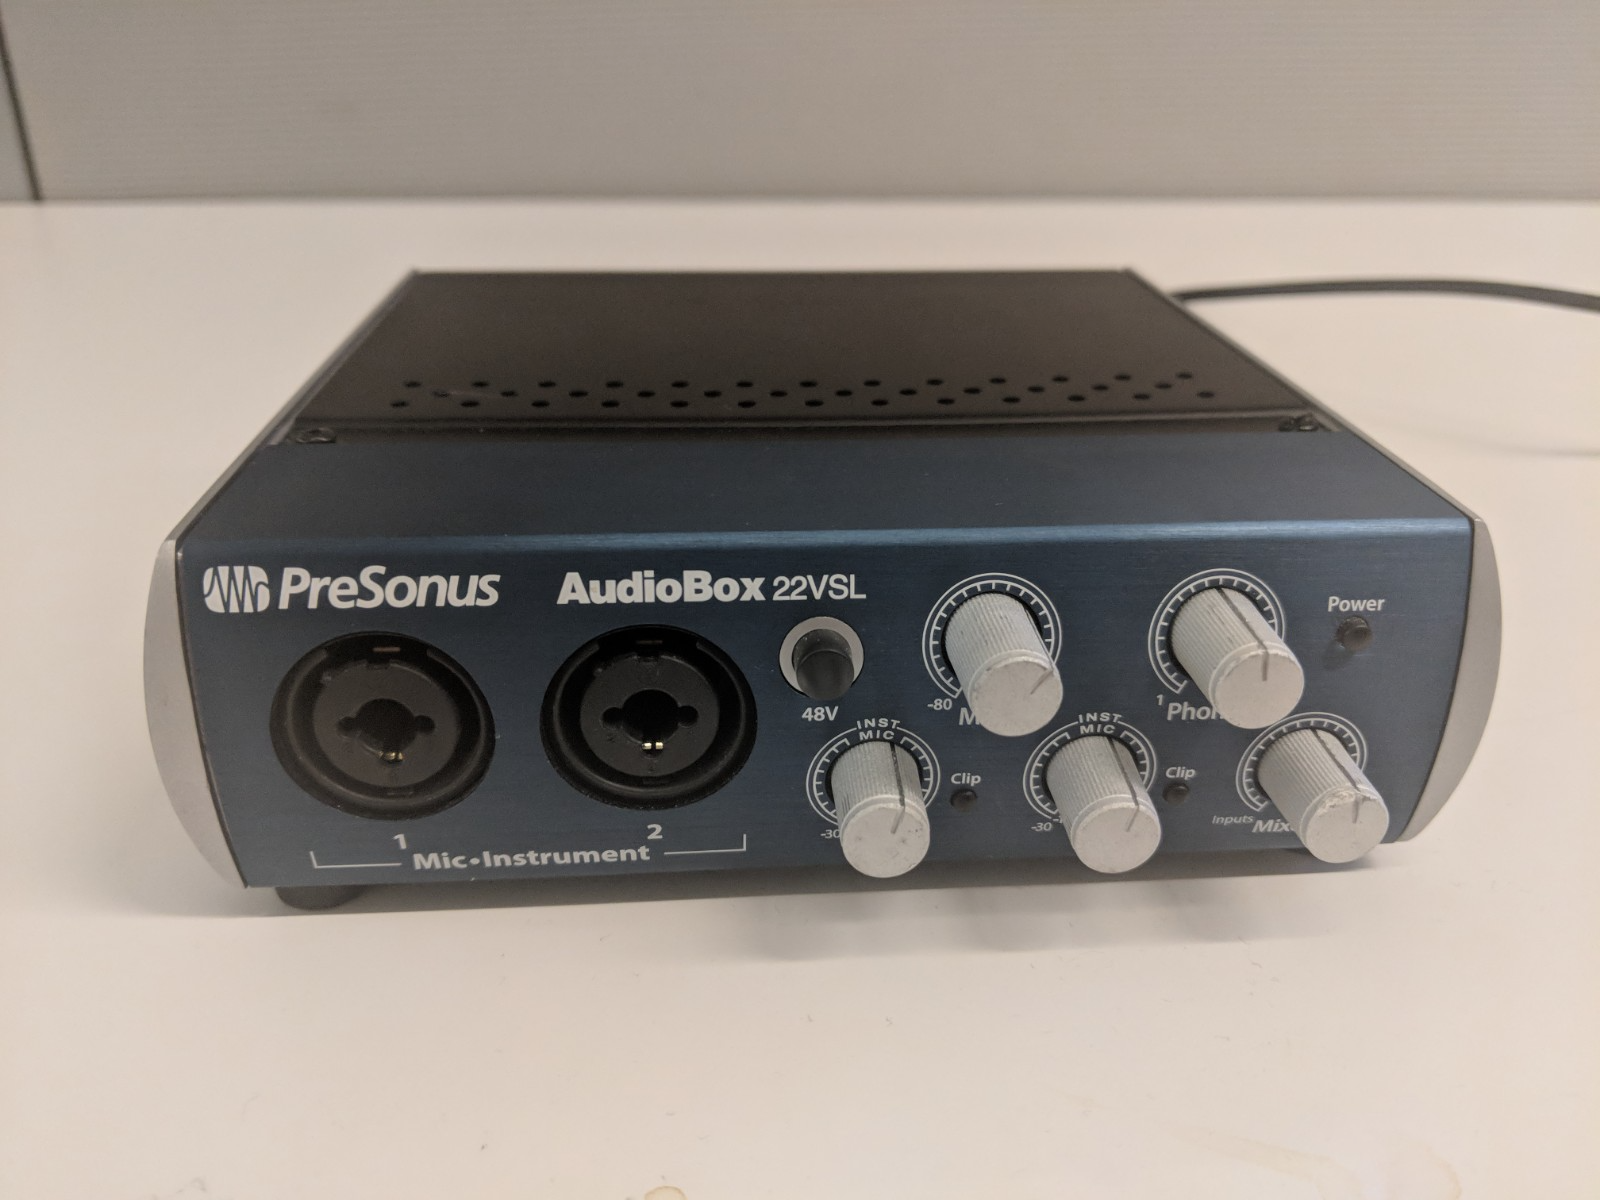
그림 1. MIDI I/O 포트가 있는 USB 오디오 인터페이스 전면
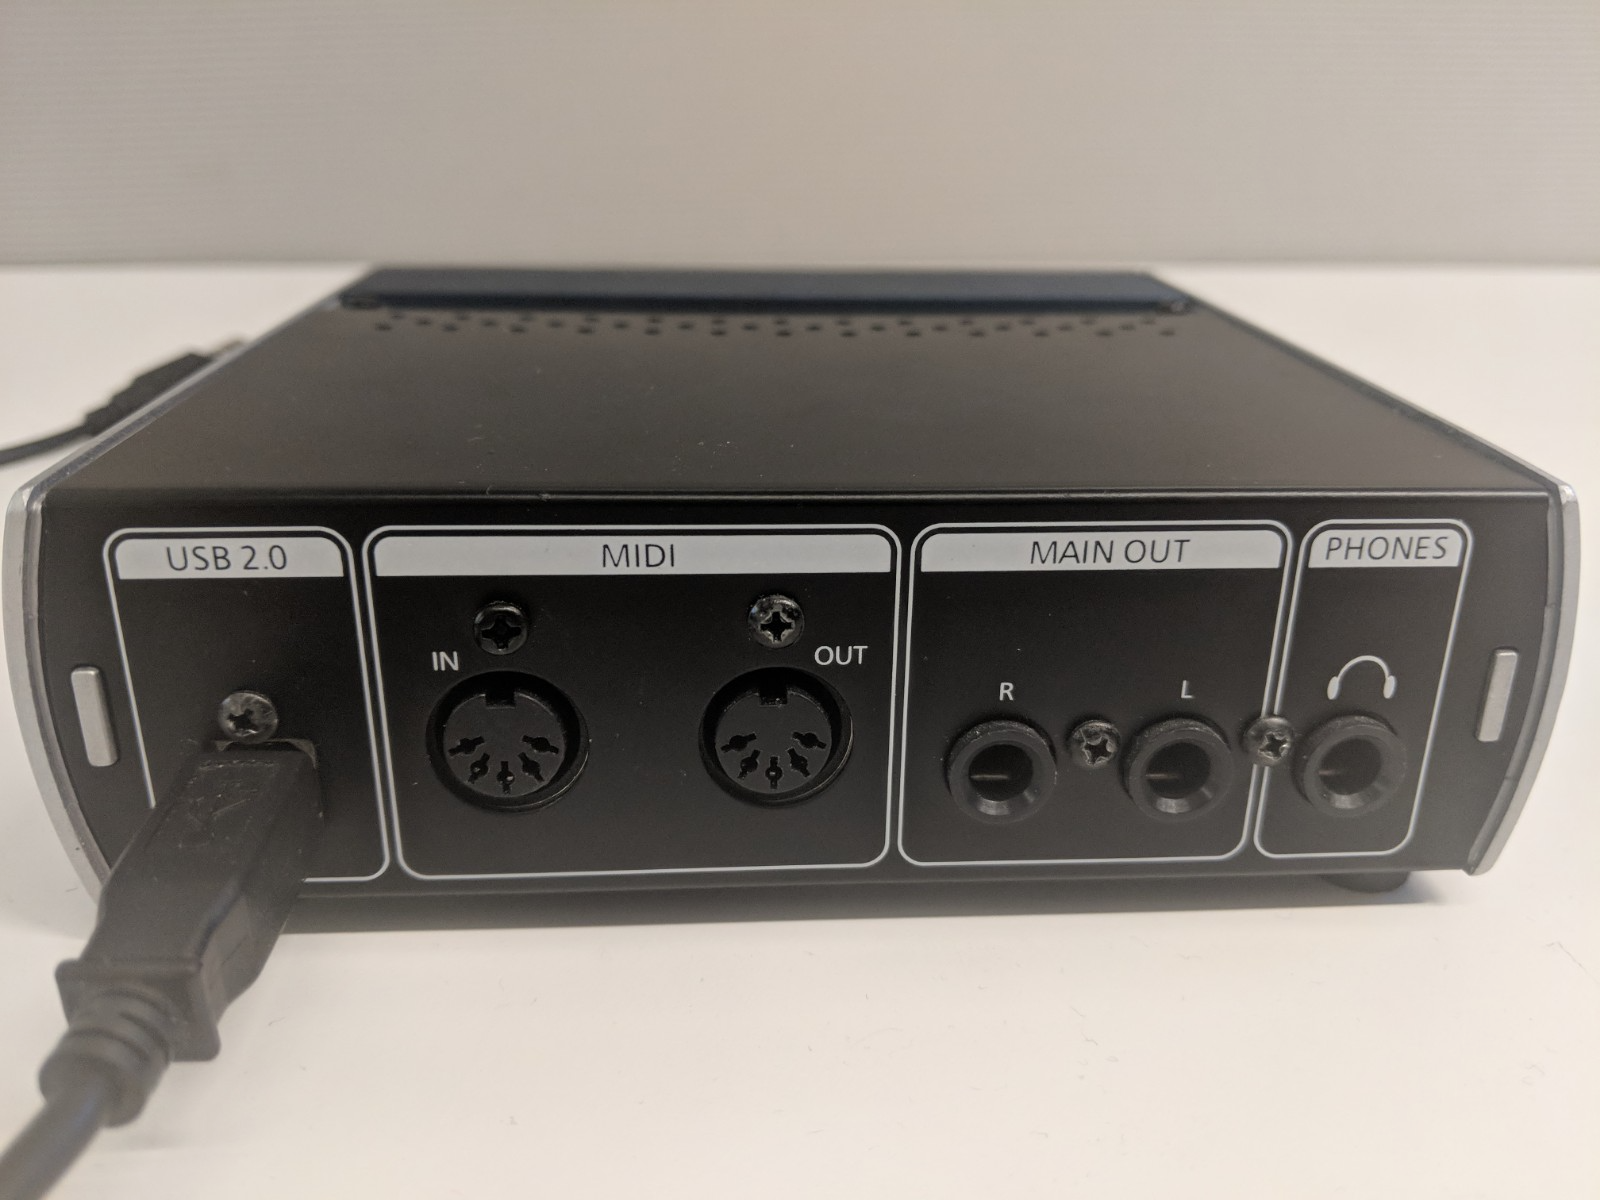
그림 2. MIDI I/O 포트가 있는 USB 오디오 인터페이스 후면
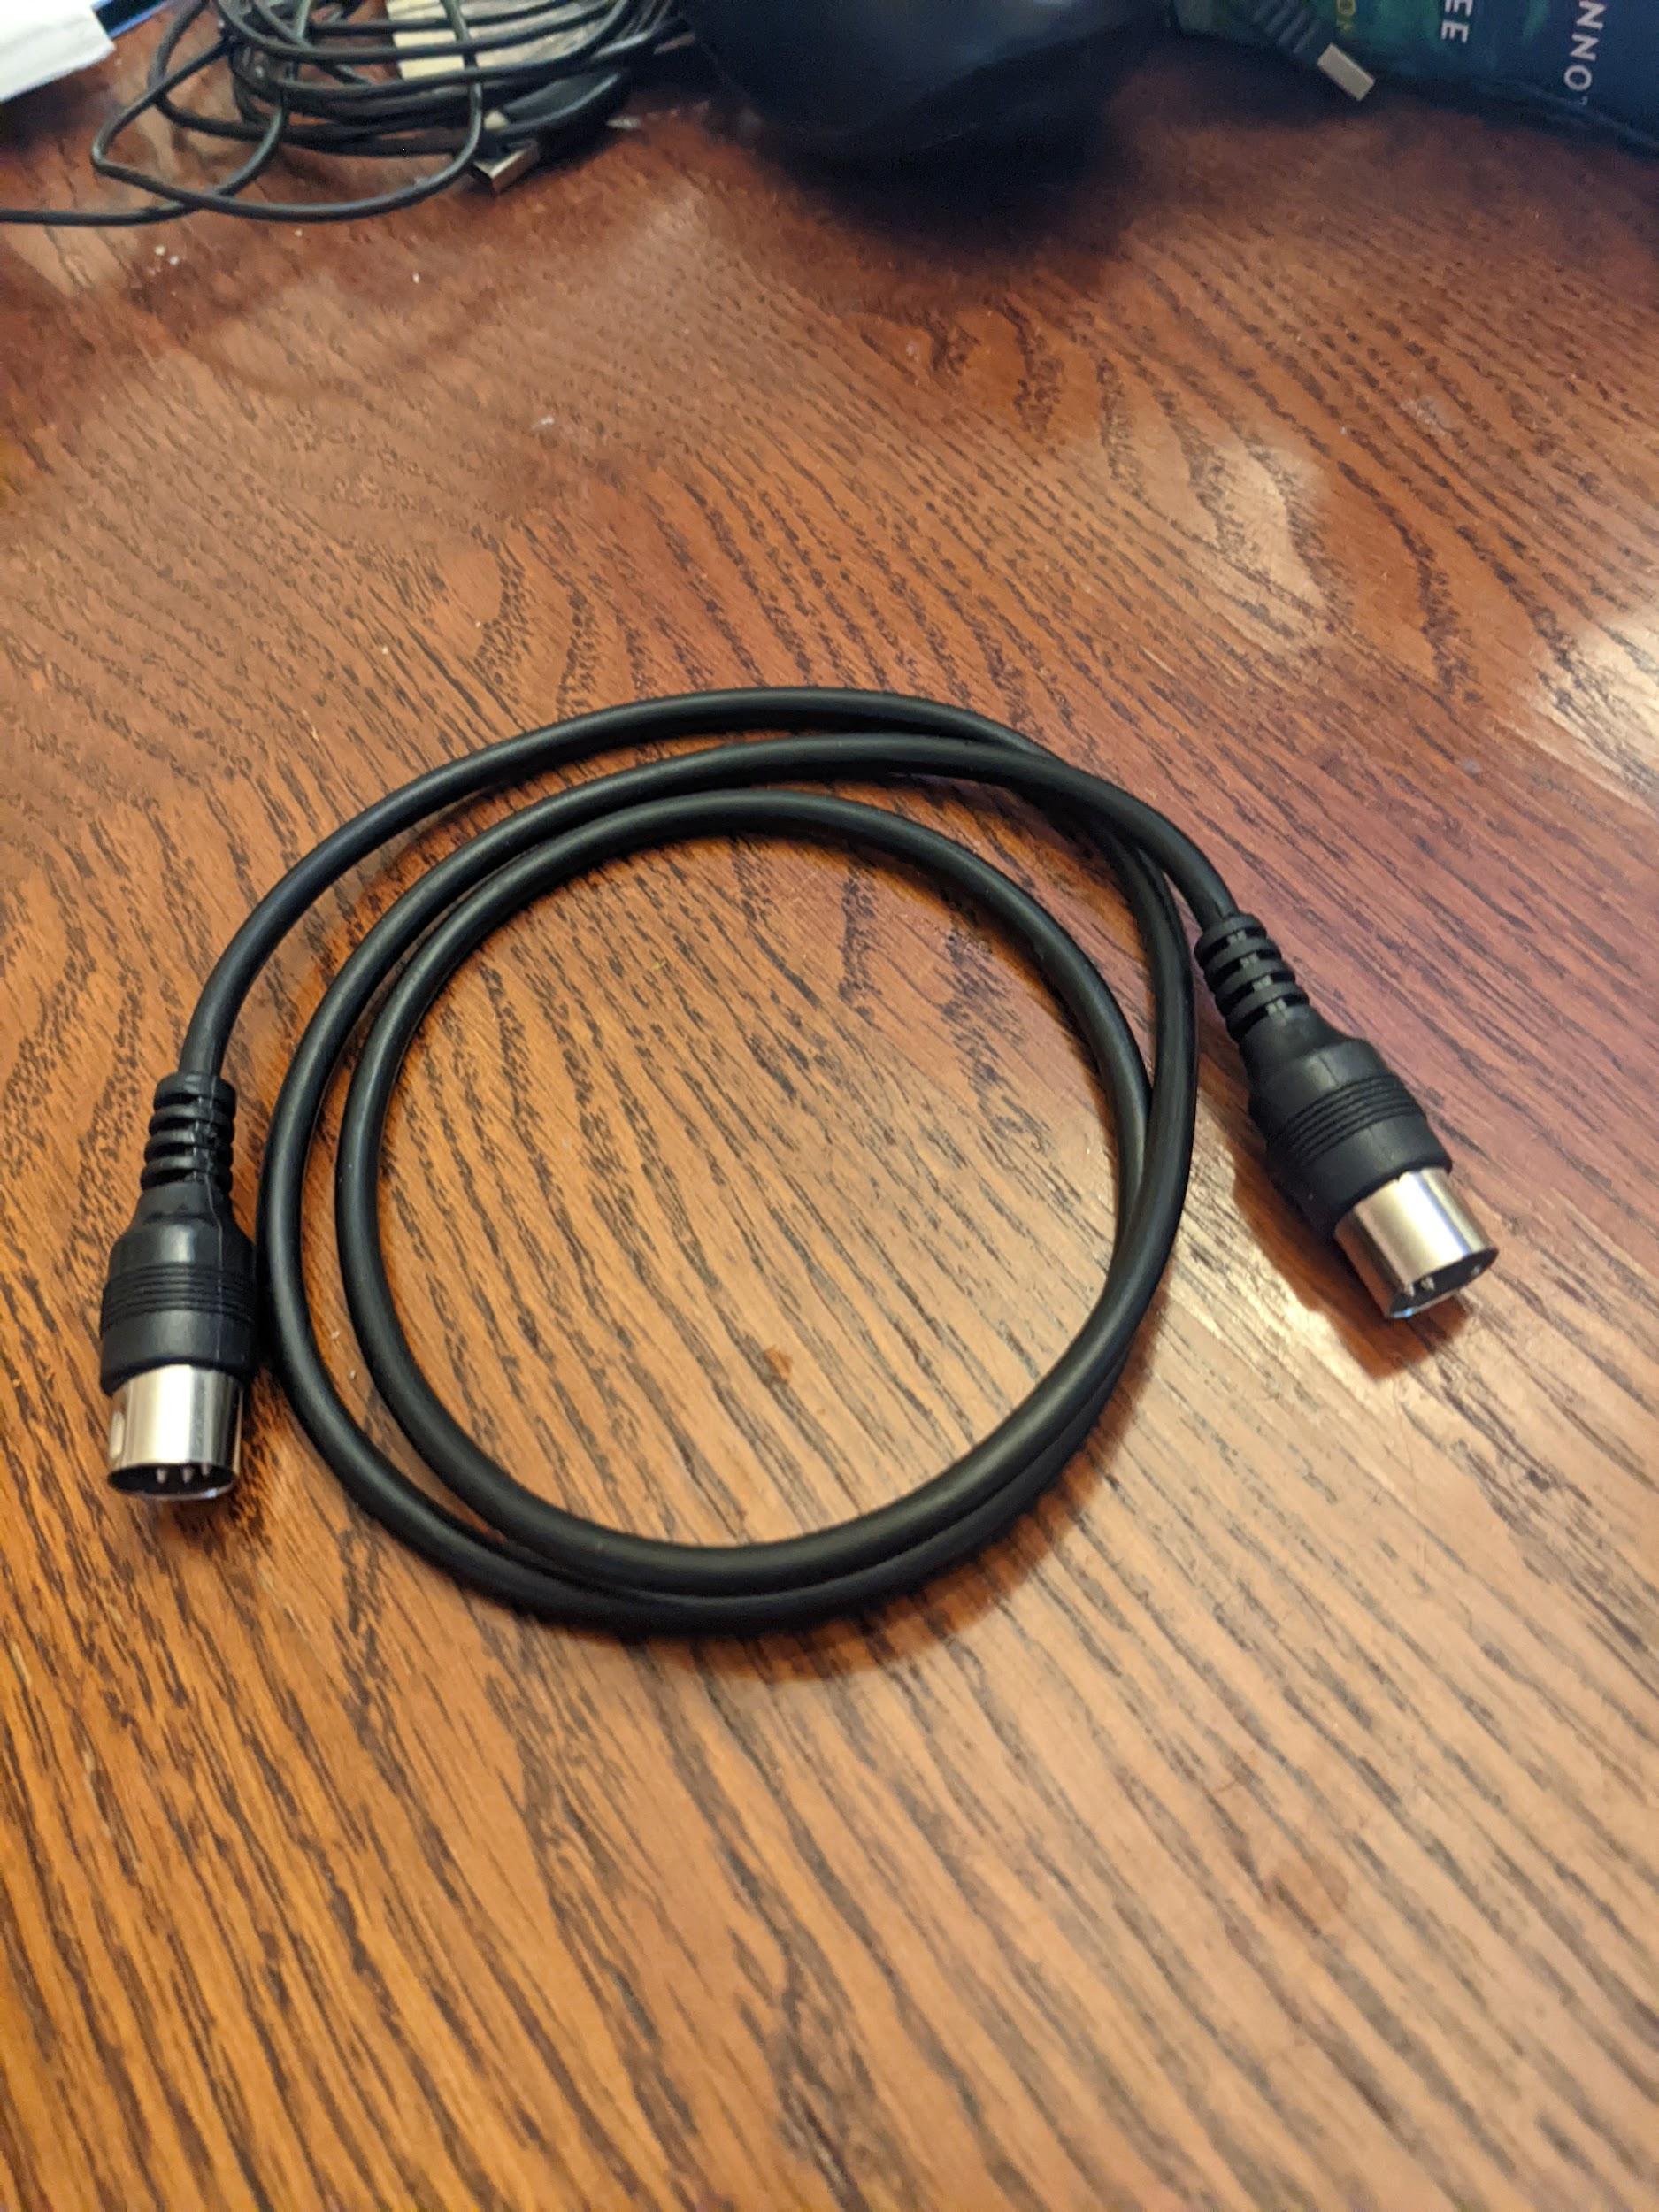
그림 3. 표준 5핀 DIN MIDI 케이블
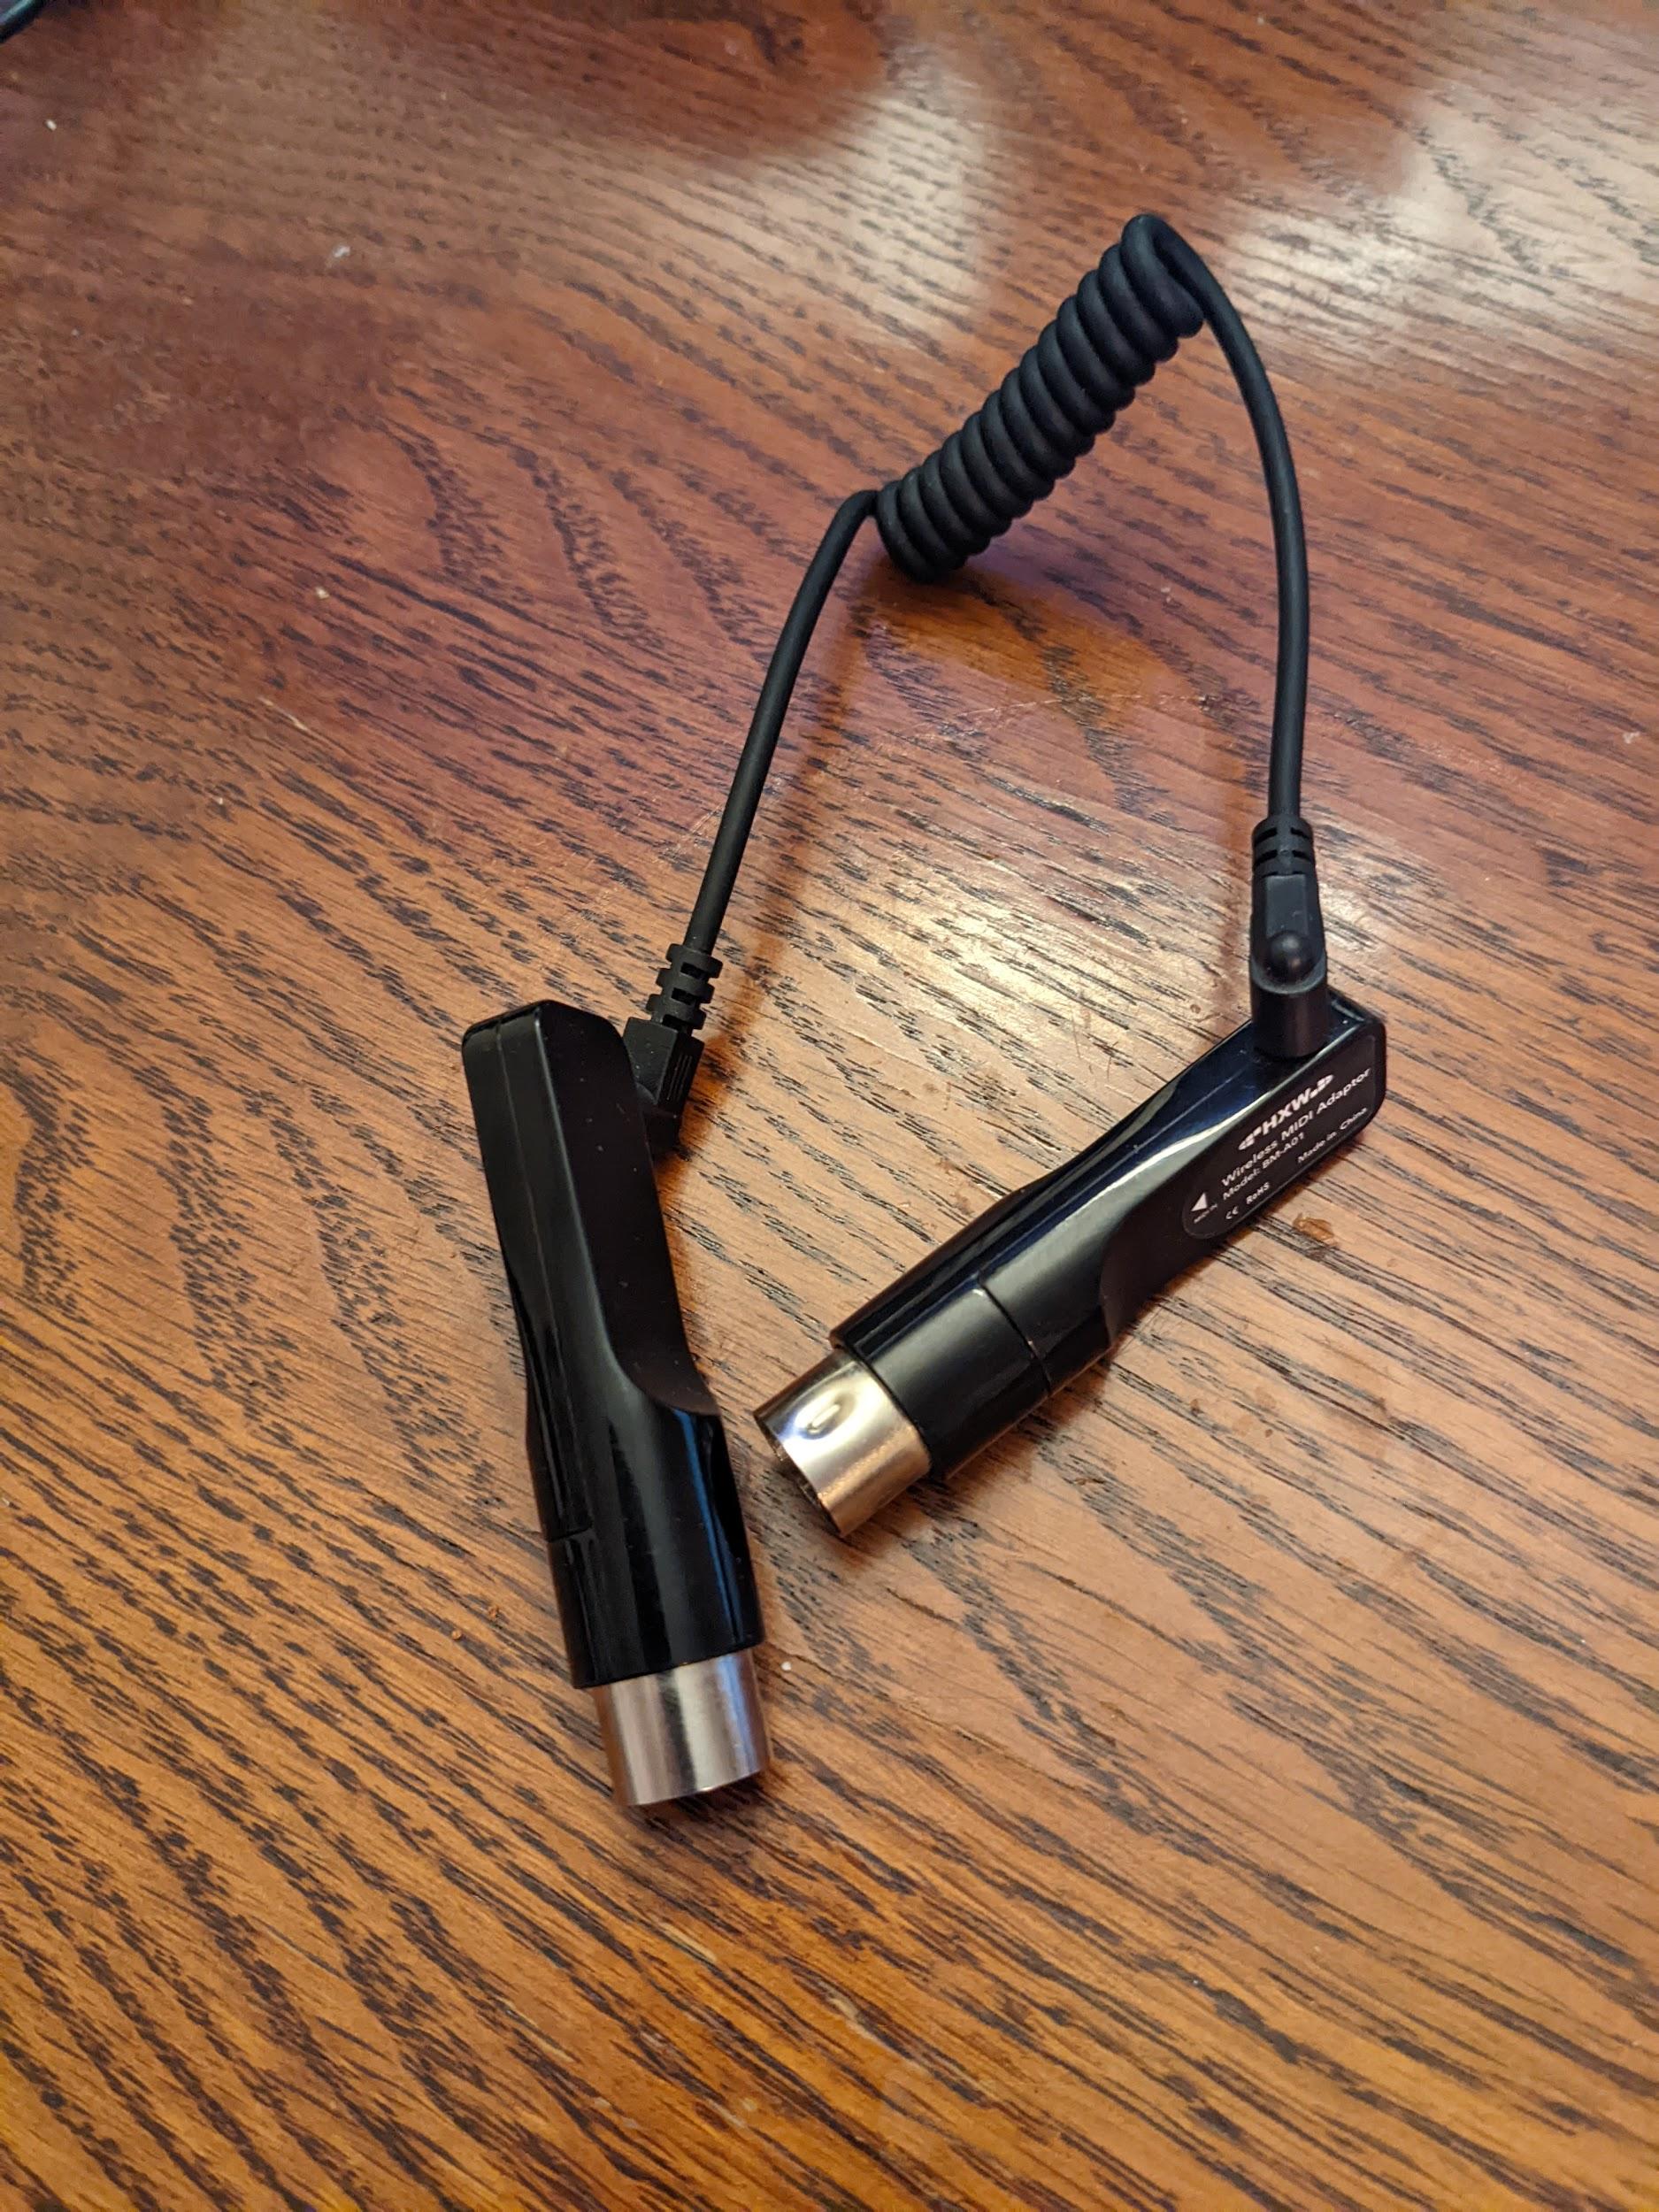
그림 4. Yamaha MD-BT01 또는 Roland WM-1과 같은 블루투스 MIDI 인터페이스
루프백 테스트
모든 루프백 테스트는 테스트 주변기기를 통해 일련의 MIDI 메시지를 보내고 데이터를 루프백한 다음 기기의 입력을 모니터링하여 수신된 데이터가 전송된 데이터와 일치하는지 확인합니다.
다음 테스트를 모두 통과해야 앱에서 통과로 표시할 수 있습니다.
USB MIDI 루프백 테스트
- USB 오디오/MIDI 인터페이스 주변기기에서 표준 5핀 DIN MIDI 케이블을 사용하여 MIDI 입력을 MIDI 출력에 연결합니다.
- USB 오디오/MIDI 인터페이스 주변기기를 테스트 대상 기기(DUT)에 연결합니다.
DUT가 연결된 주변기기를 인식하면 테스트 화면에 기기 이름(입력 및 출력)이 표시되고 USB MIDI 인터페이스 테스트 버튼을 사용할 수 있게 됩니다.
- USB MIDI 인터페이스 테스트를 탭합니다.
- 테스트가 완료될 때까지 기다린 후 테스트 화면에서 보고된 결과를 확인합니다.
가상 MIDI 루프백 테스트
이 테스트에는 외부 하드웨어가 필요하지 않습니다.
- 가상 MIDI 인터페이스 테스트를 탭합니다.
- 테스트가 완료될 때까지 기다린 후 테스트 화면에서 보고된 결과를 확인합니다.
블루투스 MIDI 루프백 테스트
- Play 스토어에서 MIDI BLE Connect 앱을 다운로드하여 설치합니다.
- USB 오디오/MIDI 인터페이스 주변기기에서 블루투스 MIDI 인터페이스를 USB 오디오/MIDI 인터페이스 뒷면에 있는 MIDI 입력 및 출력 커넥터에 연결합니다. 블루투스 MIDI 인터페이스의 커넥터는 특정 방향이 있습니다.
- 블루투스 MIDI 인터페이스의 INPUT 플러그는 USB 오디오/MIDI 인터페이스의 INPUT 잭에 연결해야 합니다.
- 블루투스 MIDI 인터페이스의 OUTPUT 플러그는 USB 오디오/MIDI 인터페이스의 OUTPUT 잭에 연결해야 합니다.
- USB 오디오/MIDI 인터페이스 주변기기를 DUT에 연결합니다.
- MIDI BLE Connect 앱을 실행합니다. USB 주변기기에 연결된 블루투스 MIDI 기기를 검색합니다. 이 블루투스 MIDI 기기를 선택합니다.
- DUT가 연결된 주변기기를 인식하면 테스트 화면에 기기 이름(입력 및 출력)이 표시되고 블루투스 USB MIDI 인터페이스 버튼이 사용할 수 있는 상태가 됩니다.
- 블루투스 USB MIDI 인터페이스를 탭합니다.
- 테스트가 완료될 때까지 기다린 후 테스트 화면에서 보고된 결과를 확인합니다.
이 페이지에 나와 있는 콘텐츠와 코드 샘플에는 콘텐츠 라이선스에서 설명하는 라이선스가 적용됩니다. 자바 및 OpenJDK는 Oracle 및 Oracle 계열사의 상표 또는 등록 상표입니다.
최종 업데이트: 2025-05-09(UTC)
[null,null,["최종 업데이트: 2025-05-09(UTC)"],[],[],null,["# CTS Verifier MIDI tests\n\nThe following tests verify that the Musical Instrument Digital Interface (MIDI)\nsystem and the associated C or C++ API (for the Native MIDI Test) and the Java\nlanguage API (for the JAVA MIDI Test) function as expected.\n| **Warning:** This page has separate \"Required peripherals\" and \"Test Bluetooth MIDI loopback\" sections (one section each for Android 16 or higher and Android 15 or lower).\n\nFollow the steps in the section for your specific Android version.\n\nRequired peripherals (Android 16 or higher)\n-------------------------------------------\n\nBefore running the CTS-V MIDI tests, you must have these peripherals:\n\n- A USB MIDI with associated loopback cables, such as [Presonus Audio Box 96](https://www.presonus.com/en-US/interfaces/usb-audio-interfaces/audiobox-series/2777700105.html) with a standard 5-pin DIN MIDI cable\n- A Bluetooth MIDI with associated cables, such as [CME WIDI Jack](https://www.cme-pro.com/product/widi-jack/?srsltid=AfmBOorhxPmDHZbqJBDJ47HcMfoAoKYyDGp2wmtFSz3Fm3qA5DfkLHlw) with a [2.5 mm MIDI TRS cable](https://www.cme-pro.com/product/widi-accessory-25trs25-cable/?srsltid=AfmBOoqXgnzXs3QjWkf8gF-vOWbs00xv33LUlNu4VzDAqxRbzaAJh8S-)\n\nExamples of MIDI peripherals with associated loopback cables are shown in the\nfollowing figures:\n\n**Figure 1.** The front of a USB audio interface with MIDI I/O ports.\n\n**Figure 2.** The back of a USB audio interface with MIDI I/O ports.\n\n**Figure 3.** A standard 5-pin DIN MIDI cable.\n\n**Figure 4.** A Bluetooth MIDI interface with 5-pin DIN.\n\n**Figure 5.** A Bluetooth MIDI interface with loopback.\n\nRequired peripherals (Android 15 or lower)\n------------------------------------------\n\nBefore running the CTS-V MIDI tests, you must have a MIDI peripheral with\nassociated loopback cables. Examples of MIDI peripherals with associated\nloopback cables are shown in the following figures:\n\n**Figure 6.** The front of a USB audio interface with MIDI I/O ports.\n\n**Figure 7.** The back of a USB audio interface with MIDI I/O ports.\n\n**Figure 8.** A standard 5-pin DIN MIDI cable.\n\n**Figure 9.** A Bluetooth MIDI interface, such as a Yamaha MD-BT01 or a Roland WM-1.\n\nLoopback tests\n--------------\n\nAll the loopback tests send a set of MIDI messages out through the test\nperipheral, loop back that data, and then monitor the input of that device to\ncheck that the data received matches the data that was sent.\n\nAll of the following tests must pass before you mark them as passed in the app.\n\n### Test USB MIDI loopback\n\n1. On the USB Audio/MIDI interface peripheral, connect the MIDI input to the MIDI output with a standard, 5-pin DIN MIDI cable.\n2. Connect the USB Audio/MIDI interface peripheral to the device under test DUT. When the DUT recognizes the connected peripheral, the test screen displays the device names (input and output) and makes the **Test USB MIDI Interface** button available.\n3. Tap **Test USB MIDI Interface**.\n4. Wait for the test to complete, then view the reported results on the test screen.\n\n### Test virtual MIDI loopback\n\nNo external hardware is required for this test.\n\n1. Tap **Test Virtual MIDI Interface**.\n2. Wait for the test to complete, then view the reported results on the test screen.\n\nTest Bluetooth MIDI loopback (Android 16 or higher)\n---------------------------------------------------\n\nThe following steps describe how to test Bluetooth MIDI loopback on\nAndroid 16 or higher:\n\n1. Download and install the [MIDI BLE Connect](https://play.google.com/store/apps/details?id=com.mobileer.example.midibtlepairing) app from Google Play.\n2. (optional) If your Bluetooth peripheral supports loopback, for example, the CME WIDI Jack in Figure 5, skip this step. Otherwise, follow these steps:\n 1. On the USB Audio/MIDI interface peripheral, connect the Bluetooth MIDI interface to the MIDI input and output connectors on the back of the USB Audio/MIDI interface. The 5-pin DIN connectors on the Bluetooth MIDI interface have specific directionality:\n - The INPUT plug on the Bluetooth MIDI interface must connect to the INPUT jack on the USB Audio/MIDI interface.\n - The OUTPUT plug on the Bluetooth MIDI interface must connect to the OUTPUT jack on the USB Audio/MIDI interface.\n 2. Connect the USB Audio/MIDI interface peripheral to the DUT.\n3. Run the MIDI BLE Connect app. Scan for the Bluetooth MIDI device. Select this Bluetooth MIDI device.\n4. When the DUT recognizes the connected peripheral, the test screen displays the device names (input and output) and makes the **Test Bluetooth MIDI\n Interface** button available.\n5. Tap **Test Bluetooth MIDI Interface**.\n6. Wait for the test to complete, then view the reported results in the test.\n\nTest Bluetooth MIDI loopback (Android 15 or lower)\n--------------------------------------------------\n\nThe following steps describe how to test Bluetooth MIDI loopback on\nAndroid 15 or lower:\n\n1. Download and install the [MIDI BLE Connect](https://play.google.com/store/apps/details?id=com.mobileer.example.midibtlepairing) app from Google Play.\n2. On the USB Audio/MIDI interface peripheral, connect the Bluetooth MIDI interface to the MIDI input and output connectors on the back of the USB Audio/MIDI interface. The connectors on the Bluetooth MIDI interface have specific directionality:\n - The INPUT plug on the Bluetooth MIDI interface must connect to the INPUT jack on the USB Audio/MIDI interface.\n - The OUTPUT plug on the Bluetooth MIDI interface must connect to the OUTPUT jack on the USB Audio/MIDI interface.\n3. Connect the USB Audio/MIDI interface peripheral to the DUT.\n4. Run the MIDI BLE Connect app. Scan for the Bluetooth MIDI device connected to the USB peripheral. Select this Bluetooth MIDI device.\n5. When the DUT recognizes the connected peripheral, the test screen displays the device names (input and output) and makes the **Bluetooth USB MIDI\n Interface** button available.\n6. Tap **Bluetooth USB MIDI Interface**.\n7. Wait for the test to complete, then view the reported results in the test screen."]]