
This page describes the full process of submitting a code change to the Android Open Source Project (AOSP), including how to request a review and track your changes.
AOSP relies on a Gerrit, a web-based code review system for projects that use Git.
Sign the contributor license agreements
Before you contribute any code changes for AOSP, you must read Contributor license agreements and headers and sign one of the following agreements:
- As an individual contributor making contributions only on your behalf, sign the Individual Contributor License Agreement.
- As an employee working for a corporation, ensure your company has signed the Corporate Contributor License Agreement authorizing you to make contributions on its behalf.
Start a branch
For each code change that you intend to make, perform the following steps:
Start a new branch within the relevant Git repository. A branch isn't a copy of the original files; it's a pointer to a specific commit, which makes creating local branches and switching among them a lightweight operation. By using branches, you can identify changes from each other. Run this command to start a branch:
repo start BRANCH_NAMEYou can start several independent branches at the same time in the same repository. The branch BRANCH_NAME is local to your workspace and isn't included either on Gerrit or in the final source tree. Branches are also specific to the project you are in, so if you need to change files in different projects as part of the same change, you'll need a branch in each project where you change files.
(optional) Verify that the branch was created:
repo status .You should see your newly created branch. For example:
project frameworks/native/ branch mynewbranch
Make and test your change
Follow these steps to make and test your change:
To ensure you're working with the most current codebase, perform a sync of the entire codebase:
repo syncIf you have any conflicts during the sync, refer to steps 2-4 of Resolve sync conflicts.
Find the code to change. To find code, consider using Android Code Search. You can use Android Code Search to view the AOSP source code as it's laid out when you actually use it. For more information, see Getting started with Code Search. To view all of the code in the latest AOSP release branch within Android Code Search, navigate to
https://cs.android.com/android/platform/superproject/.Modify or add source files. For any changes made:
Determine if you need to use feature launch flags and, if so, implement them for your new code.
Follow the best practices in Include license headers.
For Java code, follow AOSP Java code style for contributors.
Some parts of AOSP are written in Kotlin (
.kt) and you can use Kotlin in areas of the platform that are already written in Kotlin. For more information about Kotlin in Android, see the Android developer Kotlin style guide and Kotlin-Java interop guide. For more extensive Kotlin guidance, see the Kotlin language site.When writing APIs, follow the Android API Guidelines. Use these guidelines to see the context behind Android's API decisions. Additions and modifications of platform APIs are validated by Metalava.
Stage and commit your change
A commit is the basic unit of revision control in Git and consists of a snapshot of the directory structure and file contents for the entire project. Follow these steps to commit your change:
By default, Git registers but doesn't track the changes that you make. To instruct Git to track your changes, you must mark or stage those changes for inclusion in a commit. Run this command to stage the change:
git add -AThis command tracks changes that you've made to any files.
Take the files in the staging area and commit or store them in your local database:
git commit -sBy default, a text editor opens and you are prompted to provide a commit message.
Provide a commit message in the following format:
Line 1: Headline. Provide a one-line summary of the change (50 characters maximum). Consider using prefixes to describe the area you changed, followed by a description of the change you made in this commit, such as the following example containing a user interface change:
ui: Removes deprecated widgetLine 2: Blank line. Follow the headline with a blank line.
Line 3: Body. Provide a long description that hard-wraps at 72 characters maximum. Describe what issue the change solves and how. Although the body is optional, it's helpful to others who need to refer back to the change. Be sure to include a brief note of any assumptions or background information that might be important when another contributor works on this feature.
To read a blog about good commit descriptions (with examples), see How to Write a Git Commit Message.
Save the commit.
A unique change ID and your name and email, which were
provided during repo init, are automatically added to your commit message.
Upload the change for review
After you commit your change to your personal Git history, upload it to Gerrit:
Run the following command to upload all of your commits in all of your projects:
repo uploadAll changes in all projects are included in the upload.
You're prompted to run hook scripts.
Press a and then Enter.
You're prompted to approve the upload:
Upload project frameworks/native/ to remote branch android16-qpr2-release: branch BRANCH_NAME ( 1 commit, Wed Aug 7 09:32:33 2019 -0700): ff46b36d android codelab change to https://android-review.googlesource.com/ (y/N)?Press y and then Enter to approve the upload.
You should receive a message similar to remote: SUCCESS.
Request a review
After a successful upload, Repo provides you with a link to your changes in Gerrit. Click the link to view your changes on the review server, add comments, or request specific reviewers for your change. All changes to the code must be reviewed by the appropriate code owners.
To request a review:
In Gerrit, click SUGGEST OWNERS:
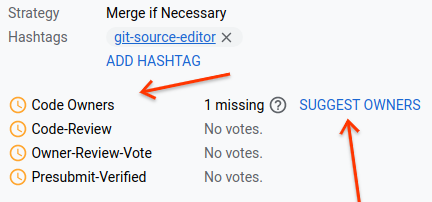
Figure 1. Suggest owners link in Gerrit.
The reviewer dialog appears. This dialog contains a list of code owners who can review your change.
Click a code owner to add them to your review.
The SEND button is activated.
(Optional) Type the email address of anyone else you'd like to review your change.
Click SEND to send the change for review.
Code owners review your code changes and if accepted, cherrypick the change and merge it into the internal development branch.
Determine status of change
To determine the status of the files in your change, check for the following icons next to the files in the change:
- (checkmark icon): Approved by code owner
- (cross icon): Not approved by code owner
- (clock icon): Pending approval by code owner
The following figure shows these status icons applied to files in a change:
![]()
Figure 2. Example of files with icons showing code owner approval.
Resolve feedback and upload a replacement change
If a reviewer requests a modification to your update, you can amend your commit within Git, which results in a new patchset on the same change.
To resolve feedback and amend your change:
Follow steps 2-4 in Make and test your change.
Run the following commands to amend your change:
git add -A
git commit --amend
When you upload the amended change, it replaces the original both on Gerrit and in your local Git history.
Resolve sync conflicts
If other changes are submitted to the source tree that conflict with yours, you receive a message that you have conflicts. To resolve the conflicts:
Ensure you're working with the most current code:
repo sync .The
repo synccommand fetches the updates from the source server, then attempts to automatically rebase yourHEADonto the new remoteHEAD.If the automatic rebase is unsuccessful, perform a manual rebase:
repo rebase .Resolve merge conflicts. If you don't have a preferred method for resolving merge conflicts, you can use
git mergetoolto manually fix conflicts between files.When you've successfully fixed the conflicting files, run this command to apply the new commits:
git rebase --continue
Submit change
After a submission makes it through the review and verification process, the code owner submits the code for you, either on the branch the change was reviewed on or into an internal branch.
After your submission is merged, you can visit the Android Continuous Integration dashboard to monitor when your submissions are integrated into the tree.