
使用车载设备界面库插件,在此库中创建组件自定义项的完整实现,而不是使用运行时资源叠加层 (RRO)。RRO 可让您只更改车载设备界面库组件的 XML 资源,这限制了您可以自定义的范围。
创建插件
车载设备界面库插件是一个 APK,其中包含实现一组插件 API 的类。插件 API 可作为静态库编译到插件中。
请参阅 Soong 和 Gradle 示例:
Soong
请看以下 Soong 示例:
android_app {
    name: "my-plugin",

    min_sdk_version: "28",
    target_sdk_version: "30",
    aaptflags: ["--shared-lib"],
    sdk_version: "current",

    manifest: "src/main/AndroidManifest.xml",
    srcs: ["src/main/java/**/*.java"],
    resource_dirs: ["src/main/res"],
    static_libs: [
        "car-ui-lib-oem-apis",
    ],
    // Disable optimization is mandatory to prevent R.java class from being
    // stripped out
    optimize: {
        enabled: false,
    },

    certificate: ":my-plugin-certificate",
}
Gradle
请看以下 build.gradle 文件:
apply plugin: 'com.android.application'

android {
  compileSdkVersion 30

  defaultConfig {
    minSdkVersion 28
    targetSdkVersion 30
  }

  compileOptions {
    sourceCompatibility JavaVersion.VERSION_1_8
    targetCompatibility JavaVersion.VERSION_1_8
  }

  signingConfigs {
    debug {
      storeFile file('chassis_upload_key.jks')
      storePassword 'chassis'
      keyAlias 'chassis'
      keyPassword 'chassis'
    }
  }
}

dependencies {
  implementation project(':oem-apis')
  // Or use the following if you'd like to use the maven artifact
  // implementation 'com.android.car.ui:car-ui-lib-plugin-apis:1.0.0'
}
Settings.gradle:
// You can remove the ':oem-apis' if you're using the maven artifact.
include ':oem-apis'
project(':oem-apis').projectDir = new File('./path/to/oem-apis')
include ':my-plugin'
project(':my-plugin').projectDir = new File('./my-plugin')
该插件必须在其清单中声明一个具有以下属性的 content provider:
  android:authorities="com.android.car.ui.plugin"
  android:enabled="true"
  android:exported="true"
android:authorities="com.android.car.ui.plugin" 使车载设备界面库可检测到该插件。必须导出 content provider,才能在运行时对其进行查询。此外,如果 enabled 属性设为 false,系统将使用默认实现而非插件实现。content provider 类不必存在。不存在时,请务必将 tools:ignore="MissingClass" 添加到 content provider 的定义中。请参阅下方的清单条目示例:
    <application>
        <provider
            android:name="com.android.car.ui.plugin.PluginNameProvider"
            android:authorities="com.android.car.ui.plugin"
            android:enabled="false"
            android:exported="true"
            tools:ignore="MissingClass"/>
    </application>
最后,作为一项安全措施,请为应用签名。
作为共享库的插件
与直接编译到应用中的 Android 静态库不同,Android 共享库会被编译成独立 APK,以供其他应用在运行时引用。
如果插件是作为 Android 共享库实现的,插件的类会自动添加到应用之间共用的类加载器中。如果某个使用车载设备界面库的应用指定了插件共享库的运行时依赖项,其类加载器便可以访问插件共享库的类。以普通 Android 应用(而非共享库)形式实现的插件可能会对应用的冷启动时间产生负面影响。
实现和构建共享库
使用 Android 共享库进行开发与使用普通 Android 应用进行开发非常相似,但有几个关键区别。
- 在插件的应用清单中,使用
application标记下的library标记和插件软件包名称:
    <application>
        <library android:name="com.chassis.car.ui.plugin" />
        ...
    </application>
- 使用用于构建共享库的 AAPT 标志
shared-lib来配置 Soongandroid_app构建规则 (Android.bp):
android_app {
  ...
  aaptflags: ["--shared-lib"],
  ...
}
共享库的依赖项
对于系统中使用车载设备界面库的每个应用,请在应用清单中的 application 标记下添加 uses-library 标记及插件软件包名称:
<manifest>
  <application
      android:name=".MyApp"
      ...>
    <uses-library android:name="com.chassis.car.ui.plugin" android:required="false"/>
    ...
  </application>
</manifest>
安装插件
必须将插件预安装到系统分区中(方法是在 PRODUCT_PACKAGES 中包含相应模块)。预安装的软件包可以像更新任何其他已安装的应用一样进行更新。
如果您要更新系统上现有的插件,使用该插件的所有应用都会自动关闭。在被用户重新打开后,它们会应用相应更新。如果应用没有运行,那么下次启动时,它会带有更新后的插件。
使用 Android Studio 安装插件时,需要考虑一些其他注意事项。在写入数据时,Android Studio 应用安装过程中存在一个 bug,会导致对插件的更新无法生效。您可以通过在插件的 build 配置中选择 Always install with package manager (disables deploy optimizations on Android 11 and later) 选项来修复此问题。
此外,在安装该插件时,Android Studio 会报告错误,指明它找不到要启动的主 activity。这是正常现象,因为该插件没有任何 activity(用于解析 intent 的空 intent 除外)。为消除该错误,请在 build 配置中将 Launch 选项更改为 Nothing。
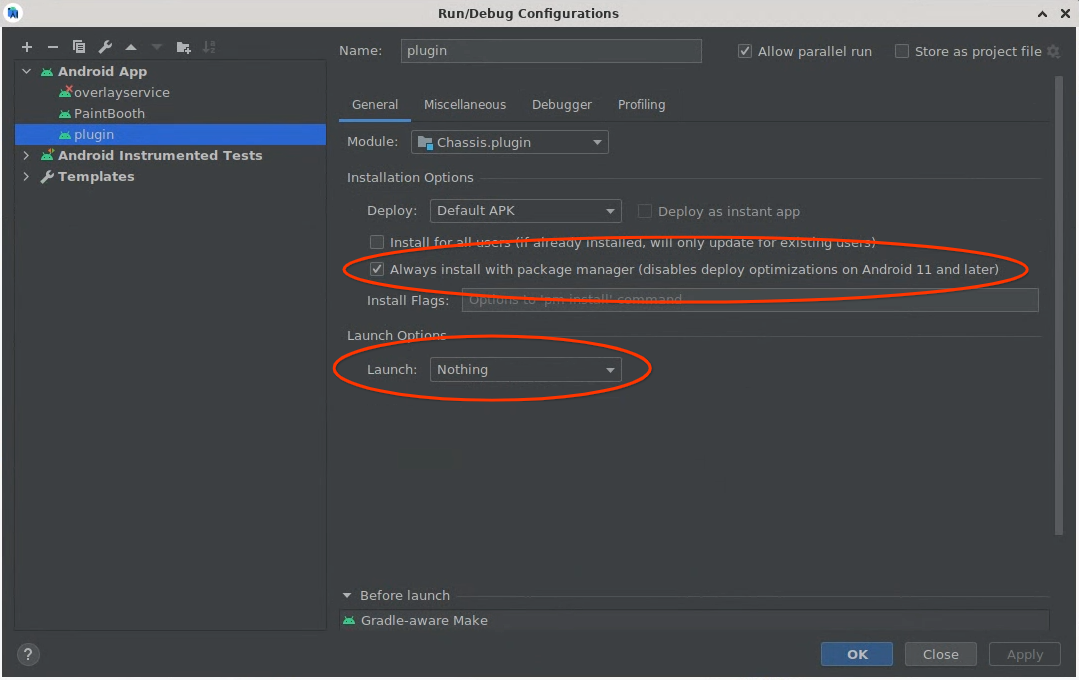 图 1. 插件 Android Studio 配置
代理插件
若要自定义使用车载设备界面库的应用,则需一个 RRO,使其以要修改的每个特定应用为目标,包括当各应用的自定义设置完全相同时。这意味着每个应用都需要一个 RRO。查看哪些应用使用车载设备界面库。
车载设备界面库代理插件是一个示例插件共享库,可将其组件实现委托给静态版本的车载设备界面库。此插件可以通过 RRO 进行定位,对于使用车载设备界面库的应用,它可用作单个自定义点,而无需实现功能性插件。如需详细了解 RRO,请参阅在运行时更改应用资源的值。
代理插件只是一个使用插件进行自定义的示例起点。如果要在 RRO 之外进行自定义,您可以先实现一部分插件组件,然后使用代理插件完成其余部分;也可以完全从头开始实现所有插件组件。
虽然代理插件为应用提供单点 RRO 自定义功能,但选择停用该插件的应用仍需要使用直接定位到应用本身的 RRO。
实现插件 API
插件的主要入口点是 com.android.car.ui.plugin.PluginVersionProviderImpl 类。所有插件都必须包含一个具有此确切名称和软件包名称的类。此类必须具有默认构造函数,并实现 PluginVersionProviderOEMV1 接口。
CarUi 插件必须与版本高于或低于该插件的应用兼容。为此,所有插件 API 的版本编号都在其类名称末尾带有 V#。如果发布了新版车载设备界面库,且其中包含新功能,这些功能会纳入 V2 版组件中。车载设备界面库会尽力让新功能可以在旧版插件组件范围内使用。例如,通过将工具栏中新类型的按钮转换为 MenuItems。
不过,使用旧版车载设备界面库的应用无法适应针对新版 API 编写的新插件。为了解决这个问题,我们允许插件根据应用支持的 OEM API 版本自行返回不同的实现。
PluginVersionProviderOEMV1 中包含一个方法:
Object getPluginFactory(int maxVersion, Context context, String packageName);
此方法会返回一个对象,以实现插件所支持的最高 PluginFactoryOEMV# 版本,同时该版本仍然低于或等于 maxVersion。如果插件没有实现该版本的 PluginFactory,则可能会返回 null,在这种情况下,系统会使用静态链接的 CarUi 组件实现。
为了与针对较旧版本的静态车载设备界面库编译的应用保持向后兼容性,建议您在插件的 PluginVersionProvider 类实现内支持 2、5 及更高的 maxVersion。1、3、4 版本均不受支持。如需了解详情,请参阅 PluginVersionProviderImpl。
PluginFactory 是创建所有其他 CarUi 组件的接口。它还定义了应使用哪个版本的接口。如果插件不实现其中的任何组件,则可能会在其创建函数中返回 null(工具栏除外,它有单独的 customizesBaseLayout() 函数)。
pluginFactory 会限制可以一起使用哪些版本的 CarUi 组件。例如,pluginFactory 永远不会同时创建版本为 100 的 Toolbar 和版本为 1 的 RecyclerView,因为无法保证版本各异的组件可以协同工作。要使用工具栏版本 100,开发者应当提供会创建工具栏版本 100 的某一版 pluginFactory 的实现,但这会限制可创建的其他组件的版本选择。其他组件的版本可能不一样,例如,pluginFactoryOEMV100 可能会创建 ToolbarControllerOEMV100 和 RecyclerViewOEMV70。
工具栏
基本布局
工具栏和“基本布局”密切相关,因此用于创建工具栏的函数名为 installBaseLayoutAround。基本布局这一概念允许将工具栏放在应用内容周围的任意位置,工具栏可在应用顶部/底部水平放置、沿侧边垂直放置,甚至还可让工具栏包围整个应用形成一个圆形。为实现此目的,需将 View 传递给 installBaseLayoutAround 以便将工具栏/基本布局围在四周。
插件应接受所提供的 View,将其与父级分离,在与父级相同的索引下使用与刚分离视图相同的 LayoutParams 膨胀插件自己的布局,然后将 View 重新附加到刚膨胀布局中的某个位置。膨胀后的布局将包含工具栏(如果应用要求这样)。
应用可以请求不带工具栏的基本布局。在这种请求下,installBaseLayoutAround 应返回 null。对于大多数插件来说,只需进行该操作即可,但是如果插件作者想要围绕应用边缘采用装饰等内容,仍然可以使用基本布局来实现。这些装饰对于具有非矩形屏幕的设备尤其有用,因为它们可以将应用推送到矩形空间,并干净地过渡为非矩形空间。
系统还会向 installBaseLayoutAround 传递 Consumer<InsetsOEMV1>。此 Consumer 可用于告知应用,插件覆盖了应用的部分内容(通过工具栏或其他方式)。然后,应用就会知道保持在此空间中绘制,而将所有关键的用户可交互组件排除在外。我们的参考设计使用了该效果,使工具栏保持半透明,并在其下方滚动显示列表。如果未实现此功能,列表中的第一项内容会卡在工具栏下方,无法点击。如果不需要该效果,插件可以忽略此 Consumer。
 图 2. 在工具栏下方滚动内容
从应用的角度来看,当插件发送新的边衬区时,它将通过实现 InsetsChangedListener 的任何 activity/fragment 接收这些边衬区。如果 activity 或 fragment 未实现 InsetsChangedListener,那么默认情况下,车载设备界面库会处理边衬区,将其作为内边距应用到包含该 fragment 的 Activity 或 FragmentActivity。默认情况下,该库不会将边衬区应用于 fragment。下面是一个示例代码段,演示了会将边衬区作为内边距应用于应用中的 RecyclerView 的实现:
public class MainActivity extends Activity implements InsetsChangedListener {
  @Override
  public void onCarUiInsetsChanged(Insets insets) {
    CarUiRecyclerView rv = requireViewById(R.id.recyclerview);
    rv.setPadding(insets.getLeft(), insets.getTop(),
                  insets.getRight(), insets.getBottom());
  }
}
最后,插件会收到 fullscreen 提示,该提示用于指明应封装的 View 会占满整个应用还是只占一小部分。这可用于避免沿边缘应用某些装饰,而这些装饰仅在沿整个屏幕的边缘显示时才有意义。“设置”就属于使用非全屏基本布局的示例应用,其中双窗格布局的每个窗格都有自己的工具栏。
由于预计 installBaseLayoutAround 将在 toolbarEnabled 为 false 时返回 null,因此要让插件指明它不希望自定义基本布局,它必须从 customizesBaseLayout 返回 false。
基本布局必须包含 FocusParkingView 和 FocusArea,才能完全支持旋转控件。在不支持旋转的设备上,可以省略这些视图。FocusParkingView/FocusAreas 在静态 CarUi 库中实现,因此使用 setRotaryFactories 来提供工厂,以从上下文创建视图。
用于创建 Focus 视图的上下文必须是来源上下文,而不是插件的上下文。FocusParkingView 应在合理的情况下尽可能接近树中的第一个视图,因为当没有焦点应对用户可见时,此视图便会获得焦点。FocusArea 必须将工具栏封装在基本布局中,以指明它是旋转轻推可用区。如果未提供 FocusArea,用户便无法使用旋控器转到工具栏中的任何按钮。
工具栏控制器
返回的实际 ToolbarController 应该比基本布局更容易实现。它的任务是获取传递给其 setter 的信息,并将其显示在基本布局中。如需了解大多数方法,请参阅 Javadoc。下面讨论一些更复杂的方法。
getImeSearchInterface 用于在 IME(键盘)窗口中显示搜索结果。这对于在键盘旁边显示搜索结果/为搜索结果添加动画效果非常有用,例如,如果键盘只占据了屏幕的一半。大多数功能都是在静态 CarUi 库中实现的,插件中的搜索接口仅为静态库提供获取 TextView 和 onPrivateIMECommand 回调的方法。为了支持这一点,插件应使用一个会替换 onPrivateIMECommand 的 TextView 子类,并将调用传递给所提供的监听器作为其搜索栏的 TextView。
setMenuItems 只会在屏幕上显示 MenuItem,但调用频率会非常高。由于 MenuItem 的插件 API 是不可变的,因此每当 MenuItem 发生变化时,将会执行全新的 setMenuItems 调用。发生这种情况的原因可能就像用户点击了开关 MenuItem 那么简单,但这种点击导致了开关切换。因此,出于性能和动画方面的原因,建议计算新旧 MenuItem 列表之间的差异,并只更新实际发生更改的 View。MenuItem 提供的 key 字段可能对此有所帮助,因为在同一 MenuItem 的不同 setMenuItems 调用中,键应该是相同的。
AppStyledView
AppStyledView 是 View 的一个容器,完全未自定义。它可用于在该 View 周围提供边框,使其与应用的其余部分区分开来,并向用户表明这是另一种界面。由 AppStyledView 封装的 View 在 setContent 中提供。AppStyledView 还可以根据应用的请求设置返回或关闭按钮。
与 installBaseLayoutAround 不同,AppStyledView 不会立即将其 View 插入 View 层次结构中,而只是通过 getView 将其视图返回到静态库,然后执行插入。AppStyledView 的位置和大小也可以通过实现 getDialogWindowLayoutParam 来控制。
上下文
插件在使用 Context 时必须小心,因为有插件和“来源”这两种上下文。插件上下文作为 getPluginFactory 的参数提供,并且是唯一包含插件资源的上下文。这意味着,这是唯一可用于在插件中膨胀布局的上下文。
但是,插件上下文可能没有设置正确的配置。为了获得正确的配置,我们在创建组件的方法中提供了来源上下文。来源上下文通常是 activity,但在某些情况下也可能是 Service 或其他 Android 组件。如需将来源上下文中的配置与插件上下文中的资源搭配使用,必须使用 createConfigurationContext 创建新的上下文。如果未使用正确的配置,就会发生 Android 严格模式违规行为,并且膨胀后的视图可能没有正确的尺寸。
Context layoutInflationContext = pluginContext.createConfigurationContext(
        sourceContext.getResources().getConfiguration());
模式变更
某些插件可以为其组件提供多种模式支持,例如可从视觉上加以区分的运动模式和节能模式。CarUi 没有提供对此类功能的内置支持,但这不能阻碍该插件完全在内部实现它。插件可以监控它想确定何时切换模式的任何条件,例如监听广播。该插件无法触发配置更改以更改模式,但仍不建议依赖配置更改,因为手动更新每个组件的外观对用户而言更加顺畅,并且能够实现通过配置更改无法完成的过渡。
Jetpack Compose
插件可以使用 Jetpack Compose 来实现,但这是一项 Alpha 版级别功能,不应被视为稳定版功能。
插件可以使用 ComposeView 创建一个支持 Compose 的 Surface 来进行渲染。此 ComposeView 将从组件中的 getView 方法返回给应用。
使用 ComposeView 的一个主要问题是,它会在布局中的根视图上设置标记,以存储在层次结构中的不同 ComposeView 间共享的全局变量。由于插件的资源 ID 与应用的资源 ID 不是分开设置命名空间,因此当应用和插件在同一 View 上设置标记时,这可能会导致冲突。下面提供了一个将这些全局变量向下移动到 ComposeView 的自定义 ComposeViewWithLifecycle。再次强调,此功能不应被视为稳定版功能。
ComposeViewWithLifecycle:
class ComposeViewWithLifecycle @JvmOverloads constructor(
  context: Context,
  attrs: AttributeSet? = null,
  defStyleAttr: Int = 0
) : FrameLayout(context, attrs, defStyleAttr),
    LifecycleOwner, ViewModelStoreOwner, SavedStateRegistryOwner {

  private val lifeCycle = LifecycleRegistry(this)
  private val modelStore = ViewModelStore()
  private val savedStateRegistryController = SavedStateRegistryController.create(this)
  private var composeView: ComposeView? = null
  private var content = @Composable {}

  init {
    ViewTreeLifecycleOwner.set(this, this)
    ViewTreeViewModelStoreOwner.set(this, this)
    ViewTreeSavedStateRegistryOwner.set(this, this)
    compositionContext = createCompositionContext()
  }

  fun setContent(content: @Composable () -> Unit) {
    this.content = content
    composeView?.setContent(content)
  }

  override fun getLifecycle(): Lifecycle {
    return lifeCycle
  }

  override fun getViewModelStore(): ViewModelStore {
    return modelStore
  }

  override fun getSavedStateRegistry(): SavedStateRegistry {
    return savedStateRegistryController.savedStateRegistry
  }

  override fun onAttachedToWindow() {
    super.onAttachedToWindow()
    savedStateRegistryController.performRestore(Bundle())
    lifeCycle.currentState = Lifecycle.State.RESUMED
    composeView = ComposeView(context)
    composeView?.setContent(content)
    addView(composeView, LayoutParams(
      LayoutParams.MATCH_PARENT, LayoutParams.MATCH_PARENT))
  }

  override fun onDetachedFromWindow() {
    super.onDetachedFromWindow()
    lifeCycle.currentState = Lifecycle.State.DESTROYED
    modelStore.clear()
    removeAllViews()
    composeView = null
  }

  // Exact copy of View.createCompositionContext() in androidx's WindowRecomposer.android.kt
  private fun createCompositionContext(): CompositionContext {
    val currentThreadContext = AndroidUiDispatcher.CurrentThread
    val pausableClock = currentThreadContext[MonotonicFrameClock]?.let {
      PausableMonotonicFrameClock(it).apply { pause() }
    }
    val contextWithClock = currentThreadContext + (pausableClock ?: EmptyCoroutineContext)
    val recomposer = Recomposer(contextWithClock)
    val runRecomposeScope = CoroutineScope(contextWithClock)
    val viewTreeLifecycleOwner = checkNotNull(ViewTreeLifecycleOwner.get(this)) {
      "ViewTreeLifecycleOwner not found from $this"
    }
    viewTreeLifecycleOwner.lifecycle.addObserver(
      LifecycleEventObserver { _, event ->
        @Suppress("NON_EXHAUSTIVE_WHEN")
        when (event) {
          Lifecycle.Event.ON_CREATE ->
            // Undispatched launch since we've configured this scope
            // to be on the UI thread
            runRecomposeScope.launch(start = CoroutineStart.UNDISPATCHED) {
              recomposer.runRecomposeAndApplyChanges()
            }
          Lifecycle.Event.ON_START -> pausableClock?.resume()
          Lifecycle.Event.ON_STOP -> pausableClock?.pause()
          Lifecycle.Event.ON_DESTROY -> {
            recomposer.cancel()
          }
        }
      }
    )
    return recomposer
  }

//  TODO: ComposeViewWithLifecycle should handle saving state and other lifecycle things
//  override fun onSaveInstanceState(): Parcelable? {
//    val superState = super.onSaveInstanceState()
//    val bundle = Bundle()
//    savedStateRegistryController.performSave(bundle)
//  }
}