
此頁面提供相機圖像測試套件 (ITS) 下的測試的完整列表,它是 Android 兼容性測試套件 (CTS) 驗證程序的一部分。 ITS 測試是功能測試,這意味著它們不測量圖像質量,但所有宣傳的相機功能都按預期工作。本文檔讓開發人員和測試人員了解各個測試的功能以及如何調試測試失敗。
測試按場景分組如下:
- scene0 :捕獲元數據、抖動、陀螺儀、振動
- 場景1 :曝光、感光度、EV補償、YUV vs JPEG/RAW
- 場景2 :人臉檢測
- 場景3 :邊緣增強,鏡頭移動
- 場景4 :縱橫比、裁剪、視野
- 場景5 :鏡頭陰影
- 場景6 :縮放
- sensor_fusion :相機/陀螺儀時序偏移
有關每個場景的描述,請參見各個部分。
場景0
Scene0 測試不需要特定的場景信息。但是,手機必須靜止才能進行陀螺儀和振動測試。
test_burst_capture
驗證整個捕獲管道能否跟上全尺寸捕獲的速度和 CPU 時間。
測試的 API:
Pass:捕獲一連串全尺寸圖像,並且相機足夠快以避免超時。
test_capture_result_dump
測試從手動捕獲返回的捕獲結果,然後轉儲它。
測試的 API:
Pass:完成捕獲並轉儲捕獲結果。
test_gyro_bias
測試設備靜止時陀螺是否有穩定的輸出。數據繪製為 20 個數據點的平均值。
測試的 API:
通過:隨著時間的推移,陀螺儀讀數的增量小於 0.01。

test_gyro_bias_plot.png
測試抖動
測量相機時間戳中的抖動。
測試的 API:
-
android.hardware.camera2.CaptureResult#SENSOR_TIMESTAMP -
android.hardware.camera2.CaptureRequest#CONTROL_AE_TARGET_FPS_RANGE
通過:幀之間至少有 30 毫秒的增量。
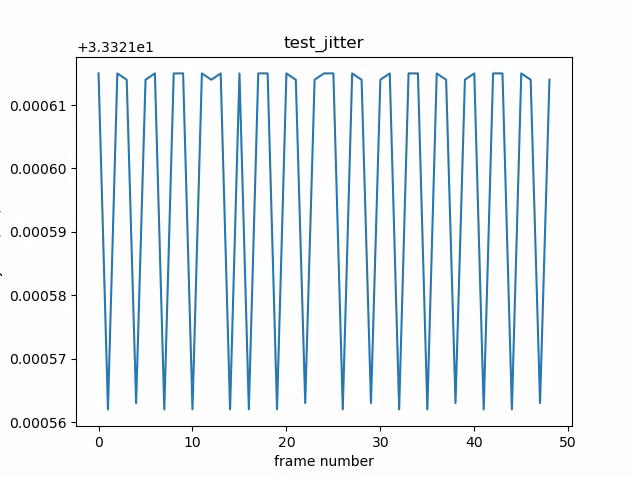
test_jitter_plot.png (注意小的 y 軸範圍。在這個圖中抖動實際上很小。)
測試元數據
測試元數據條目的有效性。查看捕獲結果和相機特徵對象。此測試使用auto_capture_request曝光和增益值,因為圖像內容並不重要。
測試的 API:
-
android.hardware.camera2.CameraCharacteristics#INFO_SUPPORTED_HARDWARE_LEVEL -
android.hardware.camera2.CameraCharacteristics#SCALER_CROPPING_TYPE -
android.hardware.camera2.CameraCharacteristics#SENSOR_BLACK_LEVEL_PATTERN -
android.hardware.camera2.CameraCharacteristics#SENSOR_INFO_TIMESTAMP_SOURCE -
android.hardware.camera2.CaptureRequest#SENSOR_FRAME_DURATION -
android.hardware.camera2.CaptureResult#SENSOR_ROLLING_SHUTTER_SKEW
通過:硬件級別、 rollingShutterSkew 、 frameDuration標籤、 timestampSource 、 croppingType 、 blackLevelPattern 、 pixel_pitch 、FOV、超焦距存在且具有有效值。
test_param_sensitivity_burst
測試android.sensor.sensitivity參數是否在突發中正確應用。僅檢查輸出元數據。
測試的 API:
-
android.hardware.camera2.CameraCharacteristics#SENSOR_INFO_SENSITIVITY_RANGE -
android.hardware.camera2.CaptureRequest#SENSOR_SENSITIVITY
通過:輸出數據的誤差容限小於 0.2%。
test_read_write
通過回讀捕獲元數據來測試設備是否寫入了正確的曝光和增益值。
測試的 API:
-
android.hardware.camera2.CameraCharacteristics#SENSOR_INFO_EXPOSURE_TIME_RANGE -
android.hardware.camera2.CameraCharacteristics#SENSOR_INFO_SENSITIVITY_RANGE -
android.hardware.camera2.CaptureRequest#SENSOR_EXPOSURE_TIME -
android.hardware.camera2.CaptureRequest#SENSOR_SENSITIVITY -
android.hardware.camera2.CaptureResult#SENSOR_EXPOSURE_TIME -
android.hardware.camera2.CaptureResult#SENSOR_SENSITIVITY
通過:讀取和寫入值在所有鏡頭中匹配。
測試傳感器事件
測試設備查詢並打印出宣傳傳感器融合支持的設備的傳感器事件。預期的傳感器是加速度計、陀螺儀和磁力計。此測試僅在屏幕打開時有效,這意味著設備未處於待機模式。
測試的 API:
Pass:接收每個傳感器的事件。
test_solid_color_test_pattern
測試是否為相機靜音正確生成純色測試圖案。如果支持相機靜音,則必須支持純色測試圖案。如果不支持相機靜音,則僅在宣傳該功能時才測試純色測試圖案。
如果支持 RAW 圖像,還會測試顏色分配。測試的顏色是黑色、白色、紅色、藍色和綠色。對於不支持 RAW 圖像的相機,僅測試黑色。
測試的 API:
-
android.hardware.camera2.CameraCharacteristic#SENSOR_AVAILABLE_TEST_PATTERN_MODES -
android.hardware.camera2.CaptureResult#SENSOR_TEST_PATTERN_DATA -
android.hardware.camera2.CaptureResult#SENSOR_TEST_PATTERN_MODE
通過:支持的實心測試圖案是正確的顏色,並且圖像中的差異很小。
test_test_pattern
測試android.sensor.testPatternMode參數以捕獲每個有效測試模式的幀,並檢查是否為純色和彩條正確生成了幀。該測試包括以下步驟:
- 為所有支持的測試模式捕獲圖像。
- 對純色測試圖案和彩條執行簡單的正確性檢查。
測試的 API:
-
android.hardware.camera2.CameraCharacteristic#SENSOR_AVAILABLE_TEST_PATTERN_MODES -
android.hardware.camera2.CaptureResult#SENSOR_TEST_PATTERN_MODE
Pass:正確生成支持的測試模式。

test_test_patterns_2.jpg
test_tonemap_curve
使用線性色調貼圖測試測試模式從 RAW 到 YUV 的轉換。該測試需要android.sensor.testPatternMode = 2 (COLOR_BARS) 來生成完美的圖像模式以進行色調映射轉換。確保管道具有正確的顏色輸出和線性色調圖和理想的圖像輸入(依賴於test_test_patterns )。
測試的 API:
-
android.hardware.camera2.CaptureRequest#DISTORTION_CORRECTION_MODE -
android.hardware.camera2.CaptureRequest#SENSOR_TEST_PATTERN_MODE -
android.hardware.camera2.CaptureRequest#TONEMAP_CURVE -
android.hardware.camera2.CaptureRequest#TONEMAP_MODE
Pass: YUV 和 RAW 看起來很相似。

test_tonemap_curve_raw_2.jpg

test_tonemap_curve_yuv_2.jpg
test_unified_timestamp
測試圖像和運動傳感器事件是否在同一時域中。
測試的 API:
-
android.hardware.camera2.CaptureResult#SENSOR_TIMESTAMP -
android.hardware.Sensor -
android.hardware.SensorEvent -
android.hardware.Sensor#TYPE_ACCELEROMETER -
android.hardware.Sensor#TYPE_GYROSCOPE
Pass:運動時間戳在兩個圖像時間戳之間。
test_vibration_restriction
測試設備的振動是否按預期運行。
測試的 API:
-
android.hardware.Sensor -
android.hardware.SensorEvent -
android.hardware.Sensor#TYPE_ACCELEROMETER -
android.os.Vibrator -
android.hardware.camera2.CameraDevice#setCameraAudioRestriction
通過:設備在被相機音頻限制 API 靜音時不振動。
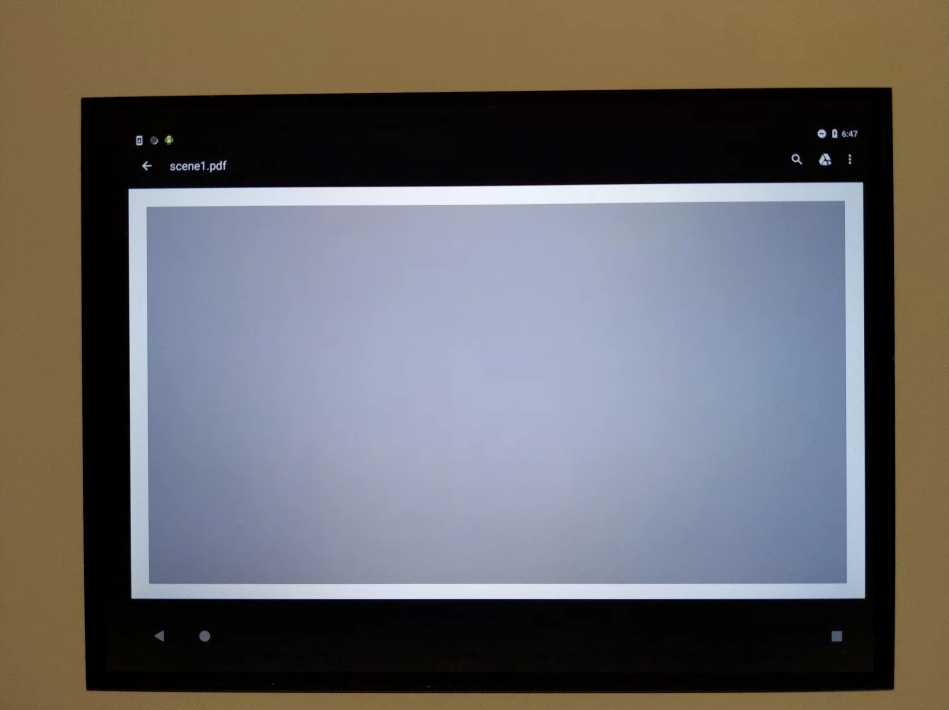
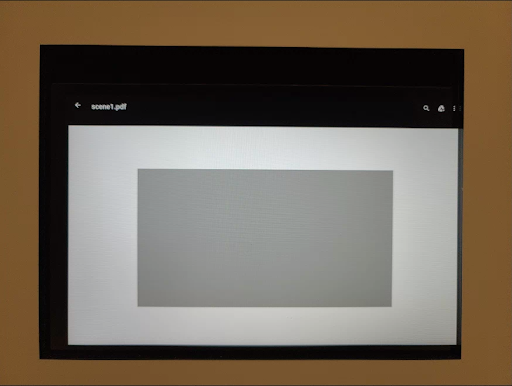
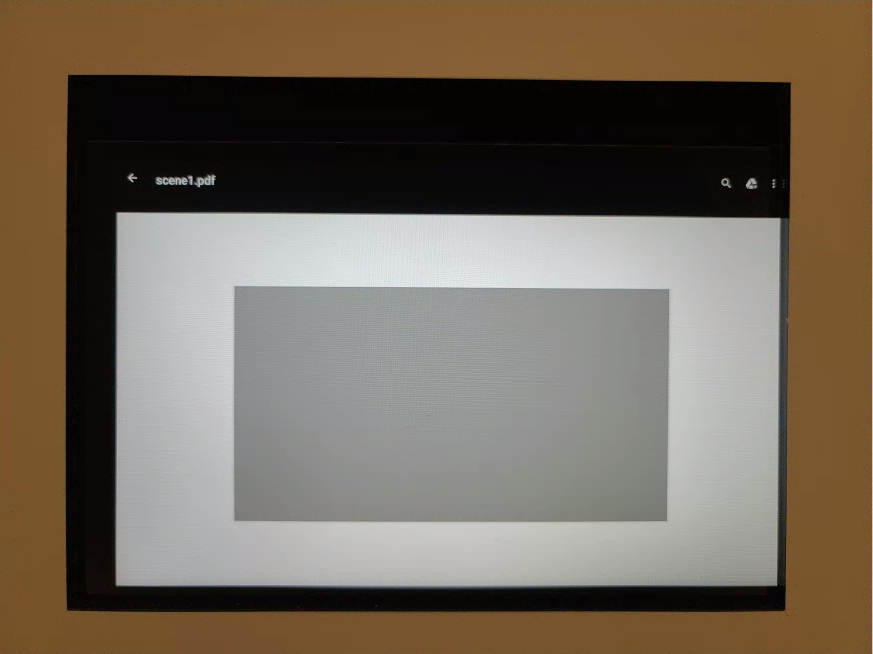
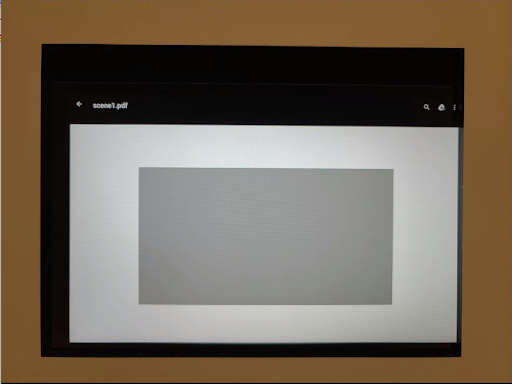
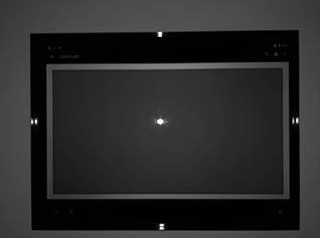
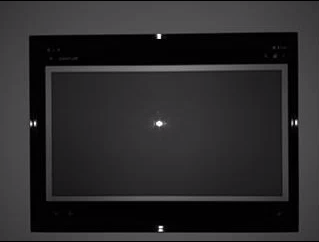
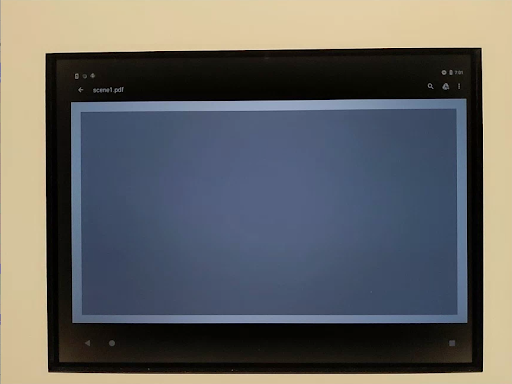
場景1
scene1 是一個灰色圖表。灰色圖表必須覆蓋相機視野的中心 30%。由於中心區域沒有特徵,灰圖有望適度挑戰3A(自動曝光、自動白平衡、自動對焦)。但是,捕獲請求指定了整個場景,其中包括足以使 3A 收斂的特徵。
RFoV 攝像機可以在 WFoV 或 RFoV 測試台中進行測試。如果在 WFoV 測試台中測試 RFoV 相機,圖表將按 ⅔ 縮放,以確保 FoV 中的灰色圖表有一些邊界,以幫助 3A 收斂。

場景1:全尺寸圖表(左)。 ⅔ 比例圖表(右)。
測試_3a
測試具有中等挑戰性目標的 3A 的收斂性。
測試的 API:
-
android.hardware.camera2.CaptureRequest#CONTROL_AE_MODE -
android.hardware.camera2.CaptureRequest#CONTROL_AF_MODE -
android.hardware.camera2.CaptureRequest#CONTROL_AWB_MODE
Pass: 3A收斂,返回的3A值有效。
test_ae_af
分別測試 3A 自動曝光 (AE) 和自動對焦 (AF) 算法。
測試的 API:
-
android.hardware.camera2.CaptureRequest#CONTROL_AE_MODE -
android.hardware.camera2.CaptureRequest#CONTROL_AF_MODE -
android.hardware.camera2.CaptureRequest#CONTROL_AWB_MODE
Pass: 3A收斂,返回的3A值合法。
test_ae_precapture_trigger
使用預捕獲觸發器時測試 AE 狀態機。在禁用 AE 的情況下捕獲五個手動請求。最後一個請求有一個 AE 預捕獲觸發器,應該忽略它,因為 AE 已禁用。
測試的 API:
-
android.hardware.camera2.CaptureRequest#CONTROL_AE_MODE -
android.hardware.camera2.CaptureRequest#CONTROL_AE_PRECAPTURE_TRIGGER -
android.hardware.camera2.CaptureResult#CONTROL_AE_STATE
通過: AE 收斂。
test_auto_vs_manual
捕捉自動和手動鏡頭的測試看起來是一樣的。
測試的 API:
-
android.hardware.camera2.CaptureRequest#COLOR_CORRECTION_GAINS -
android.hardware.camera2.CaptureRequest#COLOR_CORRECTION_TRANSFORM -
android.hardware.camera2.CaptureResult#TONEMAP_CURVE -
android.hardware.camera2.CaptureResult#TONEMAP_MODE
通過:每次捕獲結果中報告的手動白平衡增益和轉換與相機 3A 算法的自動白平衡estimate相匹配。
test_auto_vs_manual_auto.jpg
test_auto_vs_manual_wb.jpg
test_auto_vs_manual_manual_wb_tm.jpg
test_black_white
測試設備是否產生全黑白圖像。進行兩次拍攝,第一次以極低的增益和短曝光拍攝一張黑色照片,第二張以極高的增益和長時間曝光拍攝一張白色照片。
測試的 API:
-
android.hardware.camera2.CaptureRequest#SENSOR_EXPOSURE_TIME -
android.hardware.camera2.CaptureRequest#SENSOR_SENSITIVITY
Pass:產生黑白圖像。
 |  | |
| test_black_white_black.jpg | test_black_white_white.jpg |
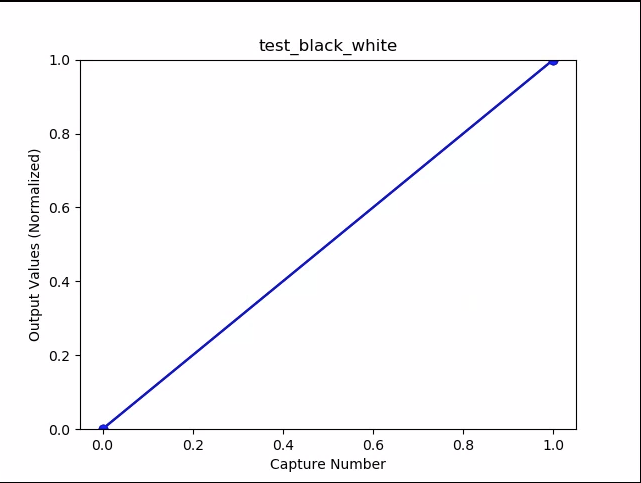
test_black_white_plot_means.png
test_burst_sameness_manual
使用手動捕獲設置拍攝 5 張 50 張圖像,並檢查它們是否完全相同。此測試可用於識別是否存在處理方式不同或具有偽影的零星幀。
測試的 API:
-
android.hardware.camera2.CameraMetadata#REQUEST_AVAILABLE_CAPABILITIES_MANUAL_SENSOR -
android.hardware.camera2.CameraMetadata#SYNC_MAX_LATENCY_PER_FRAME_CONTROL
通過:圖像在視覺上和 RGB 值上相同。
失敗:在每個突發開始時顯示 RGB 平均圖表的峰值或下降
first_API_level< 30 的容差為 3%-
first_API_level>= 30 的容差為 2%

test_burst_sameness_manual_mean.jpg
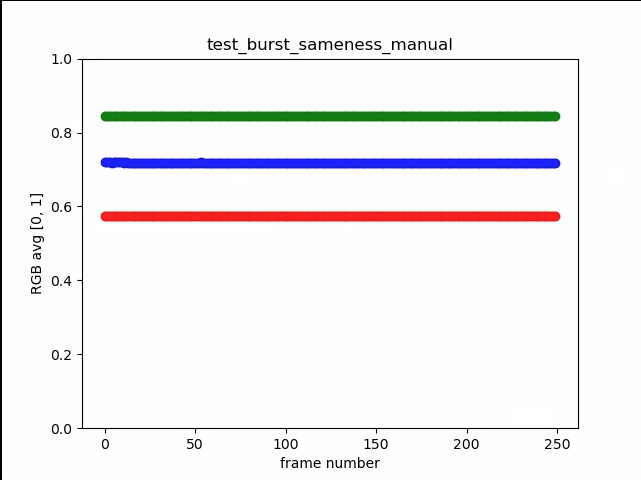
test_burst_sameness_manual_plot_means.png
test_capture_result
測試有效數據是否返回CaptureResult對象。進行自動、手動和自動捕獲。
測試的 API:
-
android.hardware.camera2.CaptureRequest#CONTROL_AE_MODE -
android.hardware.camera2.CaptureRequest#CONTROL_AE_REGIONS -
android.hardware.camera2.CaptureRequest#CONTROL_AF_MODE -
android.hardware.camera2.CaptureRequest#CONTROL_AF_REGIONS -
android.hardware.camera2.CaptureRequest#CONTROL_AWB_MODE -
android.hardware.camera2.CaptureRequest#CONTROL_AWB_REGIONS -
android.hardware.camera2.CaptureRequest#CONTROL_MODE -
android.hardware.camera2.CaptureRequest#COLOR_CORRECTION_GAINS -
android.hardware.camera2.CaptureRequest#COLOR_CORRECTION_TRANSFORM -
android.hardware.camera2.CaptureRequest#COLOR_CORRECTION_MODE -
android.hardware.camera2.CaptureRequest#SENSOR_EXPOSURE_TIME -
android.hardware.camera2.CaptureRequest#SENSOR_SENSITIVITY -
android.hardware.camera2.CaptureResult#STATISTICS_LENS_SHADING_CORRECTION_MAP -
android.hardware.camera2.CaptureRequest#STATISTICS_LENS_SHADING_MAP_MODE -
android.hardware.camera2.CaptureRequest#TONEMAP_CURVE -
android.hardware.camera2.CaptureRequest#TONEMAP_MODE
通過:元數據對所有捕獲都有效,並且手動設置不會洩漏到第二次自動捕獲中。繪製捕獲的鏡頭陰影校正。
test_capture_result_plot_lsc_auto_ch0.png
test_channel_saturation
測試 RGB 通道均勻飽和以消除圖像飽和區域中的著色。
測試的 API:
-
android.hardware.camera2.CameraCharacteristics#SENSOR_INFO_EXPOSURE_TIME_RANGE -
android.hardware.camera2.CameraCharacteristics#SENSOR_INFO_SENSITIVITY_RANGE -
android.hardware.camera2.CaptureRequest#SENSOR_EXPOSURE_TIME -
android.hardware.camera2.CaptureRequest#SENSOR_SENSITIVITY
Pass:飽和通道的 RGB 值為 [255, 255, 255],誤差幅度小於 1%。

test_channel_saturation.jpg
test_crop_region_raw
測試 RAW 流不可裁剪。
測試的 API:
-
android.hardware.camera2.CameraCharacteristics#SENSOR_INFO_ACTIVE_ARRAY_SIZE -
android.hardware.camera2.CaptureResult#SCALER_CROP_REGION -
android.hardware.camera2.CaptureRequest#SCALER_CROP_REGION
Pass: YUV 圖像被中心裁剪,但不是 RAW 圖像。

test_crop_region_raw_comp_raw_crop.jpg

test_crop_region_raw_comp_raw_full.jpg

test_crop_region_raw_comp_yuv_crop.jpg
test_crop_region_raw_yuv_full.jpg
test_crop_regions
測試作物區域是否有效。拍攝完整圖像並創建 5 個不同區域(角和中心)的補丁。拍攝為 5 個區域設置裁剪的圖像。比較補丁和裁剪圖像值。
測試的 API:
-
android.hardware.camera2.CameraCharacteristics#SENSOR_INFO_ACTIVE_ARRAY_SIZE -
android.hardware.camera2.CaptureRequest#SCALER_CROP_REGION
Pass:裁剪區域的圖像與裁剪圖像對應的補丁匹配。
test_dng_noise_model
驗證 DNG 原始模型參數是否正確。該圖描繪了在一系列靈敏度範圍內捕獲的原始照片中灰卡中心補丁的測量方差,並將這些值與相機 HAL 中的 DNG 噪聲模型在每個靈敏度下預期的方差(基於捕獲結果對像中返回的 O,S 參數)。有關 DNG 噪聲模型的更多詳細信息,請下載有關DNG噪聲模型的以下文檔。
測試的 API:
-
android.hardware.camera2.CameraCharacteristics#SENSOR_INFO_SENSITIVITY_RANGE -
android.hardware.camera2.CameraCharacteristics#SENSOR_INFO_WHITE_LEVEL -
android.hardware.camera2.CameraCharacteristics#SENSOR_MAX_ANALOG_SENSITIVITY -
android.hardware.camera2.CaptureResult#SENSOR_NOISE_PROFILE -
android.hardware.camera2.CaptureRequest#SENSOR_SENSITIVITY
通過: DNG 原始模型參數正確。預期的 RGB 值與測量的實際 RGB 值相匹配。
test_dng_noise_model_plog.png
test_ev_compensation_advanced
測試是否應用了曝光值 (EV) 補償。該測試分八步增加曝光,並檢查測量的亮度與預期的亮度。預期值是根據未應用 EV 補償的圖像的圖像亮度計算的,如果計算值超出實際圖像值範圍,則預期值將飽和。如果預期值和測量值不匹配或圖像在五個步驟內曝光過度,則測試失敗。
測試的 API:
通過:圖像顯示曝光增加,但在五個步驟內沒有過度曝光。
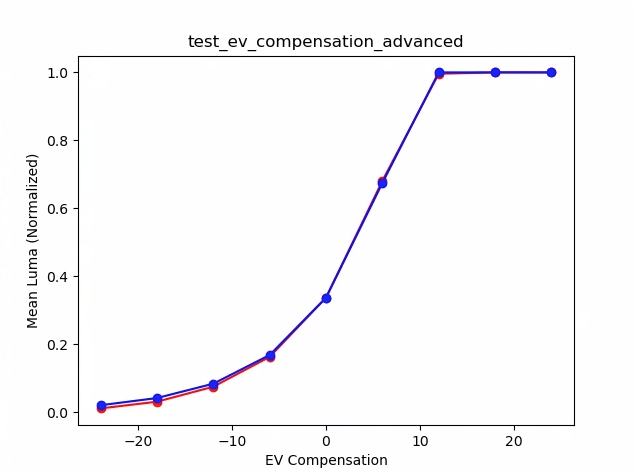
test_ev_compensation_advanced_plot_means.png
test_ev_compensation_basic
使用CONTROL_AE_COMPENSATION_STEP創建的範圍測試是否應用了 EV 補償。在每個補償值處捕獲八幀。
測試的 API:
-
android.hardware.camera2.CameraCharacteristics#CONTROL_AE_COMPENSATION_STEP -
android.hardware.camera2.CaptureRequest#CONTROL_AE_EXPOSURE_COMPENSATION -
android.hardware.camera2.CaptureRequest#CONTROL_AE_LOCK -
android.hardware.camera2.CaptureResult#CONTROL_AE_EXPOSURE_COMPENSATION -
android.hardware.camera2.CaptureResult#CONTROL_AE_STATE
通過:隨著 EV 補償設置的增加,捕獲的亮度增加,並且為每個 EV 補償設置捕獲的八幀具有穩定的亮度值。
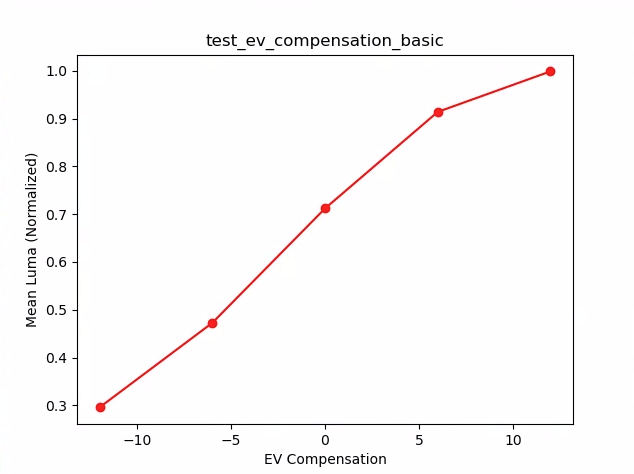
test_ev_compensation_basic.png
測試曝光
測試隨著 ISO 和曝光時間的變化實現恆定曝光。拍攝一系列照片,選擇 ISO 和曝光時間以相互平衡。結果應該具有相同的亮度,但在序列上圖像應該變得更嘈雜。驗證樣本像素平均值彼此接近。確保圖像沒有被限制為 0 或 1(這會使它們看起來像平線)。通過在配置文件中設置debug標誌,也可以使用 RAW 圖像運行測試。
測試的 API:
-
android.hardware.camera2.CaptureRequest#SENSOR_EXPOSURE_TIME -
android.hardware.camera2.CaptureRequest#SENSOR_SENSITIVITY
通過:圖像具有相同的亮度,但 ISO 越高噪點越多。當ISO*exposure的值在測試的增益空間內恆定時,RGB 平面是平坦的。
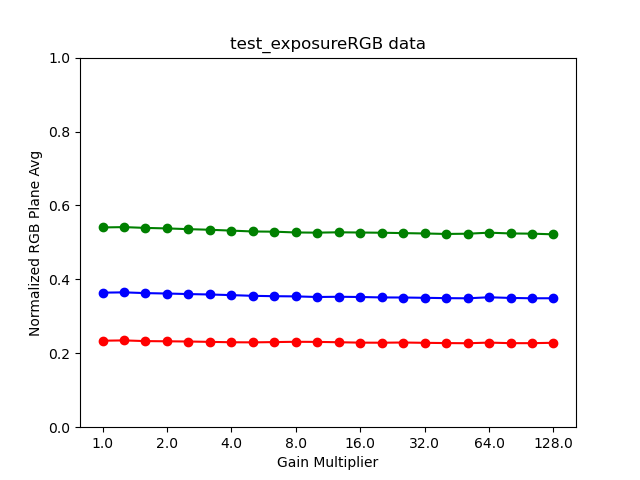
test_exposure_plot_means.png
 |  | |
| test_exposure_mult=1.00.jpg | test_exposure_mult=64.00.jpg |
test_jpeg
轉換 YUV 圖像和設備 JPEG 圖像的測試看起來相同。測試取圖像的中心 10% 併計算 RGB 值,並驗證它們是否匹配。
測試的 API:
通過:每張圖像之間的平均 RGB 差異小於 3%。
 |  | |
| test_jpeg_fmt=jpg.jpg | test_jpeg=fmt=yuv.jpg |
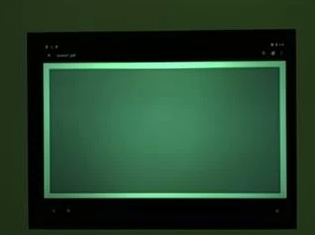
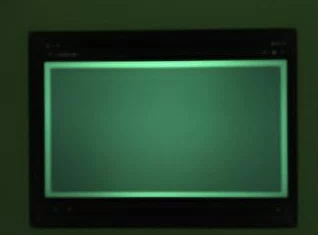
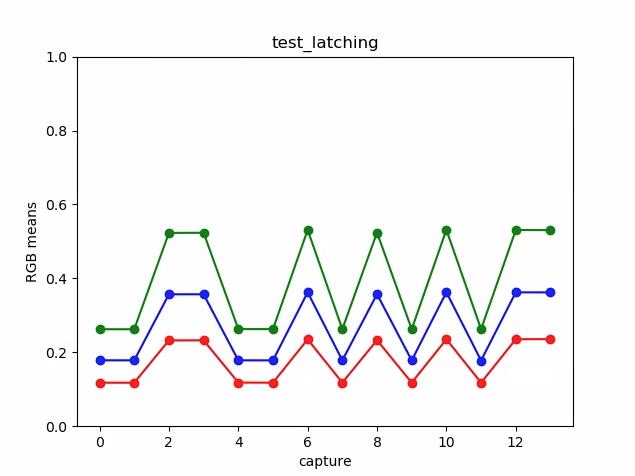
test_latch
測試設置(曝光和增益)鎖定在FULL和LEVEL_3相機的正確幀上。使用背靠背請求拍攝一系列鏡頭,在鏡頭之間改變捕獲請求參數。檢查圖像是否具有預期的屬性。
測試的 API:
通過:圖像 [2, 3, 6, 8, 10, 12, 13] 增加了 ISO 或曝光,並在test_latching_plot_means.png上顯示出更高的 RGB 平均值。
 |  |  | |
| test_latching_i=00.jpg | test_latching_i=01.jpg | test_latching_i=02.jpg | |
 |  |  | |
| test_latching_i=03.jpg | test_latching_i=04.jpg | test_latching_i=05.jpg | |
 |  |  | |
| test_latching_i=06.jpg | test_latching_i=07.jpg | test_latching_i=08.jpg | |
 |  |  | |
| test_latching_i=09.jpg | test_latching_i=10.jpg | test_latching_i=11.jpg | |
 | |||
| test_latching_i=12.jpg |
test_latching_plot_means.png
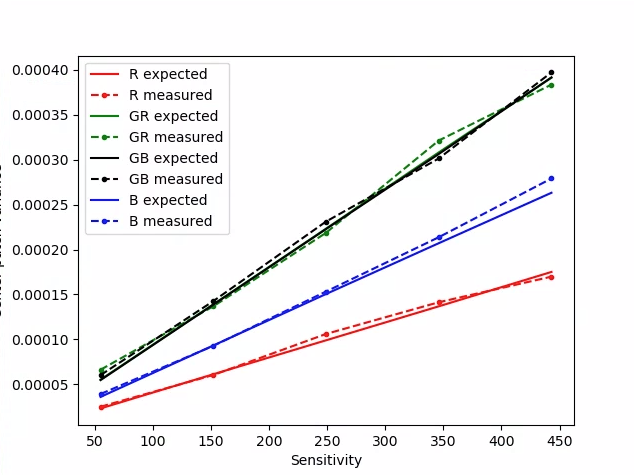
test_linearity
測試設備處理可以反轉為線性像素。使用指向統一目標的設備捕獲一系列射擊。
測試的 API:
-
android.hardware.camera2.CameraCharacteristics#SENSOR_INFO_SENSITIVITY_RANGE -
android.hardware.camera2.CaptureRequest#BLACK_LEVEL_LOCK -
android.hardware.camera2.CaptureRequest#SENSOR_SENSITIVITY -
android.hardware.camera2.CaptureRequest#TONEMAP_CURVE -
android.hardware.camera2.CaptureRequest#TONEMAP_MODE
通過: R、G、B 值必須隨著靈敏度的增加而線性增加。
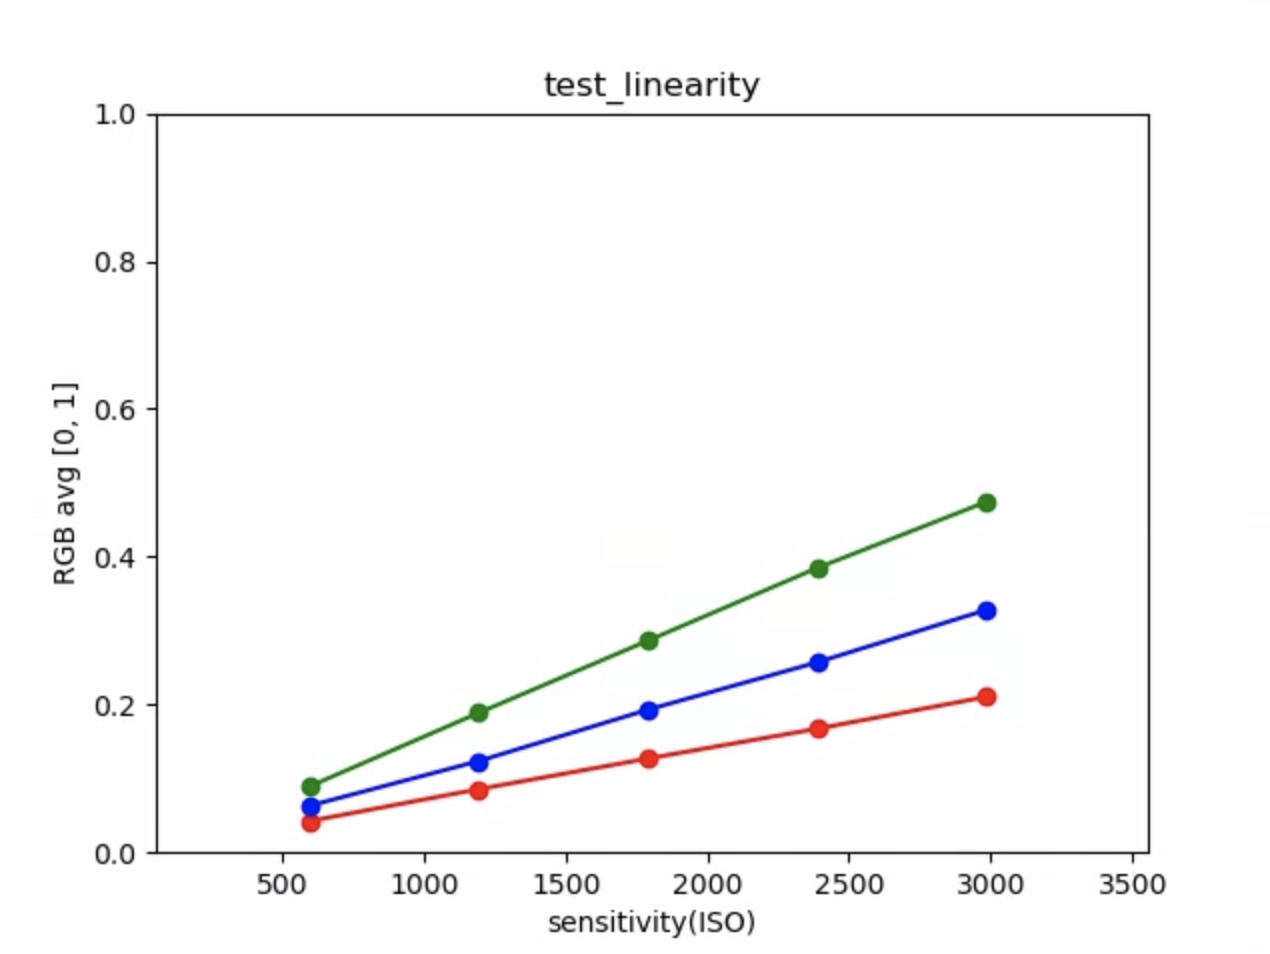
test_linearity_plot_means.png
test_locked_burst
測試 3A 鎖定和 YUV 突發(使用自動設置)。此測試旨在通過即使在沒有MANUAL_SENSOR或PER_FRAME_CONTROLS的有限設備上。測試檢查 YUV 圖像一致性,而幀率檢查在 CTS 中。
測試的 API:
-
android.hardware.camera2.CaptureRequest#CONTROL_AE_LOCK -
android.hardware.camera2.CaptureRequest#CONTROL_AWB_LOCK
通過:捕獲看起來一致。
test_locked_burst_frame0.jpg
test_locked_burst_frame1.jpg
test_locked_burst_frame2.jpg
test_multi_camera_match
測試設備上的多台攝像機是否為灰色補丁提供了相似的 RGB 值。
測試的 API:
-
android.hardware.camera2.CameraCharacteristics#getPhysicalCameraIds() -
android.hardware.camera2.CameraCharacteristics#LENS_INFO_AVAILABLE_FOCAL_LENGTHS -
android.hardware.camera2.CameraMetadata#REQUEST_AVAILABLE_CAPABILITIES_LOGICAL_MULTI_CAMERA -
android.hardware.camera2.CaptureRequest#LENS_FOCAL_LENGTH
Pass:不同的相機為相同的灰度補丁產生相似的 RGB 值。

test_multi_camera+match_yuv_fl=4.38.jpg
test_param_color_correction
測試設置時應用android.colorCorrection.*參數。使用不同的變換和增益值進行拍攝,並測試它們看起來是否相應不同。選擇變換和增益以使輸出越來越紅或越來越藍。使用線性色調貼圖。色調映射是圖像處理中使用的一種技術,用於將一組顏色映射到另一組顏色,以在動態範圍更有限的介質中近似高動態範圍圖像的外觀。
測試的 API:
-
android.hardware.camera2.CaptureRequest#COLOR_CORRECTION_GAINS -
android.hardware.camera2.CaptureRequest#COLOR_CORRECTION_MODE -
android.hardware.camera2.CaptureRequest#COLOR_CORRECTION_TRANSFORM
通過: R 和 B 值根據變換提升。
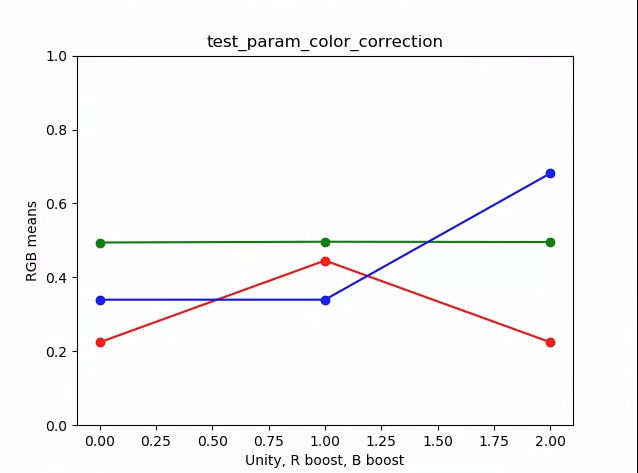
test_param_color_correction_plot_means.png
*x 軸是捕獲請求:0 = 統一,1=紅色增強,2= 藍色增強
test_param_color_correction_req=0.jpg
test_param_color_correctness_req=1.jpg (R 提升)
test_param_color_correction_req=2.jpg(B 提升)
test_param_exposure_time
測試應用了android.sensor.exposureTime參數。
測試的 API:
Pass:每一個鏡頭都比前一個鏡頭亮。
test_param_exposure_time_frame0.jpg
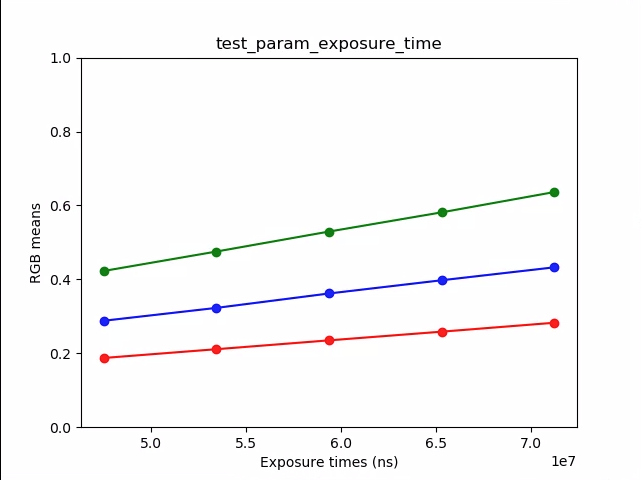
test_param_exposure_time_plot.png
test_param_flash_mode
測試應用了android.flash.mode參數。手動將曝光設置在暗側,以便閃光燈是否閃光一目了然,並使用線性色調貼圖。檢查平鋪圖像的中心,以查看是否創建了一個大漸變來驗證閃光燈是否觸發。
測試的 API:
Pass:平鋪圖像的中心有一個大的漸變,意味著閃光燈發射了。
test_param_flash_mode_1.jpg

test_param_flash_mode_1_tile.jpg
test_param_flash_mode_2.jpg

test_param_flash_mode_2_tile.jpg
test_param_noise_reduction
測試android.noiseReduction.mode參數在設置時是否正確應用。在相機光線昏暗的情況下拍攝圖像。使用高模擬增益來確保捕獲的圖像有噪聲。捕獲三個圖像,用於 NR 關閉、“快速”和“高質量”。還捕獲具有低增益和 NR 關閉的圖像,並將其方差用作基線。 SNR(信噪比)越高,圖像質量越好。
測試的 API:
Pass: SNR 隨降噪模式的不同而變化,表現類似下圖。

test_param_noise_reduction_plot_SNRs.png
0:關閉,1:快速,2:HQ,3:MIN,4:ZSL
test_param_noise_reduction_high_gain_nr=0.jpg

test_param_noise_reduction_high_gain_nr=1.jpg
test_param_noise_reduction_high_gain_nr=2.jpg
test_param_noise_reduction_high_gain_nr=3.jpg
test_param_noise_reduction_low_gain.jpg
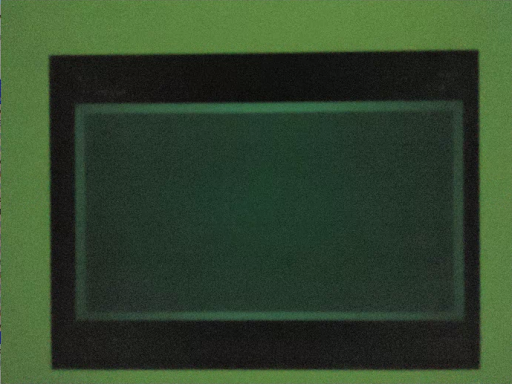
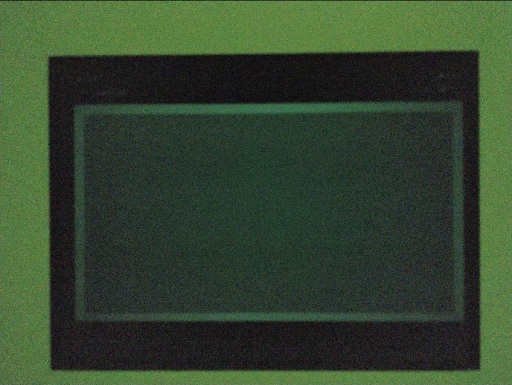
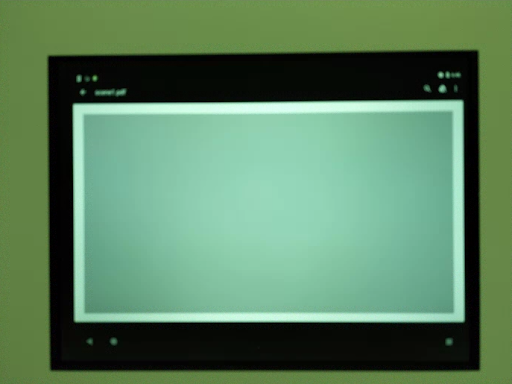
test_param_sensitivity
測試應用了android.sensor.sensitivity參數。該測試以 5 個步驟提高靈敏度,每次拍攝固定曝光。
測試的 API:
通過:中心 10% 的 RGB 表示隨著靈敏度的提高而變亮。

test_param_sensitivity_iso=0055.jpg

test_param_sensitive_iso=1819.jpg

test_param_sensitive_iso=3583.jpg

test_param_sensitive_iso=5347.jpg

test_param_sensitive_iso=7111.jpg
test_param_sensitivity_plot.png
test_param_shading_mode
測試應用了android.shading.mode參數。
測試的 API:
-
android.hardware.camera2.CaptureRequest#SHADING_MODE -
android.hardware.camera2.CaptureRequest#STATISTICS_LENS_SHADING_MAP_MODE -
android.hardware.camera2.CaptureResult#STATISTICS_LENS_SHADING_CORRECTION_MAP
Pass:切換著色模式並按預期修改鏡頭著色圖。
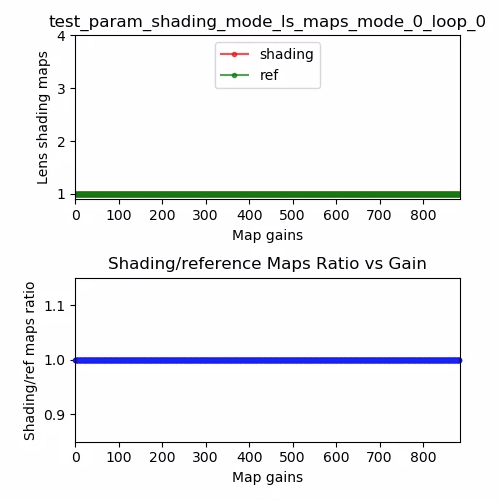
test_param_shading_mode_ls_maps_mode_0_loop_0.png
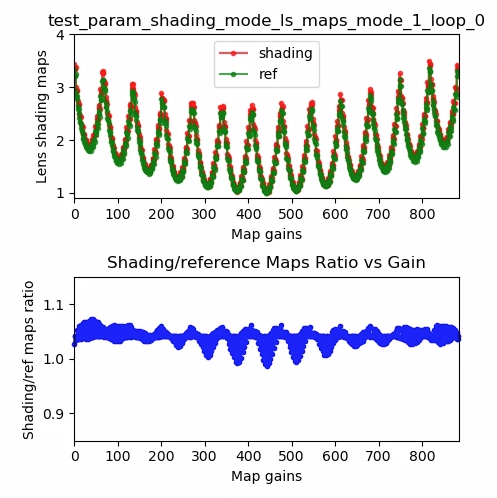
test_param_shading_mode_ls_maps_mode_1_loop_0.png
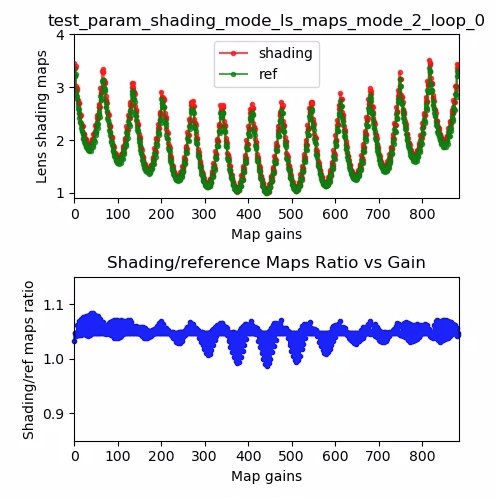
test_param_shading_mode_ls_maps_mode_2_loop_0.png
test_param_tonemap_mode
測試應用了 android.tonemap.mode 參數。將不同的色調映射曲線應用於每個 R、G、B 通道,並檢查輸出圖像是否按預期進行了修改。該測試由兩個測試組成,test1 和 test2。
測試的 API:
-
android.hardware.camera2.CaptureRequest#TONEMAP_CURVE -
android.hardware.camera2.CaptureRequest#TONEMAP_MODE
經過:
- test1:兩個圖像都有一個線性色調圖,但 n=1 有一個更陡峭的梯度。對於 n=1 圖像,G(綠色)通道更亮。
- test2:相同的色調圖,但長度不同。圖像是一樣的。
 |  | |
| test_param_tonemap_mode_n=0.jpg | test_param_tonemap_mode_n=1.jpg |
test_post_raw_sensitivity_boost
檢查後 RAW 靈敏度提升。捕獲一組具有不同靈敏度的 RAW 和 YUV 圖像,發布 RAW 靈敏度提升組合併檢查輸出像素平均值是否與請求設置匹配。
測試的 API:
-
android.hardware.camera2.CameraCharacteristics#CONTROL_POST_RAW_SENSITIVITY_BOOST_RANGE -
android.hardware.camera2.CameraMetadata#REQUEST_AVAILABLE_CAPABILITIES_RAW -
android.hardware.camera2.CaptureRequest#CONTROL_POST_RAW_SENSITIVITY_BOOST -
android.hardware.camera2.CaptureRequest#SENSOR_SENSITIVITY
通過: RAW 圖像隨著增強的增加而變暗,而 YUV 圖像的亮度保持不變

test_post_raw_sensitivity_boost_raw_s=3583_boost=0100.jpg

test_post_raw_sensitive_boost_raw_s=1792_boost=0200.jpg

test_post_raw_sensitivity_boost_raw_s=0896_boost=0400.jpg

test_post_raw_sensitive_boost_raw_s=0448_boost=0800.jpg

test_post_raw_sensitivity_boost_raw_s=0224_boost=1600.jpg

test_post_raw_sensitivity_boost_raw_s=0112_boost=3199.jpg
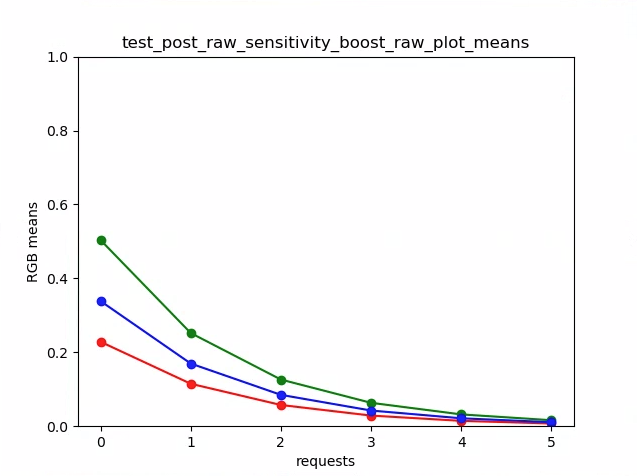
test_post_raw_sensitivity_boost_raw_plot_means.png

test_post_raw_sensitivity_boost_yuv_s=0112_boost=3199.jpg

test_post_raw_sensitive_boost_yuv_s=0448_boost=0800.jpg

test_post_raw_sensitivity_boost_yuv_s=0896_boost=0400.jpg

test_post_raw_sensitivity_boost_yuv_s=1792_boost=0200.jpg

test_post_raw_sensitivity_boost_yuv_s=3585_boost=0100.jpg
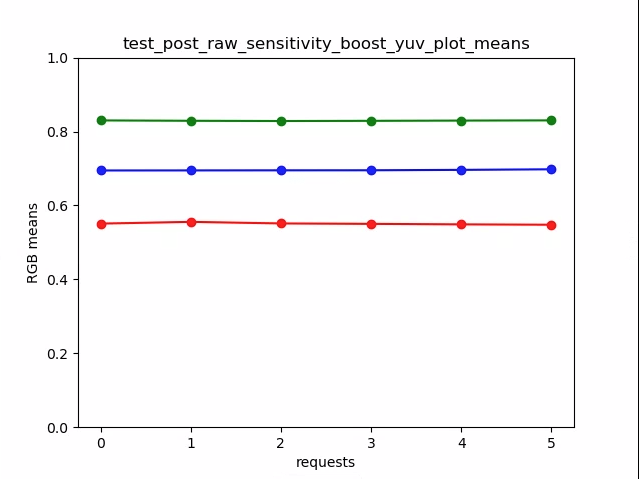
test_post_raw_sensitivity_boost_yuv_plot_means.png
test_raw_burst_sensitivity
捕獲一組增益增加的原始圖像並測量噪聲。一次只捕獲原始數據。
測試的 API:
-
android.hardware.camera2.CameraCharacteristics#SENSOR_INFO_ACTIVE_ARRAY_SIZE -
android.hardware.camera2.CameraCharacteristics#SENSOR_INFO_SENSITIVITY_RANGE -
android.hardware.camera2.CameraCharacteristics#SENSOR_INFO_WHITE_LEVEL -
android.hardware.camera2.CameraCharacteristics#SENSOR_MAX_ANALOG_SENSITIVITY -
android.hardware.camera2.CameraMetadata#REQUEST_AVAILABLE_CAPABILITIES_RAW
傳球:隨著增益的增加,每一次射擊都比前一次更嘈雜。
使用中心統計網格單元格的方差。
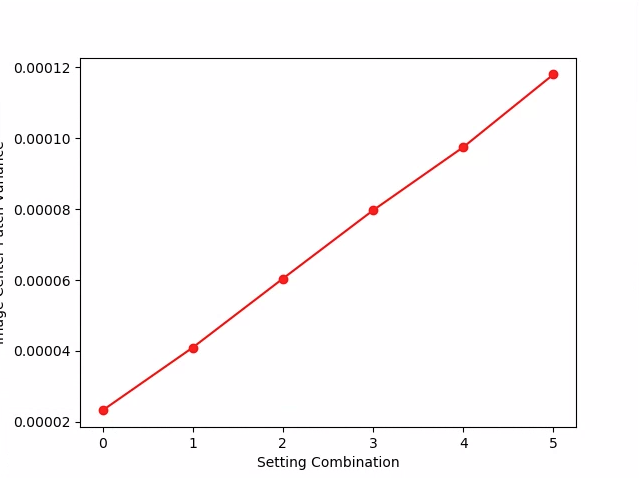
test_raw_burst_sensitivity_variance.png
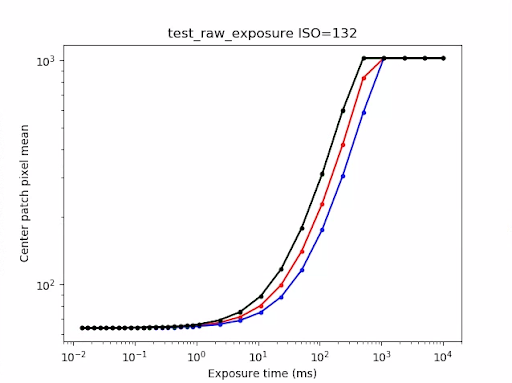
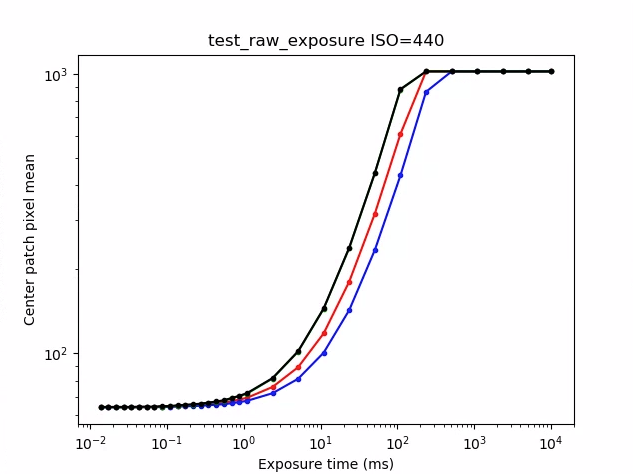
test_raw_exposure
捕獲一組增加曝光時間的原始圖像並測量像素值。
測試的 API:
-
android.hardware.camera2.CameraMetadata#REQUEST_AVAILABLE_CAPABILITIES_RAW -
android.hardware.camera2.CaptureRequest#SENSOR_EXPOSURE_TIME
通過:增加 ISO(增益)使像素對光更敏感,因此繪圖向左移動。
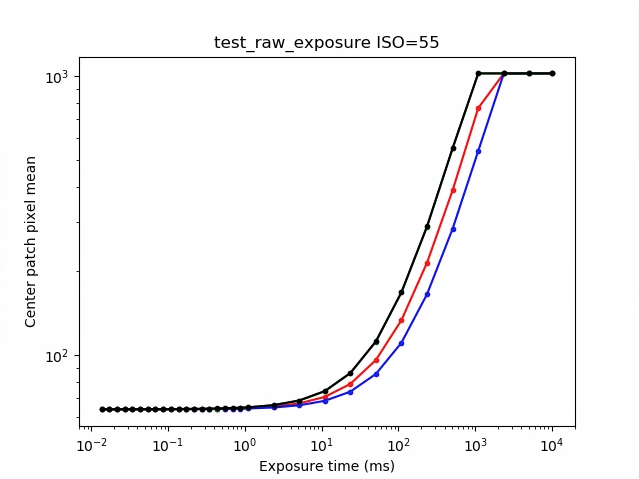
test_raw_exposure_s=55.png
(10⁰ 是 1 毫秒,10¹ 是 10 毫秒,10⁻¹ 是 0.1 毫秒)
test_raw_exposure_s=132.png
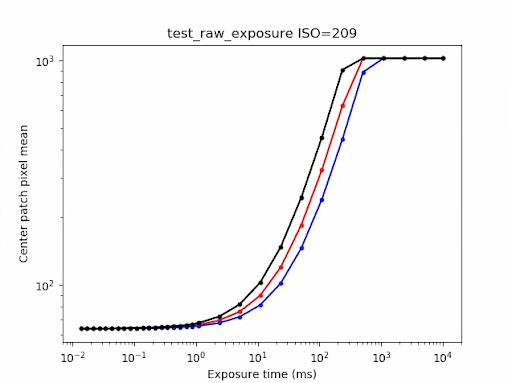
test_raw_exposure_s=209.png
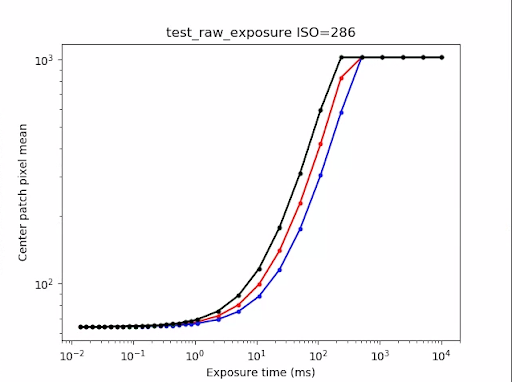
test_raw_exposure_s=286.png
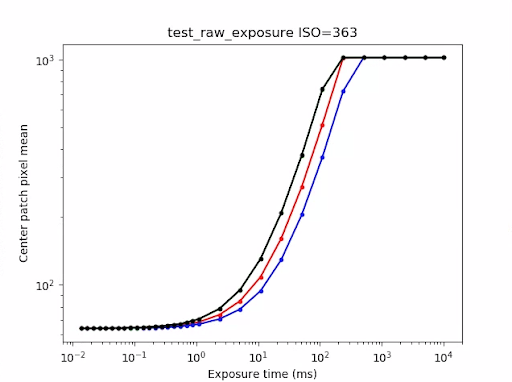
test_raw_exposure_s=363.png
test_raw_exposure_s=440.png
test_raw_sensitivity
捕獲一組靈敏度提高的原始圖像,並測量圖像中心 10% 的噪聲(方差)。測試每個鏡頭是否比前一個鏡頭更嘈雜。
測試的 API:
-
android.hardware.camera2.CameraCharacteristics#SENSOR_INFO_PRE_CORRECTION_ACTIVE_ARRAY_SIZE -
android.hardware.camera2.CameraCharacteristics#SENSOR_INFO_SENSITIVITY_RANGE -
android.hardware.camera2.CameraCharacteristics#SENSOR_INFO_WHITE_LEVEL -
android.hardware.camera2.CameraCharacteristics#SENSOR_MAX_ANALOG_SENSITIVITY -
android.hardware.camera2.CameraMetadata#REQUEST_AVAILABLE_CAPABILITIES_RAW
傳球:每次擊球時差異都會增加。
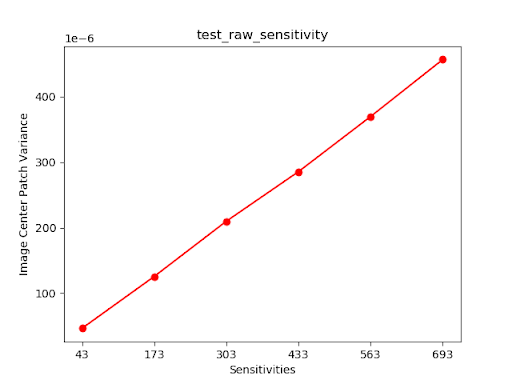
test_raw_sensitivity_variance.png
test_reprocess_noise_reduction
測試android.noiseReduction.mode是否應用於重新處理請求。在相機昏暗的情況下捕獲重新處理的圖像。使用高模擬增益來確保捕獲的圖像有噪聲。捕獲三個重新處理的圖像,用於 NR 關閉、“快速”和“高質量”。以低增益和關閉 NR 捕獲重新處理的圖像,並將其方差用作基線。
測試的 API:
通過: FAST >= OFF,HQ >= FAST,HQ >> OFF
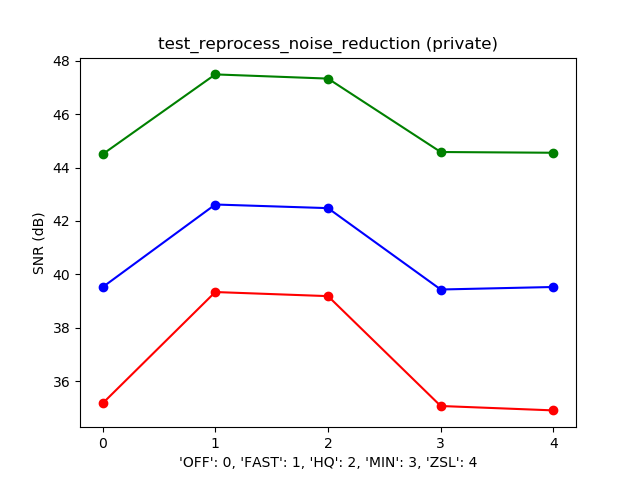
典型 SNR 與 NR_MODE 圖
test_tonemap_sequence
使用不同的色調映射曲線測試一系列鏡頭。使用線性色調圖捕獲 3 次手動拍攝。使用默認色調映射捕獲 3 次手動拍攝。計算每個連續幀對之間的增量。
測試的 API:
Pass:有 3 個相同的幀,後面跟著一組不同的 3 個相同的幀。

test_tonemap_sequence_i=0.jpg

test_tonemap_sequence_i=1.jpg

test_tonemap_sequence_i=2.jpg

test_tonemap_sequence_i=3.jpg

test_tonemap_sequence_i=4.jpg

test_tonemap_sequence_i=5.jpg
test_yuv_jpeg_all
測試所有報告的圖像捕獲大小和格式。使用帶有線性色調圖的手動請求,以便 YUV 和 JPEG 在由 its.image 模塊轉換時看起來相同。默認情況下不保存圖像,但可以通過啟用debug_mode來保存。
測試的 API:
-
android.hardware.camera2.CaptureRequest#TONEMAP_CURVE -
android.hardware.camera2.CaptureRequest#TONEMAP_MODE -
android.graphics.ImageFormat#JPEG
通過:所有圖像中心在 RGB 轉換圖像中具有最大 RMS(信號的均方根值)差異,具有 3% 的最高分辨率 YUV 圖像。
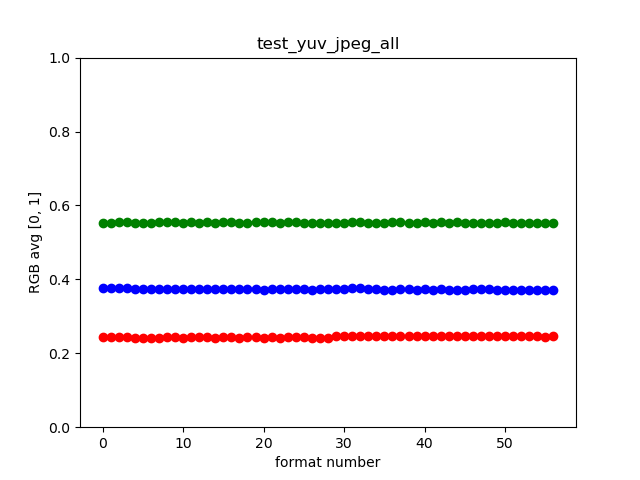
test_yuv_jpeg_all.png
test_yuv_plus_dng
測試報告的圖像捕獲大小和格式是否有效。
測試的 API:
通過:測試完成並返回請求的圖像。
test_yuv_plus_dng.jpg
test_yuv_plus_jpeg
測試捕獲單個幀作為 YUV 和 JPEG 輸出。使用帶有線性色調圖的手動請求,以便 YUV 和 JPEG 看起來相同(當由its.image模塊轉換時。)
測試的 API:
-
android.hardware.camera2.CaptureRequest#TONEMAP_CURVE -
android.hardware.camera2.CaptureRequest#TONEMAP_MODE -
android.graphics.ImageFormat#JPEG
通過: YUV 和 JPEG 圖像相似,並且具有小於 1% RMS(信號的均方根值)的差異。
 |  | |
| test_yuv_plus_jpg_jpg.jpg | test_yuv_plus_jpeg_yuv.jpg |
test_yuv_plus_raw
測試捕獲單個幀作為 RAW 和 YUV 輸出。使用帶有線性色調映射的手動請求,因此 RAW 和 YUV 應該是相同的。比較 RGB 轉換圖像的中心 10% RGB 值。記錄android.shading.mode 。
測試的 API:
-
android.hardware.camera2.CameraMetadata#REQUEST_AVAILABLE_CAPABILITIES_RAW -
android.hardware.camera2.CaptureRequest#COLOR_CORRECTION_MODE -
android.hardware.camera2.CaptureRequest#COLOR_CORRECTION_GAINS -
android.hardware.camera2.CaptureRequest#COLOR_CORRECTION_TRANSFORM -
android.hardware.camera2.CaptureRequest#CONTROL_AWB_MODE -
android.hardware.camera2.CaptureRequest#CONTROL_MODE -
android.hardware.camera2.CaptureRequest#SHADING_MODE -
android.hardware.camera2.CaptureRequest#TONEMAP_CURVE -
android.hardware.camera2.CaptureRequest#TONEMAP_MODE
通過: YUV 和 JPEG 圖像相似並且具有小於 3.5% RMS(信號的均方根值)的差異。
 |  | |
| test_yuv_plus_raw_shading=1_raw.jpg | test_yuv_plus_raw_shading=1_yuv.jpg |
test_yuv_plus_raw10
測試捕獲單個幀作為 RAW10 和 YUV 輸出。使用帶有線性色調映射的手動請求,因此 RAW 和 YUV 應該是相同的。比較 RGB 轉換圖像的中心 10% RGB 值。記錄android.shading.mode 。
測試的 API:
-
android.hardware.camera2.CameraMetadata#REQUEST_AVAILABLE_CAPABILITIES_RAW -
android.hardware.camera2.CaptureRequest#COLOR_CORRECTION_MODE -
android.hardware.camera2.CaptureRequest#COLOR_CORRECTION_GAINS -
android.hardware.camera2.CaptureRequest#COLOR_CORRECTION_TRANSFORM -
android.hardware.camera2.CaptureRequest#CONTROL_AWB_MODE -
android.hardware.camera2.CaptureRequest#CONTROL_MODE -
android.hardware.camera2.CaptureRequest#SHADING_MODE -
android.hardware.camera2.CaptureRequest#TONEMAP_CURVE -
android.hardware.camera2.CaptureRequest#TONEMAP_MODE -
android.hardware.graphics.ImageFormat#RAW10
通過: RAW10 和 YUV 圖像相似,並且具有小於 3.5% RMS(信號的均方根值)的差異。
 |  | |
| test_yuv_plus_raw10_shading=1_raw.jpg | test_yuv_plus_raw10_shading=1_yuv.jpg |
test_yuv_plus_raw12
測試捕獲單個幀作為 RAW12 和 YUV 輸出。使用帶有線性色調映射的手動請求,因此 RAW 和 YUV 應該是相同的。比較 RGB 轉換圖像的中心 10% RGB 值。記錄android.shading.mode 。
測試的 API:
-
android.hardware.camera2.CameraMetadata#REQUEST_AVAILABLE_CAPABILITIES_RAW -
android.hardware.camera2.CaptureRequest#COLOR_CORRECTION_MODE -
android.hardware.camera2.CaptureRequest#COLOR_CORRECTION_GAINS -
android.hardware.camera2.CaptureRequest#COLOR_CORRECTION_TRANSFORM -
android.hardware.camera2.CaptureRequest#CONTROL_AWB_MODE -
android.hardware.camera2.CaptureRequest#CONTROL_MODE -
android.hardware.camera2.CaptureRequest#SHADING_MODE -
android.hardware.camera2.CaptureRequest#TONEMAP_CURVE -
android.hardware.camera2.CaptureRequest#TONEMAP_MODE -
android.hardware.graphics.ImageFormat#RAW12
通過: RAW12 和 YUV 圖像相似,並且具有小於 3.5% RMS(信號的均方根值)的差異。
 |  | |
| test_yuv_plus_raw12_shading=1_raw.jpg | test_yuv_plus_raw12_shading=1_yuv.jpg |
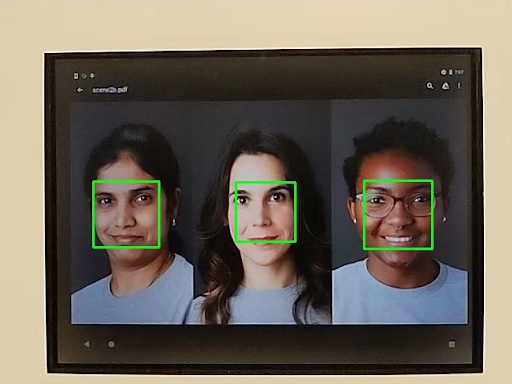
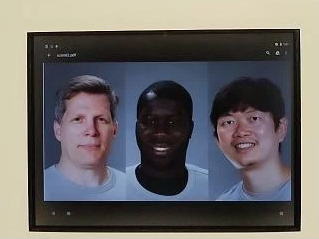
場景2_a
scene2_a 有三個灰色背景和中性服裝的面孔。選擇面部以具有廣泛的膚色。
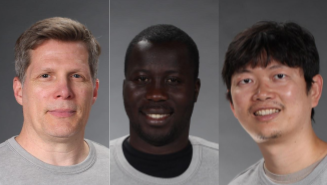
場景2_a
測試效果
捕獲支持的相機效果的幀並檢查它們是否正確生成。該測試僅檢查效果OFF和MONO ,但會保存所有支持效果的圖像。
測試的 API:
-
android.hardware.camera2.CameraCharacteristics#CONTROL_AVAILABLE_EFFECTS -
android.hardware.camera2.CaptureRequest#CONTROL_EFFECT_MODE
Pass:捕獲效果OFF的場景圖像和效果設置為MONO的單色圖像。
test_effects_MONO.jpg
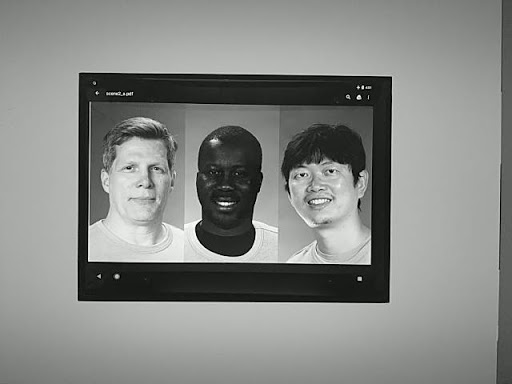
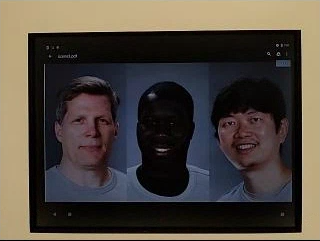
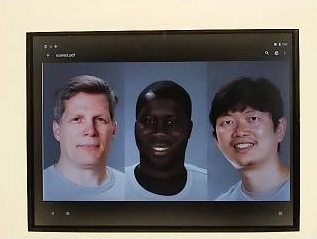
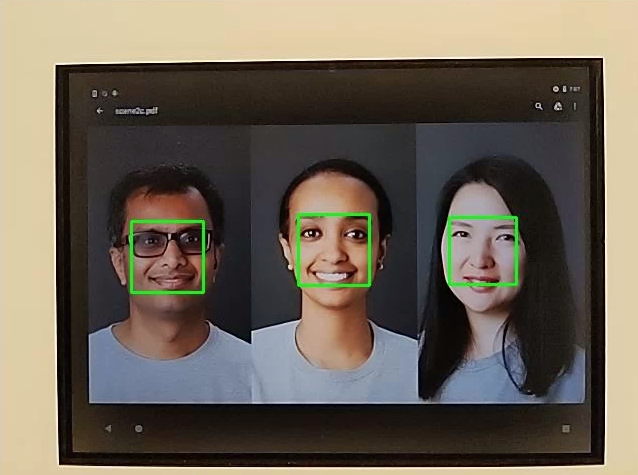
test_faces
測試人臉檢測。圖像被保存,但盒子和地標信息在test_faces_stdout.txt中列出。
測試的 API:
-
android.hardware.camera2.CaptureResult#STATISTICS_FACES -
android.hardware.camera2.CaptureResult#STATISTICS_FACE_DETECT_MODE
Pass:從圖像中檢測到至少一張人臉。
test_format_combos
測試輸出格式的不同組合。
測試的 API:
android.hardware.camera2.CameraCharacteristics#SCALER_STREAM_CONFIGURATION_MAPandroid.hardware.camera2.params.StreamConfigurationMap#getOutputSizes()android.hardware.camera2.CameraCaptureSession#captureBurst()
通過:成功捕獲所有組合。
test_jpeg_quality
測試相機 JPEG 壓縮質量。通過android.jpeg.quality步進 JPEG 質量並確保量化表正確更改。
測試的 API:
Pass:量化矩陣隨著質量的增加而減小。 (矩陣表示除法因子。)
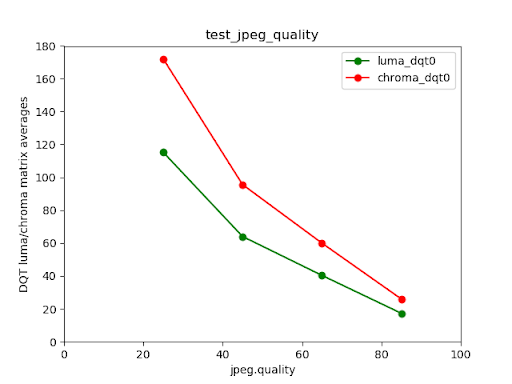
Pixel 4 後置攝像頭亮度/色度 DQT 矩陣平均值與 JPEG 質量
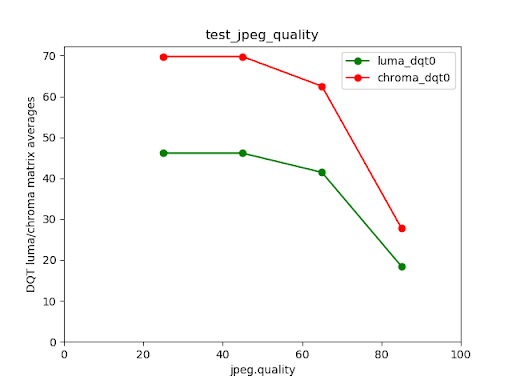
失敗的測試示例
請注意,對於質量非常低的圖像(jpeg.quality < 50),量化矩陣中的壓縮不會增加。
test_num_faces
測試人臉檢測。
測試的 API:
-
android.hardware.camera2.CaptureResult#STATISTICS_FACES -
android.hardware.camera2.CaptureResult#STATISTICS_FACE_DETECT_MODE
Pass:找到三個面。
test_num_faces_fd_mode_1.jpg
場景2_b
test_auto_per_frame_control
測試自動捕獲請求的PER_FRAME_CONTROL屬性。
測試的 API:
-
android.hardware.camera2.CaptureRequest#COLOR_CORRECTION_GAINS -
android.hardware.camera2.CaptureRequest#COLOR_CORRECTION_TRANSFORM -
android.hardware.camera2.CaptureResult#CONTROL_AE_STATE -
android.hardware.camera2.CaptureResult#CONTROL_AWB_STATE -
android.hardware.camera2.CaptureRequest#CONTROL_POST_RAW_SENSITIVITY_BOOST -
android.hardware.camera2.CaptureRequest#LENS_FOCUS_DISTANCE -
android.hardware.camera2.CaptureRequest#SENSOR_EXPOSURE_TIME -
android.hardware.camera2.CaptureRequest#SENSOR_SENSITIVITY -
android.hardware.camera2.CaptureRequest#STATISTICS_LENS_SHADING_MAP_MODE -
android.hardware.camera2.CaptureResult#STATISTICS_LENS_SHADING_CORRECTION_MAP -
android.hardware.camera2.CaptureRequest#TONEMAP_CURVE -
android.hardware.camera2.CaptureRequest#TONEMAP_MODE
通過:所有PER_FRAME_CONTROL屬性都存在。
test_auto_per_frame_control_frame_1.jpg
test_auto_per_frame_control_frame_10.jpg
test_auto_per_frame_control_frame_29.jpg

test_auto_per_frame_control_plot.png
test_num_faces
測試人臉檢測,增加人臉場景中的膚色多樣性。
測試的 API:
-
android.hardware.camera2.CaptureResult#STATISTICS_FACES -
android.hardware.camera2.CaptureResult#STATISTICS_FACE_DETECT_MODE
通過:找到 3 個面孔。
test_num_faces_fd_mode_1.jpg
場景2_c
test_num_faces
測試人臉檢測,增加人臉場景中的膚色多樣性。
測試的 API:
-
android.hardware.camera2.CaptureResult#STATISTICS_FACES -
android.hardware.camera2.CaptureResult#STATISTICS_FACE_DETECT_MODE
通過:找到 3 個面孔。
test_num_faces_fd_mode_1.jpg
test_jpeg_capture_perf_class
測試 CDD 中第 2.2.7.2 節中指定的 S 性能等級的 JPEG 捕獲延遲。
通過:對於 1080p 分辨率,camera2 JPEG 捕獲延遲必須小於 1000 毫秒,由 CTS 攝像機 PerformanceTest 在 ITS 照明條件 (3000K) 下對兩個主攝像機進行測量。
test_camera_launch_perf_class
按照 CDD 中指定的第 2.2.7.2 節相機測試 S 性能等級的相機啟動延遲。
通過:必須有 camera2 啟動延遲(打開相機到第一個預覽幀)< 600 毫秒,由 CTS 相機 PerformanceTest 在 ITS 照明條件 (3000K) 下為兩個主相機測量。
場景2_d
test_num_faces
測試人臉檢測,增加人臉場景中的膚色多樣性。
測試的 API:
-
android.hardware.camera2.CaptureResult#STATISTICS_FACES -
android.hardware.camera2.CaptureResult#STATISTICS_FACE_DETECT_MODE
通過:找到 3 個面孔。
場景2_e
test_continuous_picture
使用捕獲請求首先設置android.control.afMode = 4 (CONTINUOUS_PICTURE).
測試的 API:
android.hardware.camera2.CaptureRequest#CONTROL_CAPTURE_INTENTandroid.hardware.camera2.CaptureResult#CONTROL_POST_RAW_SENSITIVITY_BOOST
通過: 3A 系統在 50 幀捕獲結束時穩定下來。
test_num_faces
測試人臉檢測,增加人臉場景中的膚色多樣性。
測試的 API:
-
android.hardware.camera2.CaptureResult#STATISTICS_FACES -
android.hardware.camera2.CaptureResult#STATISTICS_FACE_DETECT_MODE
通過:找到 3 個面孔。
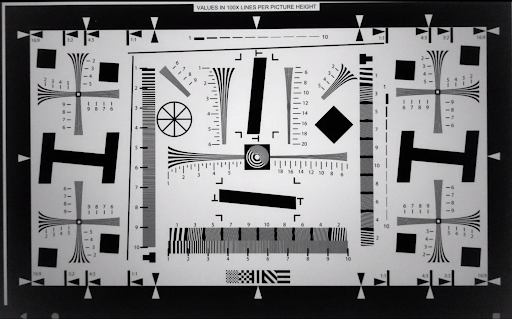
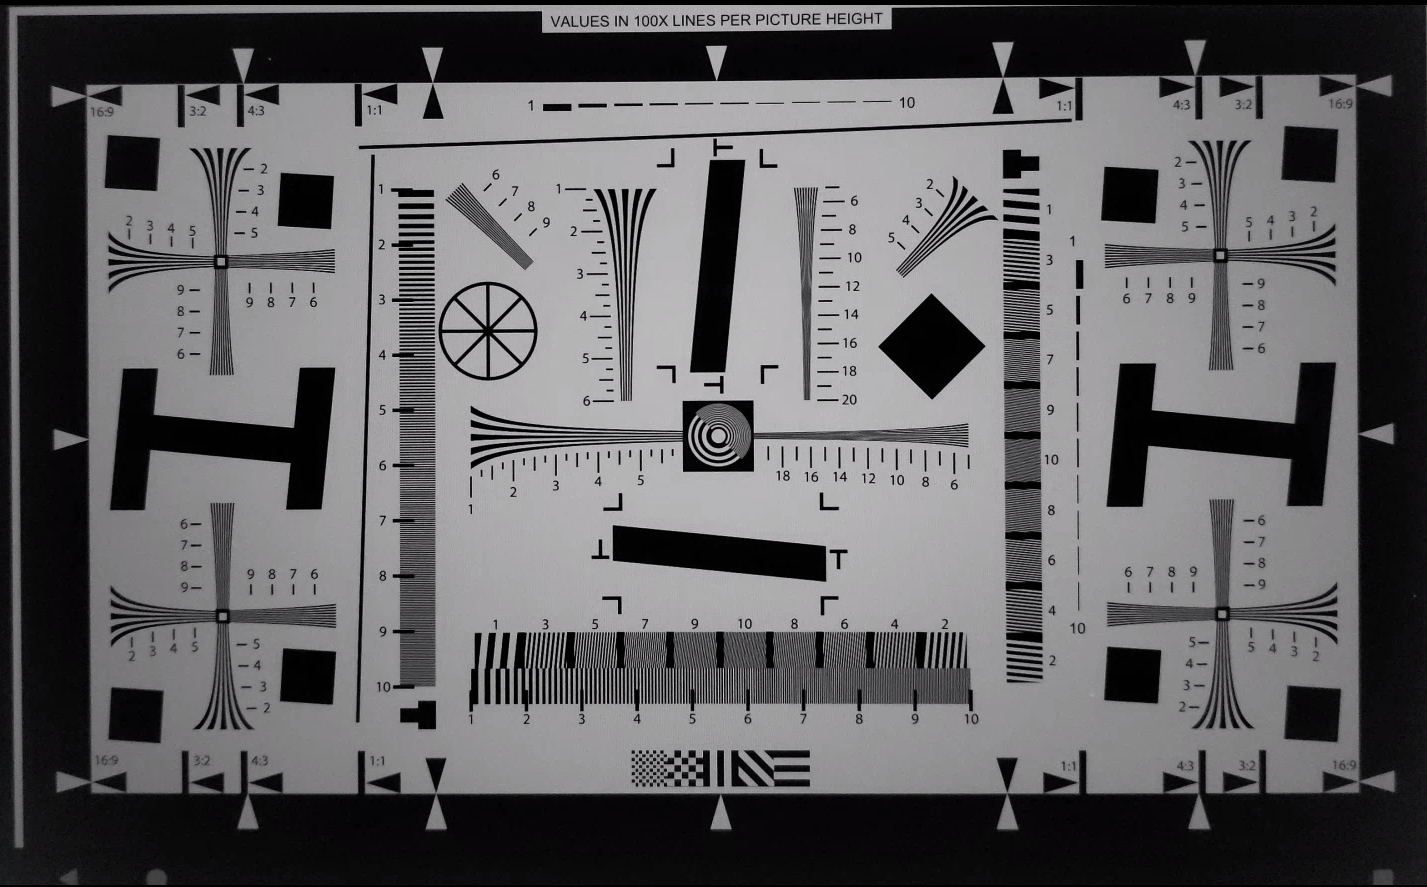
場景3
Scene3 使用 ISO12233 圖表,大多數測試使用圖表提取器方法來查找場景中的圖表。出於這個原因,大多數保存的圖像沒有像場景1、2或4的圖像那樣有邊框,而只有圖表。
test_3a_consistency
測試 3A 一致性。
測試的 API:
-
android.hardware.camera2.CaptureRequest#COLOR_CORRECTION_GAINS -
android.hardware.camera2.CaptureRequest#COLOR_CORRECTION_TRANSFORM -
android.hardware.camera2.CaptureRequest#LENS_FOCUS_DISTANCE -
android.hardware.camera2.CaptureResult#SENSOR_EXPOSURE_TIME -
android.hardware.camera2.CaptureResult#SENSOR_SENSITIVITY
通過: 3A 在容差範圍內將曝光、增益、awb(自動白平衡)和 fd(焦距)收斂三倍。
test_edge_enhancement
測試android.edge.mode參數是否正確應用。為每個邊緣模式捕獲非再處理圖像,並返回輸出圖像的清晰度和捕獲結果元數據。處理具有給定邊緣模式、靈敏度、曝光時間、焦距和輸出表面參數的捕獲請求。
通過:快速模式並不比 HQ(高質量)模式更清晰。
測試的 API:
受影響的相機參數:
-
EDGE_MODE
test_edge_enhancement_edge=0.jpg

test_edge_enhancement_edge=1.jpg(快速模式)
test_edge_enhancement_edge=2.jpg(高質量模式)
test_flip_mirror
根據CDD 第 7.5.2 節前置攝像頭 [C-1-5]測試圖像是否正確定向。
鏡像、翻轉或旋轉的圖像可以通過中心附近的菱形特徵來識別。
通過:圖像未翻轉、鏡像或旋轉。
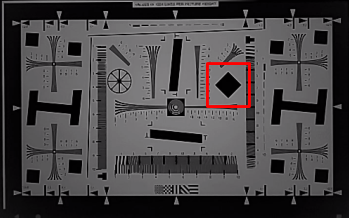
test_flip_mirror_scene_patch.jpg
test_lens_movement_reporting
測試是否正確報告了鏡頭移動標誌。拍攝 24 張連拍圖像,前 12 幀在最佳焦距處(如 3A 所示),最後 12 幀在最短焦距處。在第 12 幀附近,鏡頭移動導致清晰度下降。隨著鏡頭移動到最終位置,清晰度最終會穩定下來。 The lens movement flag should be asserted in all frames where the sharpness is intermediate to sharpness in the first 10 frames with the lens stationary at optimum focal distance, and the final 10 frames where the lens is stationary in the minimum focal distance. The exact frame the lens moves isn't important: what is checked is that the movement flag is asserted when the lens is moving.
APIs tested:
-
android.hardware.camera2.CameraCharacteristics#LENS_INFO_MINIMUM_FOCUS_DISTANCE -
android.hardware.camera2.CaptureResult#LENS_STATE -
android.hardware.camera2.CaptureResult#LENS_FOCUS_DISTANCE -
android.hardware.camera2.CaptureResult#SENSOR_TIMESTAMP -
android.hardware.camera2.CaptureRequest#LENS_FOCUS_DISTANCE
Pass: Lens movement flag is True in the frame with sharpness change.
test_lens_position
Tests if the focus position is properly reported for moving lenses.
APIs tested:
-
android.hardware.camera2.CameraCharacteristics#LENS_INFO_HYPERFOCAL_DISTANCE -
android.hardware.camera2.CameraCharacteristics#LENS_INFO_MINIMUM_FOCUS_DISTANCE -
android.hardware.camera2.CaptureResult#LENS_STATE -
android.hardware.camera2.CaptureResult#SENSOR_TIMESTAMP
Pass: Correct focus positions are reported.
test_reprocess_edge_enhancement
Returns sharpness of the output images and the capture result metadata. Processes a capture request with a given edge mode, sensitivity, exposure time, focus distance, output surface parameter, and reprocess format.
APIs tested:
-
android.hardware.camera2.CaptureRequest#EDGE_MODE -
android.hardware.camera2.CaptureRequest#REPROCESS_EFFECTIVE_EXPOSURE_FACTOR
Pass: Sharpness for the different edge modes is correct.
scene4
Scene4 consists of a black circle on a white background inside a square.

scene4
test_aspect_ratio_and_crop
Takes pictures of a circle inside of a square over all formats. Verifies that the aspect ratio of the circle doesn't change, the cropped images keep the circle in center, and the circle size doesn't change for a constant format or with different resolution (field of view check).
APIs tested:
-
android.hardware.camera2.CaptureResult#LENS_DISTORTION -
android.hardware.camera2.CaptureResult#LENS_FOCAL_LENGTH -
android.hardware.camera2.CaptureResult#LENS_INTRINSIC_CALIBRATION
Pass: Images aren't stretched, the center of images don't differ by more than 3%, and the maximum possible FOV (field of view) is preserved.
test_multi_camera_alignment
Tests the multi camera system parameters related to camera spacing. Using the multi-camera physical sub-cameras, takes a picture with one of the physical cameras. Finds the circle center. Projects the circle center to the world coordinates for each camera. Compares the difference between the cameras' circle centers in world coordinates. Reprojects the world coordinate back to pixel coordinates and compares against originals as a validity check. Compares the circle sizes checking if the focal lengths of the cameras are different.
APIs tested:
-
android.hardware.camera2.CameraCharacteristics#getPhysicalCameraIds() -
android.hardware.camera2.CameraCharacteristics#LENS_DISTORTION -
android.hardware.camera2.CameraCharacteristics#LENS_INTRINSIC_CALIBRATION -
android.hardware.camera2.CameraCharacteristics#LENS_POSE_ROTATION -
android.hardware.camera2.CameraCharacteristics#LENS_POSE_TRANSLATION -
android.hardware.camera2.CameraMetadata#REQUEST_AVAILABLE_CAPABILITIES_LOGICAL_MULTI_CAMERA -
android.hardware.camera2.CaptureRequest#SCALER_CROP_REGION -
android.hardware.camera2.CaptureRequest#DISTORTION_CORRECTION_MODE
Pass: Focal lengths and circles sizes are consistent.
scene5/diffuser
test_lens_shading_and_color_uniformity
Tests that the lens shading correction is applied appropriately, and color of a monochrome uniform scene is evenly distributed. Performs this test on a YUV frame with auto 3A. Lens shading is evaluated based on the y channel. Measures the average y value for each sample block specified, and determines pass or fail by comparing with the center y value. The color uniformity test is evaluated in r/g and b/g space.
APIs tested:
-
android.hardware.camera2.CaptureRequest#CONTROL_AE_MODE -
android.hardware.camera2.CaptureRequest#CONTROL_AWB_MODE
Pass: At the specified radius of the image, the variance of r/g and b/g value must be less than 20% to pass the test.
scene6
Scene6 is a grid of small circles with a square in one corner to indicate orientation. The small circles are needed to test zoom function over a large range.
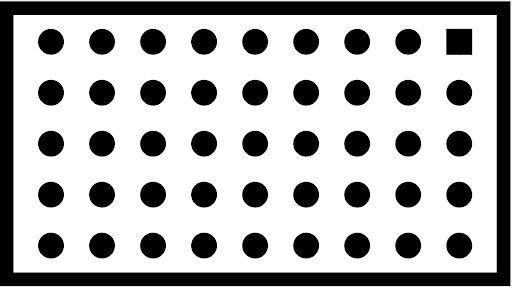
scene6
test_zoom
Tests the camera zoom behavior. Takes captures over the zoom range and checks if the circles get bigger as the camera zooms in.
APIs tested:
-
android.hardware.camera2.CameraCharacteristics#CONTROL_ZOOM_RATIO_RANGE -
android.hardware.camera2.CameraCharacteristics#LENS_INFO_AVAILABLE_FOCAL_LENGTHS -
android.hardware.camera2.CaptureRequest#CONTROL_ZOOM_RATIO -
android.hardware.camera2.CaptureResult#LENS_FOCAL_LENGTH
Pass: Relative size of captured circle is accurate against requested zoom ratio to ensure camera is zooming correctly.
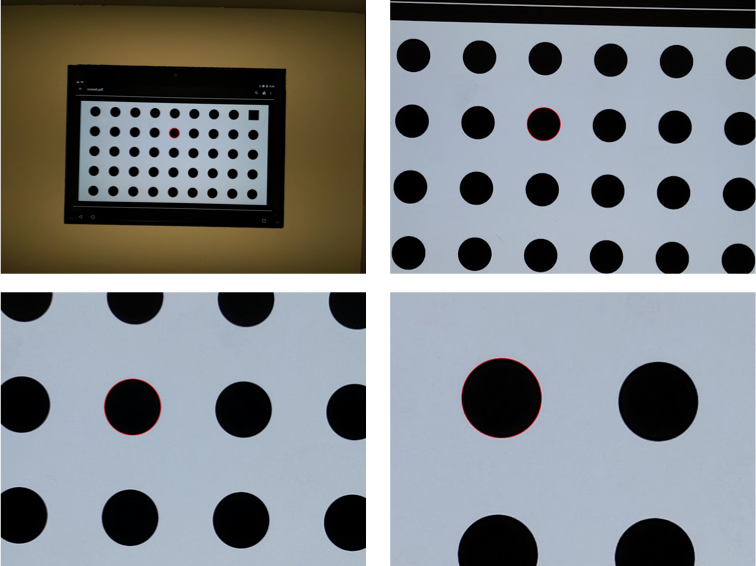
test_zoom to find the contour of the circle closest to the center.
scene_change
test_scene_change
The scene change makes use of the tablet displaying a face scene and then turns the tablet on and off to create a scene change. The scene reuses scene2_e, but is in a separate scene because of the required tablet control. Additionally, for manual testing, the scene change can be accomplished by waving your hand in front of the camera.
APIs tested:
Pass: The android.control.afSceneChange flag is asserted with a scene change.
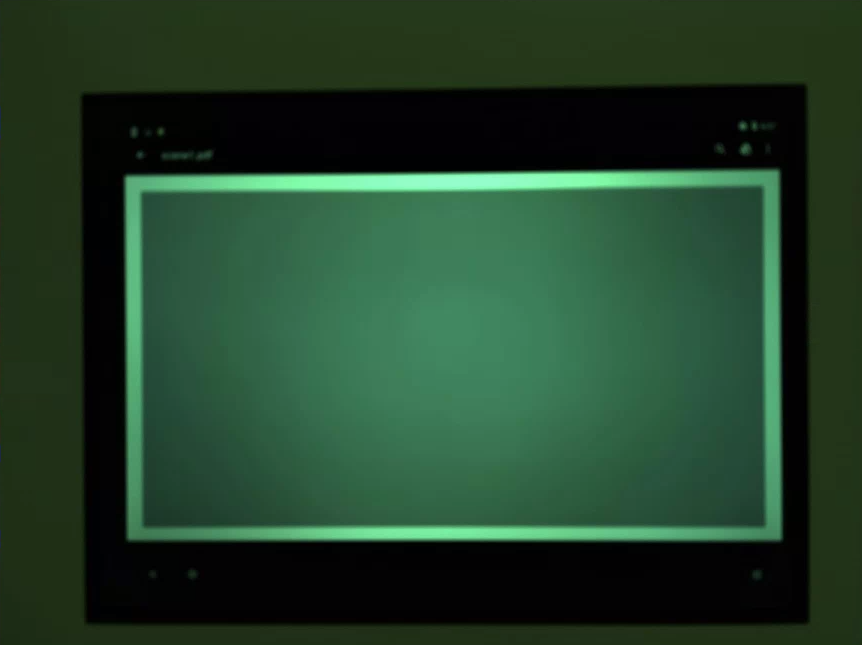
sensor_fusion
Sensor fusion tests require specific phone movement in front of a checkerboard pattern. The sensor_fusion tests can be automated with the Sensor Fusion Box .
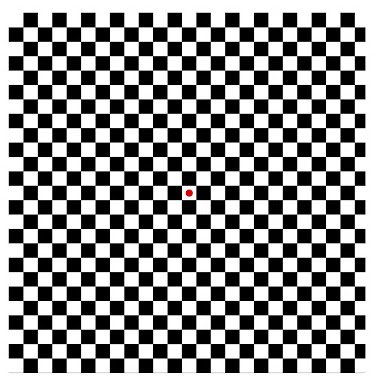
Image of checkerboard
test_multi_camera_frame_sync
Tests that frame timestamps captured by logical camera are within 10 ms by computing angles of squares within the checkerboard to determine the timestamp.
APIs tested:
-
android.hardware.camera2.CameraCharacteristics#LOGICAL_MULTI_CAMERA_SENSOR_SYNC_TYPE -
android.hardware.camera2.CameraCharacteristics#getPhysicalCameraIds() -
android.hardware.camera2.CameraMetadata#REQUEST_AVAILABLE_CAPABILITIES_LOGICAL_MULTI_CAMERA -
android.hardware.camera2.params.OutputConfiguration#setPhysicalCameraId()
Pass: Angle between images from each camera doesn't change appreciably as phone is rotated.
test_sensor_fusion
Tests the timestamp difference between the camera and the gyroscope for AR and VR applications. Phone is rotated 90 degrees 10 times in front of the checkerboard pattern. Motion is about 2 s round trip. This test is skipped if no gyroscope is included or if the REALTIME parameter is not enabled.
The test_sensor_fusion test generates a number of plots. The two most important plots for debugging are:
test_sensor_fusion_gyro_events: Shows the gyroscope events for the phone during the test. Movement in the x and y direction implies the phone isn't securely mounted on the mounting plate, reducing the probability of the test passing. The number of cycles in the plot depends on the write speed for saving frames.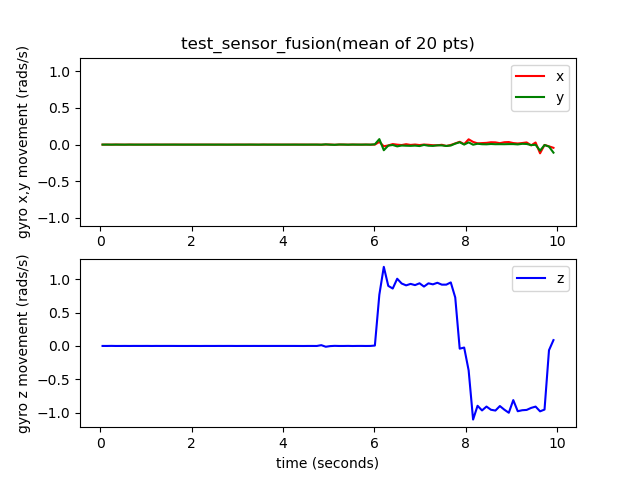
test_sensor_fusion_gyro_events
test_sensor_fusion_plot_rotations: Shows the alignment of the gyroscope and camera events. This plot must show matching movement between camera and gyroscope to +/-1 ms.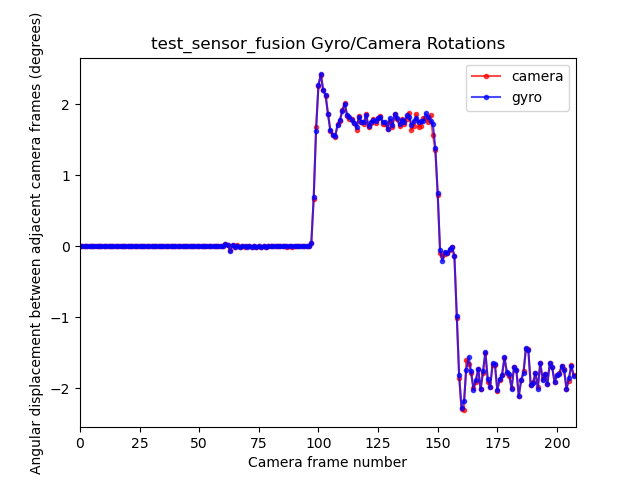
test_sensor_fusion_plot_rotations
APIs tested:
-
android.hardware.camera2.CameraCharacteristics#LENS_FACING -
android.hardware.camera2.CaptureRequest#CONTROL_AE_TARGET_FPS_RANGE -
android.hardware.camera2.CaptureRequest#SENSOR_FRAME_DURATION -
android.hardware.camera2.CaptureRequest#SENSOR_TIMESTAMP -
android.hardware.camera2.CaptureResult#SENSOR_ROLLING_SHUTTER_SKEW
Pass: Camera and gyroscope timestamps' offset is less than 1 ms as per CDD section 7.3.9 High Fidelity Sensors [C-2-14] .