
이 페이지는 Android CTS(Compatibility Test Suite) Verifier의 일부인 ITS(Camera Image Test Suite)에서 테스트의 전체 목록을 제공합니다. ITS 테스트는 기능 테스트입니다. 즉, 이미지 품질을 측정하지 않지만 광고된 모든 카메라 기능이 예상대로 작동합니다. 이 문서를 통해 개발자와 테스터는 개별 테스트가 수행하는 작업과 테스트 실패를 디버그하는 방법을 이해할 수 있습니다.
테스트는 다음과 같이 장면별로 그룹화됩니다.
- scene0 : 메타데이터, 지터, 자이로스코프, 진동 캡처
- scene1 : 노출, 감도, EV 보정, YUV vs JPEG/RAW
- scene2 : 얼굴 감지
- scene3 : 에지 향상, 렌즈 이동
- scene4 : 종횡비, 자르기, 시야
- scene5 : 렌즈 음영
- 장면6 : 줌
- sensor_fusion : 카메라/자이로스코프 타이밍 오프셋
각 장면에 대한 설명은 개별 섹션을 참조하십시오.
장면0
Scene0 테스트에는 특정 장면 정보가 필요하지 않습니다. 그러나 자이로스코프 및 진동 테스트를 위해서는 전화기가 고정되어 있어야 합니다.
test_burst_capture
전체 캡처 파이프라인이 전체 크기 캡처 속도와 CPU 시간을 따라갈 수 있는지 확인합니다.
테스트한 API:
통과: 전체 크기 이미지의 버스트를 캡처하고 카메라는 시간 초과를 방지할 만큼 충분히 빠릅니다.
test_capture_result_dump
수동 캡처에서 캡처 결과가 반환되는지 테스트한 다음 덤프합니다.
테스트한 API:
통과: 캡처를 완료하고 캡처 결과를 덤프합니다.
test_gyro_bias
장치가 정지 상태일 때 자이로 출력이 안정적인지 테스트합니다. 데이터는 20개 데이터 포인트의 평균으로 표시됩니다.
테스트한 API:
통과: 자이로 판독값의 델타가 시간 경과에 따라 0.01 미만입니다.
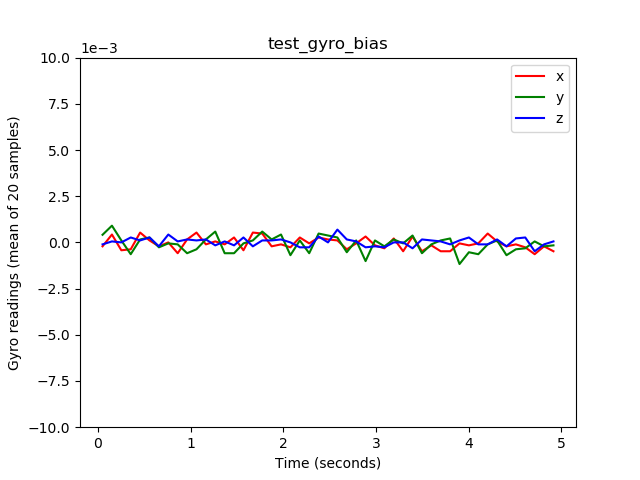
test_gyro_bias_plot.png
테스트_지터
카메라 타임스탬프의 지터를 측정합니다.
테스트한 API:
-
android.hardware.camera2.CaptureResult#SENSOR_TIMESTAMP -
android.hardware.camera2.CaptureRequest#CONTROL_AE_TARGET_FPS_RANGE
통과: 프레임 사이에 최소 30ms의 델타가 있습니다.
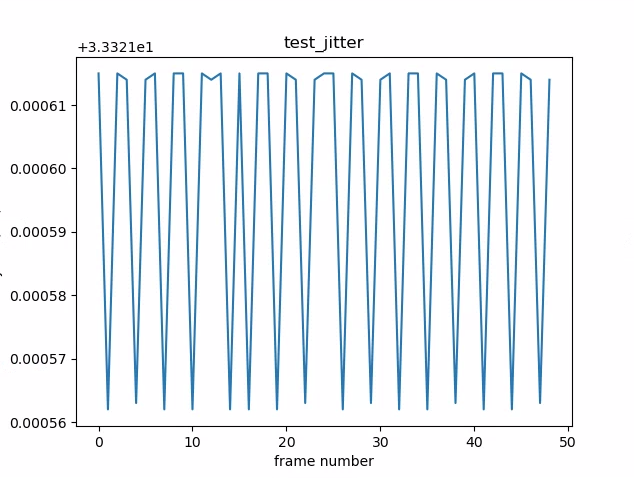
test_jitter_plot.png (작은 y축 범위에 주의하십시오. 이 플롯에서 지터는 실제로 작습니다.)
test_metadata
메타데이터 항목의 유효성을 테스트합니다. 캡처 결과 및 카메라 특성 개체를 봅니다. 이 테스트는 이미지 콘텐츠가 중요하지 않기 때문에 auto_capture_request 노출 및 게인 값을 사용합니다.
테스트한 API:
-
android.hardware.camera2.CameraCharacteristics#INFO_SUPPORTED_HARDWARE_LEVEL -
android.hardware.camera2.CameraCharacteristics#SCALER_CROPPING_TYPE -
android.hardware.camera2.CameraCharacteristics#SENSOR_BLACK_LEVEL_PATTERN -
android.hardware.camera2.CameraCharacteristics#SENSOR_INFO_TIMESTAMP_SOURCE -
android.hardware.camera2.CaptureRequest#SENSOR_FRAME_DURATION -
android.hardware.camera2.CaptureResult#SENSOR_ROLLING_SHUTTER_SKEW
통과: 하드웨어 수준, rollingShutterSkew , frameDuration 태그, timestampSource , croppingType , blackLevelPattern , pixel_pitch , FOV, hyperfocal distance가 있고 유효한 값을 가집니다.
test_param_sensitivity_burst
android.sensor.sensitivity 매개변수가 버스트에서 제대로 적용되는지 테스트합니다. 출력 메타데이터만 검사합니다.
테스트한 API:
-
android.hardware.camera2.CameraCharacteristics#SENSOR_INFO_SENSITIVITY_RANGE -
android.hardware.camera2.CaptureRequest#SENSOR_SENSITIVITY
통과: 출력 데이터의 허용오차가 0.2% 미만입니다.
test_read_write
캡처 메타데이터를 다시 읽어 장치가 올바른 노출 및 게인 값을 쓰는지 테스트합니다.
테스트한 API:
-
android.hardware.camera2.CameraCharacteristics#SENSOR_INFO_EXPOSURE_TIME_RANGE -
android.hardware.camera2.CameraCharacteristics#SENSOR_INFO_SENSITIVITY_RANGE -
android.hardware.camera2.CaptureRequest#SENSOR_EXPOSURE_TIME -
android.hardware.camera2.CaptureRequest#SENSOR_SENSITIVITY -
android.hardware.camera2.CaptureResult#SENSOR_EXPOSURE_TIME -
android.hardware.camera2.CaptureResult#SENSOR_SENSITIVITY
통과: 읽기 및 쓰기 값이 모든 샷에서 일치합니다.
test_sensor_events
장치가 센서 융합 지원을 광고하는 장치에 대한 센서 이벤트를 쿼리하고 출력하는지 테스트합니다. 예상되는 센서는 가속도계, 자이로스코프 및 자력계입니다. 이 테스트는 화면이 켜져 있는 경우에만 작동합니다. 즉, 장치가 대기 모드에 있지 않습니다.
테스트한 API:
통과: 각 센서에 대한 이벤트를 수신합니다.
test_solid_color_test_pattern
카메라 음소거에 대해 단색 테스트 패턴이 제대로 생성되는지 테스트합니다. 카메라 음소거가 지원되는 경우 단색 테스트 패턴이 지원되어야 합니다. 카메라 음소거가 지원되지 않는 경우 단색 테스트 패턴은 기능이 광고되는 경우에만 테스트됩니다.
RAW 이미지가 지원되는 경우 색상 할당도 테스트됩니다. 테스트된 색상은 검정, 흰색, 빨강, 파랑 및 녹색입니다. RAW 이미지를 지원하지 않는 카메라의 경우 검정만 테스트됩니다.
테스트한 API:
-
android.hardware.camera2.CameraCharacteristic#SENSOR_AVAILABLE_TEST_PATTERN_MODES -
android.hardware.camera2.CaptureResult#SENSOR_TEST_PATTERN_DATA -
android.hardware.camera2.CaptureResult#SENSOR_TEST_PATTERN_MODE
합격: 지원되는 솔리드 테스트 패턴은 올바른 색상이며 이미지의 편차가 적습니다.
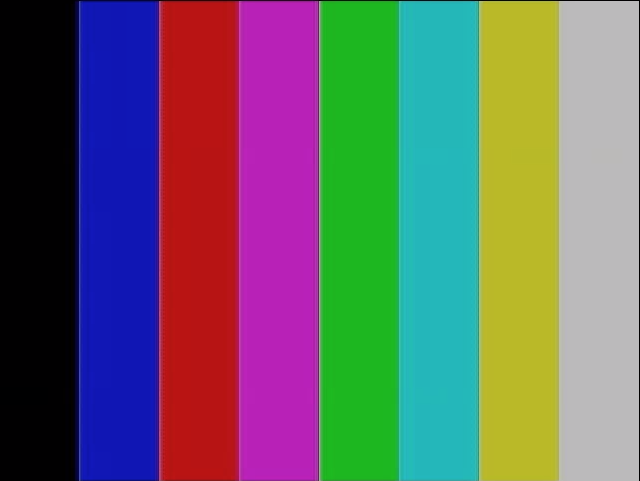
test_test_pattern
android.sensor.testPatternMode 매개변수를 테스트하여 각 유효한 테스트 패턴에 대한 프레임을 캡처하고 단색 및 색상 막대에 대해 프레임이 올바르게 생성되었는지 확인합니다. 이 테스트에는 다음 단계가 포함됩니다.
- 지원되는 모든 테스트 패턴에 대한 이미지를 캡처합니다.
- 단색 테스트 패턴 및 색상 막대에 대한 간단한 정확성 검사를 수행합니다.
테스트한 API:
-
android.hardware.camera2.CameraCharacteristic#SENSOR_AVAILABLE_TEST_PATTERN_MODES -
android.hardware.camera2.CaptureResult#SENSOR_TEST_PATTERN_MODE
통과: 지원되는 테스트 패턴이 올바르게 생성됩니다.

test_test_patterns_2.jpg
test_tonemap_curve
선형 톤맵을 사용하여 RAW에서 YUV로의 테스트 패턴 변환을 테스트합니다. 이 테스트는 톤맵 변환을 위한 완벽한 이미지 패턴을 생성하기 위해 android.sensor.testPatternMode = 2 (COLOR_BARS)가 필요합니다. 파이프라인이 선형 톤맵과 이상적인 이미지 입력으로 적절한 색상 출력을 갖도록 합니다( test_test_patterns 에 의존).
테스트한 API:
-
android.hardware.camera2.CaptureRequest#DISTORTION_CORRECTION_MODE -
android.hardware.camera2.CaptureRequest#SENSOR_TEST_PATTERN_MODE -
android.hardware.camera2.CaptureRequest#TONEMAP_CURVE -
android.hardware.camera2.CaptureRequest#TONEMAP_MODE
통과: YUV와 RAW가 서로 비슷하게 보입니다.

test_tonemap_curve_raw_2.jpg
test_tonemap_curve_yuv_2.jpg
test_unified_timestamp
이미지 및 모션 센서 이벤트가 동일한 시간 도메인에 있는지 테스트합니다.
테스트한 API:
-
android.hardware.camera2.CaptureResult#SENSOR_TIMESTAMP -
android.hardware.Sensor -
android.hardware.SensorEvent -
android.hardware.Sensor#TYPE_ACCELEROMETER -
android.hardware.Sensor#TYPE_GYROSCOPE
통과: 모션 타임스탬프가 두 이미지 타임스탬프 사이에 있습니다.
test_vibration_restriction
장치의 진동이 예상대로 작동하는지 테스트합니다.
테스트한 API:
-
android.hardware.Sensor -
android.hardware.SensorEvent -
android.hardware.Sensor#TYPE_ACCELEROMETER -
android.os.Vibrator -
android.hardware.camera2.CameraDevice#setCameraAudioRestriction
통과: 카메라 오디오 제한 API에 의해 음소거되면 장치가 진동하지 않습니다.
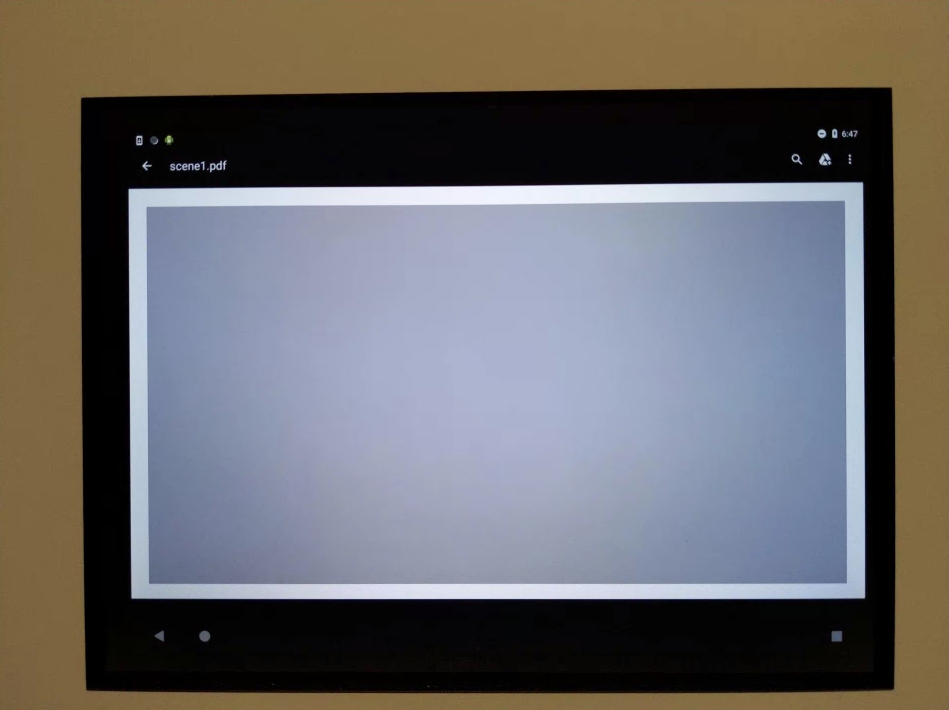
장면1
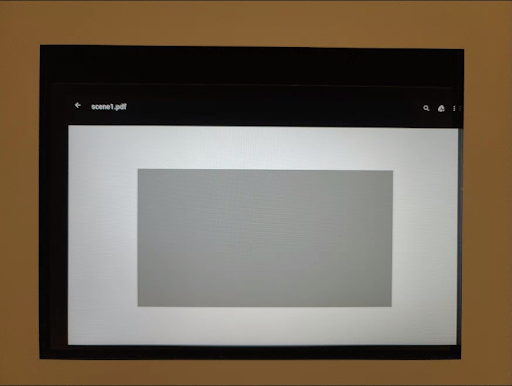
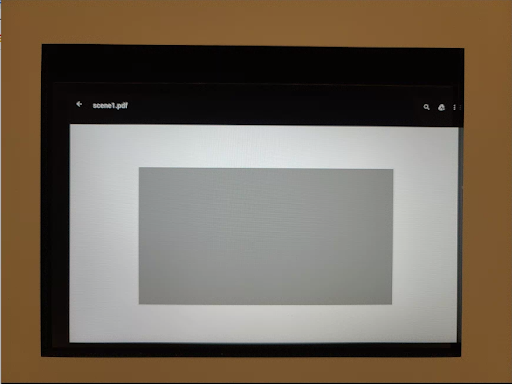
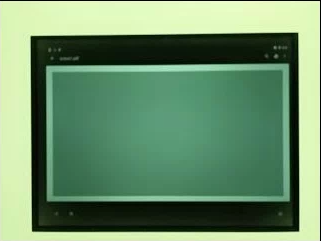
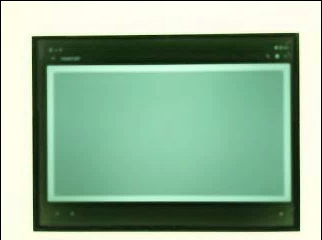
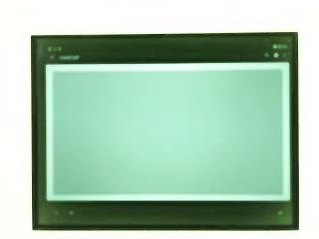
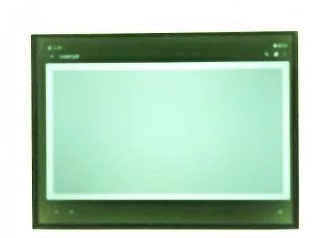
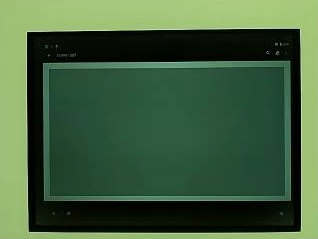
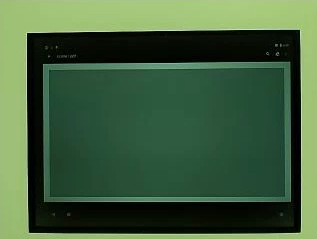
scene1은 회색 차트입니다. 회색 차트는 카메라 시야의 중앙 30%를 커버해야 합니다. 회색 차트는 중앙 영역에 기능이 없기 때문에 3A(자동 노출, 자동 화이트 밸런스, 자동 초점)에 적당히 도전할 것으로 예상됩니다. 그러나 캡처 요청은 3A가 수렴하기에 충분한 기능을 포함하는 전체 장면을 지정합니다.
RFoV 카메라는 WFoV 또는 RFoV 테스트 장비에서 테스트할 수 있습니다. RFoV 카메라가 WFoV 테스트 장비에서 테스트되면 차트는 3A 수렴을 돕기 위해 FoV의 회색 차트에 대한 일부 경계를 보장하기 위해 ⅔만큼 조정됩니다.

scene1: 전체 크기 차트(왼쪽). ⅔ 스케일 차트(오른쪽).
test_3a
적당히 도전적인 대상으로 3A의 수렴을 테스트합니다.
테스트한 API:
-
android.hardware.camera2.CaptureRequest#CONTROL_AE_MODE -
android.hardware.camera2.CaptureRequest#CONTROL_AF_MODE -
android.hardware.camera2.CaptureRequest#CONTROL_AWB_MODE
통과: 3A가 수렴되고 반환된 3A 값이 유효합니다.
test_ae_af
3A 자동 노출(AE) 및 자동 초점(AF) 알고리즘을 개별적으로 테스트합니다.
테스트한 API:
-
android.hardware.camera2.CaptureRequest#CONTROL_AE_MODE -
android.hardware.camera2.CaptureRequest#CONTROL_AF_MODE -
android.hardware.camera2.CaptureRequest#CONTROL_AWB_MODE
통과: 3A가 수렴되고 반환된 3A 값이 유효합니다.
test_ae_precapture_trigger
사전 캡처 트리거를 사용할 때 AE 상태 시스템을 테스트합니다. AE가 비활성화된 상태에서 5개의 수동 요청을 캡처합니다. 마지막 요청에는 AE 사전 캡처 트리거가 있으며 AE가 비활성화되어 있으므로 무시해야 합니다.
테스트한 API:
-
android.hardware.camera2.CaptureRequest#CONTROL_AE_MODE -
android.hardware.camera2.CaptureRequest#CONTROL_AE_PRECAPTURE_TRIGGER -
android.hardware.camera2.CaptureResult#CONTROL_AE_STATE
통과: AE가 수렴합니다.
test_auto_vs_manual
자동 및 수동 샷을 캡처한 테스트는 동일하게 보입니다.
테스트한 API:
-
android.hardware.camera2.CaptureRequest#COLOR_CORRECTION_GAINS -
android.hardware.camera2.CaptureRequest#COLOR_CORRECTION_TRANSFORM -
android.hardware.camera2.CaptureResult#TONEMAP_CURVE -
android.hardware.camera2.CaptureResult#TONEMAP_MODE
통과: 각 캡처 결과에 보고된 수동 화이트 밸런스 게인 및 변환이 카메라의 3A 알고리즘에서 estimate 한 자동 화이트 밸런스와 일치합니다.
test_auto_vs_manual_auto.jpg
test_auto_vs_manual_wb.jpg
test_auto_vs_manual_manual_wb_tm.jpg
test_black_white
장치가 완전한 흑백 이미지를 생성하는지 테스트합니다. 두 번 캡처합니다. 첫 번째는 매우 낮은 게인과 짧은 노출로 검은색 사진이 생성되고 두 번째는 매우 높은 게인과 긴 노출로 흰색 사진이 됩니다.
테스트한 API:
-
android.hardware.camera2.CaptureRequest#SENSOR_EXPOSURE_TIME -
android.hardware.camera2.CaptureRequest#SENSOR_SENSITIVITY
통과: 흑백 이미지를 생성합니다.
 |  | |
| test_black_white_black.jpg | test_black_white_white.jpg |
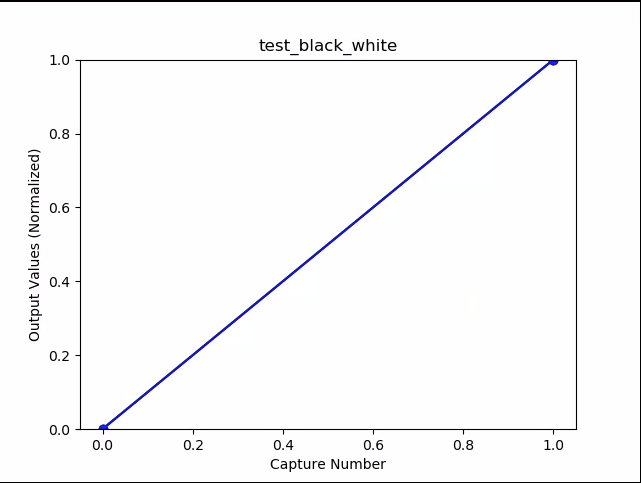
test_black_white_plot_means.png
test_burst_sameness_manual
수동 캡처 설정으로 50장의 이미지를 5번 연속 촬영하고 모두 동일한지 확인합니다. 이 테스트는 다르게 처리되거나 아티팩트가 있는 산발적인 프레임이 있는지 식별하는 데 사용할 수 있습니다.
테스트한 API:
-
android.hardware.camera2.CameraMetadata#REQUEST_AVAILABLE_CAPABILITIES_MANUAL_SENSOR -
android.hardware.camera2.CameraMetadata#SYNC_MAX_LATENCY_PER_FRAME_CONTROL
통과: 이미지가 시각적으로 동일하고 RGB 값이 동일합니다.
실패: 각 버스트의 시작 부분에서 RGB 평균 차트의 스파이크 또는 드롭을 표시합니다.
- 허용 오차는
first_API_level< 30에 대해 3%입니다. - 허용 오차는
first_API_level>= 30에 대해 2%입니다.
test_burst_sameness_manual_mean.jpg
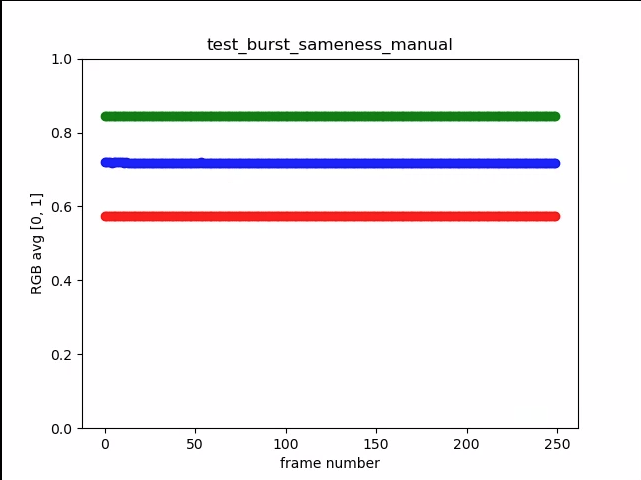
test_burst_sameness_manual_plot_means.png
테스트_캡처_결과
유효한 데이터가 CaptureResult 개체에 다시 오는지 테스트합니다. 자동, 수동 및 자동 캡처를 수행합니다.
테스트한 API:
-
android.hardware.camera2.CaptureRequest#CONTROL_AE_MODE -
android.hardware.camera2.CaptureRequest#CONTROL_AE_REGIONS -
android.hardware.camera2.CaptureRequest#CONTROL_AF_MODE -
android.hardware.camera2.CaptureRequest#CONTROL_AF_REGIONS -
android.hardware.camera2.CaptureRequest#CONTROL_AWB_MODE -
android.hardware.camera2.CaptureRequest#CONTROL_AWB_REGIONS -
android.hardware.camera2.CaptureRequest#CONTROL_MODE -
android.hardware.camera2.CaptureRequest#COLOR_CORRECTION_GAINS -
android.hardware.camera2.CaptureRequest#COLOR_CORRECTION_TRANSFORM -
android.hardware.camera2.CaptureRequest#COLOR_CORRECTION_MODE -
android.hardware.camera2.CaptureRequest#SENSOR_EXPOSURE_TIME -
android.hardware.camera2.CaptureRequest#SENSOR_SENSITIVITY -
android.hardware.camera2.CaptureResult#STATISTICS_LENS_SHADING_CORRECTION_MAP -
android.hardware.camera2.CaptureRequest#STATISTICS_LENS_SHADING_MAP_MODE -
android.hardware.camera2.CaptureRequest#TONEMAP_CURVE -
android.hardware.camera2.CaptureRequest#TONEMAP_MODE
통과: 메타데이터는 모든 캡처에 유효하며 수동 설정은 두 번째 자동 캡처로 누출되지 않습니다. 캡처에 대한 렌즈 음영 보정을 표시합니다.
test_capture_result_plot_lsc_auto_ch0.png
test_channel_saturation
RGB 채널이 균일하게 포화되어 이미지의 포화된 영역에서 색조를 제거하는지 테스트합니다.
테스트한 API:
-
android.hardware.camera2.CameraCharacteristics#SENSOR_INFO_EXPOSURE_TIME_RANGE -
android.hardware.camera2.CameraCharacteristics#SENSOR_INFO_SENSITIVITY_RANGE -
android.hardware.camera2.CaptureRequest#SENSOR_EXPOSURE_TIME -
android.hardware.camera2.CaptureRequest#SENSOR_SENSITIVITY
통과: 포화 채널의 RGB 값은 [255, 255, 255]이고 오차 범위는 1% 미만입니다.

test_channel_saturation.jpg
test_crop_region_raw
RAW 스트림을 자를 수 없는지 테스트합니다.
테스트한 API:
-
android.hardware.camera2.CameraCharacteristics#SENSOR_INFO_ACTIVE_ARRAY_SIZE -
android.hardware.camera2.CaptureResult#SCALER_CROP_REGION -
android.hardware.camera2.CaptureRequest#SCALER_CROP_REGION
통과: YUV 이미지는 중앙이 잘리지만 RAW 이미지는 잘리지 않습니다.
test_crop_region_raw_comp_raw_crop.jpg
test_crop_region_raw_comp_raw_full.jpg

test_crop_region_raw_comp_yuv_crop.jpg
test_crop_region_raw_yuv_full.jpg
test_crop_regions
자르기 영역이 작동하는지 테스트합니다. 전체 이미지를 촬영하고 5개의 다른 영역(모서리 및 중앙)의 패치를 만듭니다. 5개 영역에 대해 크롭을 설정하여 이미지를 촬영합니다. 패치와 자르기 이미지 값을 비교합니다.
테스트한 API:
-
android.hardware.camera2.CameraCharacteristics#SENSOR_INFO_ACTIVE_ARRAY_SIZE -
android.hardware.camera2.CaptureRequest#SCALER_CROP_REGION
통과: 자른 영역의 이미지가 자르기 이미지에 해당하는 패치와 일치합니다.
test_dng_noise_model
DNG 원시 모델 매개변수가 올바른지 확인합니다. 플롯은 감도 범위에 걸쳐 캡처된 원시 샷에서 회색 카드의 중앙 패치의 측정된 분산을 묘사하고 이러한 값을 카메라 HAL의 DNG 노이즈 모델에 의해 각 감도에서 예상되는 분산과 비교합니다(기반 캡처 결과 개체에 반환된 O,S 매개변수). DNG 노이즈 모델에 대한 자세한 내용은 DNG 노이즈 모델 에 대한 다음 문서를 다운로드하십시오.
테스트한 API:
-
android.hardware.camera2.CameraCharacteristics#SENSOR_INFO_SENSITIVITY_RANGE -
android.hardware.camera2.CameraCharacteristics#SENSOR_INFO_WHITE_LEVEL -
android.hardware.camera2.CameraCharacteristics#SENSOR_MAX_ANALOG_SENSITIVITY -
android.hardware.camera2.CaptureResult#SENSOR_NOISE_PROFILE -
android.hardware.camera2.CaptureRequest#SENSOR_SENSITIVITY
통과: DNG 원시 모델 매개변수가 정확합니다. 예상 RGB 값은 측정된 실제 RGB 값과 일치합니다.
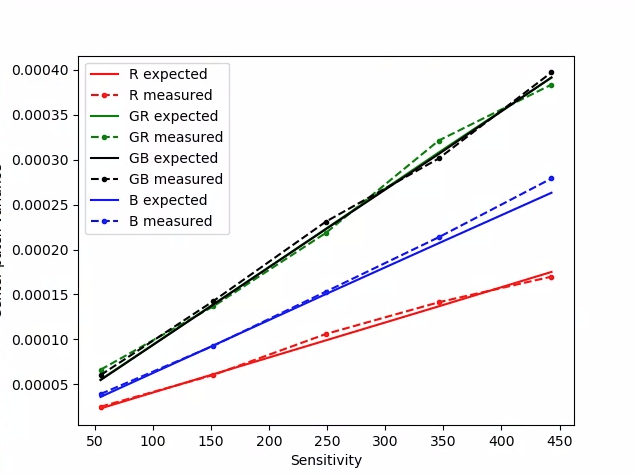
test_dng_noise_model_plog.png
test_ev_compensation_advanced
노출값(EV) 보정이 적용되었는지 테스트합니다. 이 테스트는 8단계로 노출을 증가시키고 측정된 밝기와 예상 밝기를 비교합니다. 기대값은 EV 보정이 적용되지 않은 이미지의 이미지 밝기에서 계산되며 계산된 값이 실제 이미지 값 범위를 초과하면 예상값이 포화됩니다. 예상 값과 측정 값이 일치하지 않거나 5단계 이내에 이미지가 과다 노출되면 테스트가 실패합니다.
테스트한 API:
통과: 이미지가 5단계 내에서 과다 노출 없이 증가하는 노출을 보여줍니다.
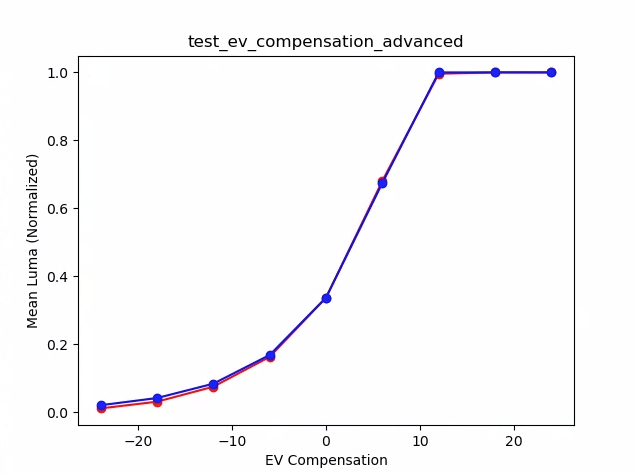
test_ev_compensation_advanced_plot_means.png
test_ev_compensation_basic
CONTROL_AE_COMPENSATION_STEP 으로 생성된 범위를 사용하여 EV 보상이 적용되는지 테스트합니다. 각 보정 값에서 8개의 프레임이 캡처됩니다.
테스트한 API:
-
android.hardware.camera2.CameraCharacteristics#CONTROL_AE_COMPENSATION_STEP -
android.hardware.camera2.CaptureRequest#CONTROL_AE_EXPOSURE_COMPENSATION -
android.hardware.camera2.CaptureRequest#CONTROL_AE_LOCK -
android.hardware.camera2.CaptureResult#CONTROL_AE_EXPOSURE_COMPENSATION -
android.hardware.camera2.CaptureResult#CONTROL_AE_STATE
통과: EV 보정 설정이 증가하여 휘도가 증가하는 것을 캡처하고 각 EV 보정 설정에 대해 캡처된 8개의 프레임이 안정적인 휘도 값을 갖습니다.

test_ev_compensation_basic.png
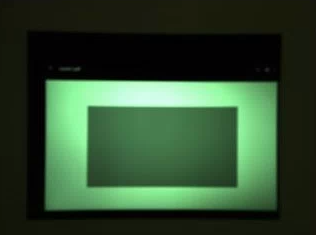
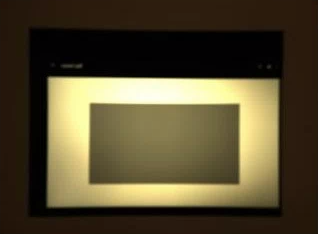
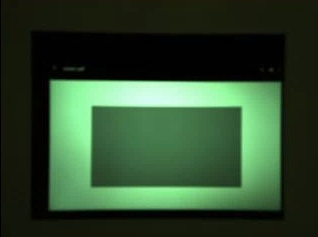
테스트_노출
ISO 및 노출 시간이 다양함에 따라 일정한 노출이 달성되는지 테스트합니다. ISO와 노출 시간이 서로 균형을 이루도록 선택한 일련의 사진을 촬영합니다. 결과의 밝기는 동일해야 하지만 시퀀스에 따라 이미지가 더 시끄럽습니다. 샘플 픽셀 평균 값이 서로 가까운지 확인합니다. 이미지가 0 또는 1로 고정되지 않도록 합니다(평평한 선처럼 보이게 함). 구성 파일에서 debug 플래그를 설정하여 RAW 이미지로 테스트를 실행할 수도 있습니다.
테스트한 API:
-
android.hardware.camera2.CaptureRequest#SENSOR_EXPOSURE_TIME -
android.hardware.camera2.CaptureRequest#SENSOR_SENSITIVITY
통과: 이미지의 밝기는 동일하지만 ISO가 높을수록 노이즈가 커집니다. ISO* 노출 값이 테스트된 게인 공간에서 일정할 때 RGB 평면은 평평합니다.
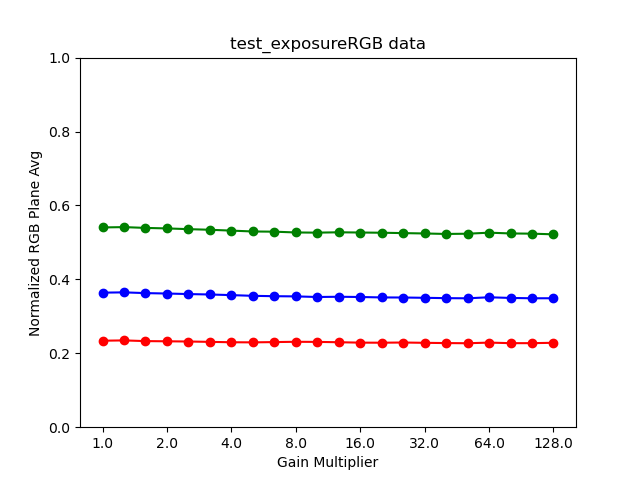
test_exposure_plot_means.png
 |  | |
| test_exposure_mult=1.00.jpg | test_exposure_mult=64.00.jpg |
test_jpeg
변환된 YUV 이미지와 장치 JPEG 이미지가 동일하게 보이는지 테스트합니다. 테스트는 이미지의 중앙 10%를 가져와 RGB 값을 계산하고 일치하는지 확인합니다.
테스트한 API:
통과: 각 이미지 간의 평균 RGB 차이가 3% 미만입니다.
 |  | |
| test_jpeg_fmt=jpg.jpg | test_jpeg=fmt=yuv.jpg |
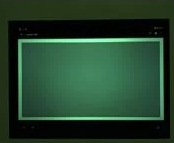
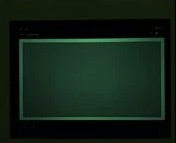
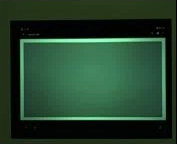
테스트 래칭
FULL 및 LEVEL_3 카메라의 오른쪽 프레임에서 설정(노출 및 게인)이 래치되는지 테스트합니다. 연속 요청을 사용하여 일련의 샷을 촬영하고 샷 간에 캡처 요청 매개변수를 변경합니다. 이미지에 예상 속성이 있는지 확인합니다.
테스트한 API:
통과: 이미지 [2, 3, 6, 8, 10, 12, 13]은 ISO 또는 노출이 증가했으며 test_latching_plot_means.png 에서 더 높은 RGB 평균으로 나타납니다.
 |  |  | |
| test_latching_i=00.jpg | test_latching_i=01.jpg | test_latching_i=02.jpg | |
 |  |  | |
| test_latching_i=03.jpg | test_latching_i=04.jpg | test_latching_i=05.jpg | |
 |  |  | |
| test_latching_i=06.jpg | test_latching_i=07.jpg | test_latching_i=08.jpg | |
 |  |  | |
| test_latching_i=09.jpg | test_latching_i=10.jpg | test_latching_i=11.jpg | |
 | |||
| test_latching_i=12.jpg |
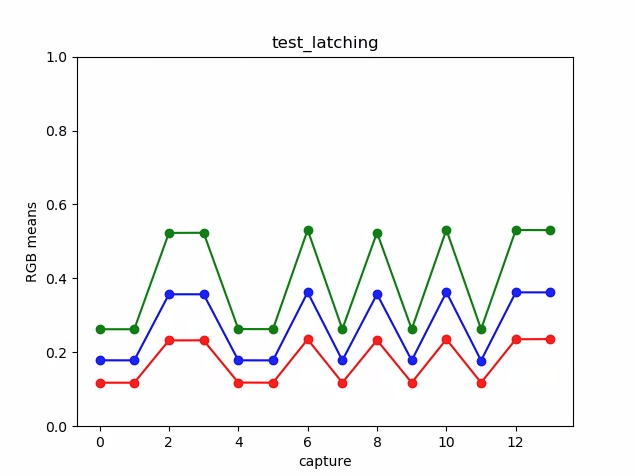
test_latching_plot_means.png
test_linearity
장치 처리가 선형 픽셀로 반전될 수 있는지 테스트합니다. 장치가 균일한 대상을 가리켜 일련의 샷을 캡처합니다.
테스트한 API:
-
android.hardware.camera2.CameraCharacteristics#SENSOR_INFO_SENSITIVITY_RANGE -
android.hardware.camera2.CaptureRequest#BLACK_LEVEL_LOCK -
android.hardware.camera2.CaptureRequest#SENSOR_SENSITIVITY -
android.hardware.camera2.CaptureRequest#TONEMAP_CURVE -
android.hardware.camera2.CaptureRequest#TONEMAP_MODE
통과: R, G, B 값은 감도가 증가함에 따라 선형으로 증가해야 합니다.
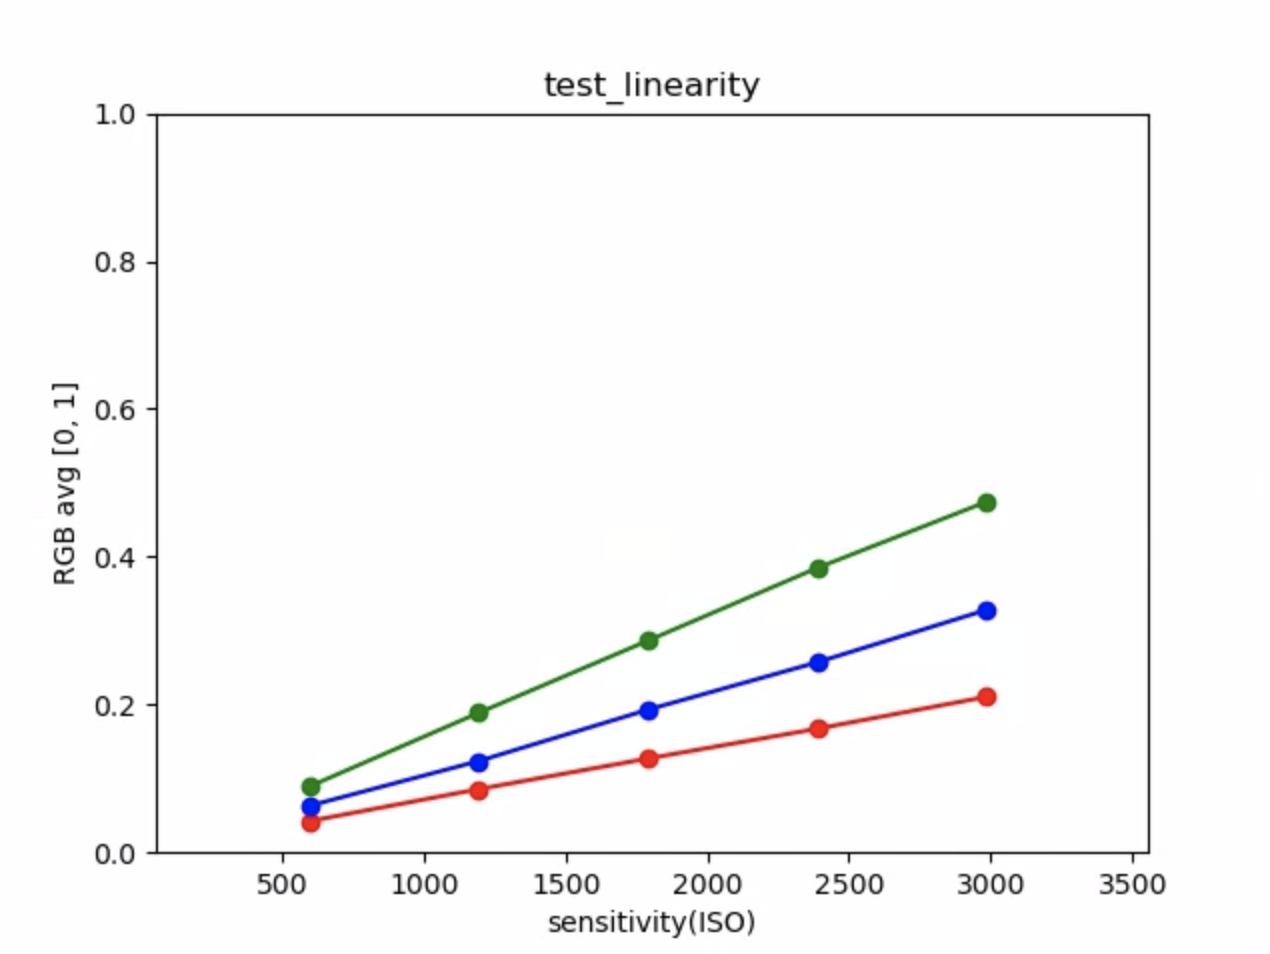
test_linearity_plot_means.png
test_locked_burst
3A 잠금 및 YUV 버스트를 테스트합니다(자동 설정 사용). 이 테스트는 MANUAL_SENSOR 또는 PER_FRAME_CONTROLS 가 없는 제한된 기기에서도 통과하도록 설계되었습니다. 테스트는 프레임 속도 검사가 CTS에 있는 동안 YUV 이미지 일관성을 검사합니다.
테스트한 API:
-
android.hardware.camera2.CaptureRequest#CONTROL_AE_LOCK -
android.hardware.camera2.CaptureRequest#CONTROL_AWB_LOCK
통과: 캡처가 일관되게 보입니다.
test_locked_burst_frame0.jpg

test_locked_burst_frame1.jpg
test_locked_burst_frame2.jpg
test_multi_camera_match
장치의 다중 카메라가 회색 패치에 대해 유사한 RGB 값을 제공하는지 테스트합니다.
테스트한 API:
-
android.hardware.camera2.CameraCharacteristics#getPhysicalCameraIds() -
android.hardware.camera2.CameraCharacteristics#LENS_INFO_AVAILABLE_FOCAL_LENGTHS -
android.hardware.camera2.CameraMetadata#REQUEST_AVAILABLE_CAPABILITIES_LOGICAL_MULTI_CAMERA -
android.hardware.camera2.CaptureRequest#LENS_FOCAL_LENGTH
통과: 다른 카메라는 동일한 회색 패치에 대해 유사한 RGB 값을 생성합니다.

test_multi_camera+match_yuv_fl=4.38.jpg
test_param_color_correction
android.colorCorrection.* 매개변수가 설정될 때 적용되는지 테스트합니다. 다른 변환 및 게인 값으로 샷을 찍고 그에 따라 다르게 보이는지 테스트합니다. 변환 및 이득은 출력을 점점 더 빨간색 또는 파란색으로 만들기 위해 선택됩니다. 선형 톤맵을 사용합니다. 톤 매핑은 동적 범위가 더 제한된 매체에서 HDR(High Dynamic Range) 이미지의 모양을 근사화하기 위해 한 세트의 색상을 다른 세트로 매핑하기 위해 이미지 처리에 사용되는 기술입니다.
테스트한 API:
-
android.hardware.camera2.CaptureRequest#COLOR_CORRECTION_GAINS -
android.hardware.camera2.CaptureRequest#COLOR_CORRECTION_MODE -
android.hardware.camera2.CaptureRequest#COLOR_CORRECTION_TRANSFORM
통과: 변환에 따라 R 및 B 값이 증가합니다.
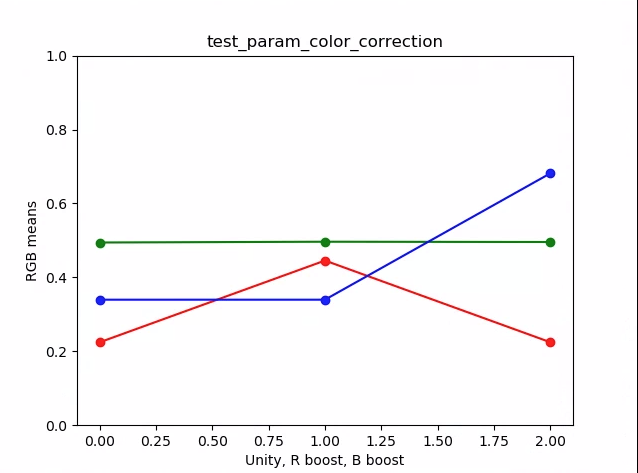
test_param_color_correction_plot_means.png
*x축은 캡처 요청입니다. 0 = 단일성, 1=빨간 부스트, 2= 파랑 부스트
test_param_color_correction_req=0.jpg
test_param_color_correctness_req=1.jpg (R 부스트)

test_param_color_correction_req=2.jpg (B 부스트)
test_param_exposure_time
android.sensor.exposureTime 매개변수가 적용되었는지 테스트합니다.
테스트한 API:
패스: 각 샷이 이전 샷보다 밝습니다.
test_param_exposure_time_frame0.jpg
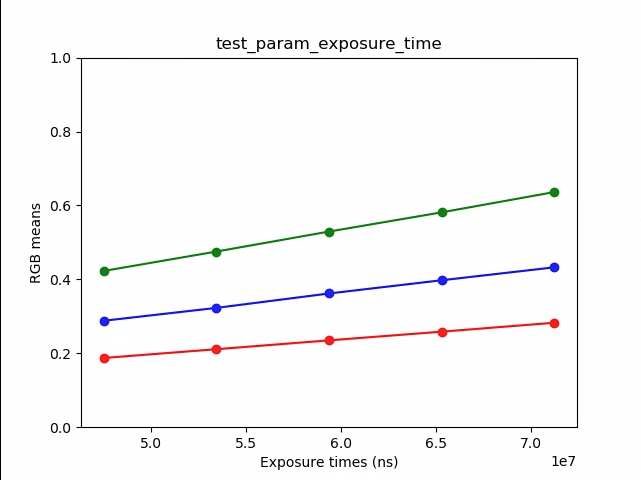
test_param_exposure_time_plot.png
test_param_flash_mode
android.flash.mode 매개변수가 적용되었는지 테스트합니다. 노출을 어두운 면으로 수동 설정하여 플래시 발광 여부를 명확하게 하고 선형 톤맵을 사용합니다. 타일 이미지가 있는 가운데를 확인하여 플래시가 터졌는지 확인하기 위해 생성된 큰 그라디언트가 있는지 확인합니다.
테스트한 API:
통과: 타일 이미지의 중앙에 큰 그래디언트가 있어 플래시가 터진 것입니다.
test_param_flash_mode_1.jpg

test_param_flash_mode_1_tile.jpg
test_param_flash_mode_2.jpg

test_param_flash_mode_2_tile.jpg
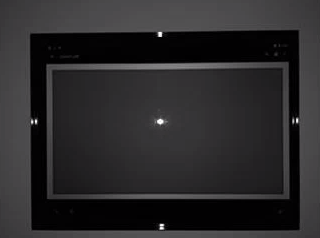
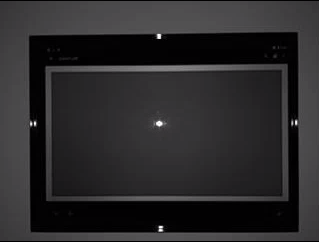
test_param_noise_reduction
android.noiseReduction.mode 매개변수가 설정되면 올바르게 적용되는지 테스트합니다. 카메라의 조명이 어두운 상태에서 이미지를 캡처합니다. 캡처된 이미지에 노이즈가 있는지 확인하기 위해 높은 아날로그 게인을 사용합니다. NR 끄기, "고속" 및 "고화질"의 세 가지 이미지를 캡처합니다. 또한 게인이 낮고 NR이 꺼진 이미지를 캡처하고 이 분산을 기준선으로 사용합니다. SNR(Signal to Noise Ratio)이 높을수록 이미지 품질이 좋아집니다.
테스트한 API:
통과: SNR은 노이즈 감소 모드에 따라 달라지며 아래 그래프와 유사하게 동작합니다.
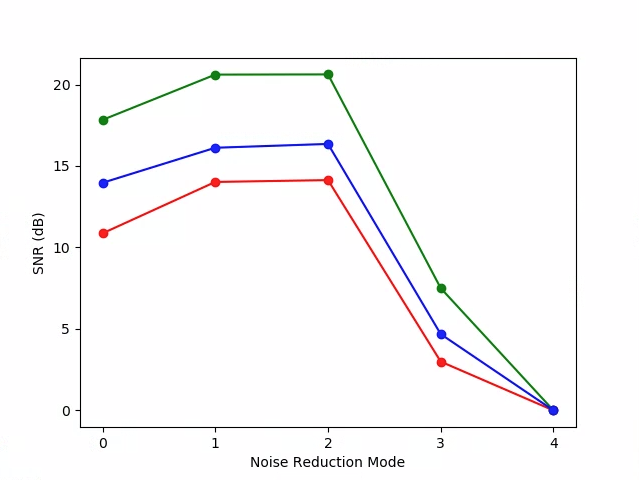
test_param_noise_reduction_plot_SNRs.png
0: 끄기, 1: 빠르게, 2: HQ, 3: 최소, 4: ZSL
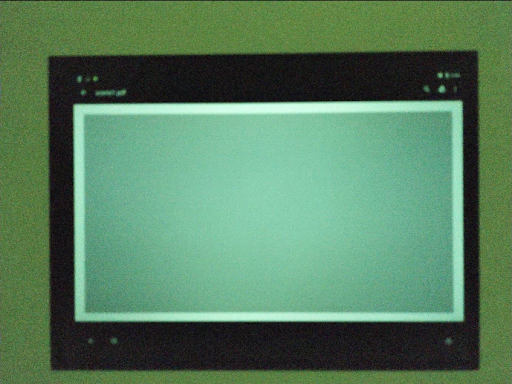
test_param_noise_reduction_high_gain_nr=0.jpg
test_param_noise_reduction_high_gain_nr=1.jpg
test_param_noise_reduction_high_gain_nr=2.jpg
test_param_noise_reduction_high_gain_nr=3.jpg
test_param_noise_reduction_low_gain.jpg
test_param_sensitivity
android.sensor.sensitivity 매개변수가 적용되었는지 테스트합니다. 테스트는 각 샷에 대해 고정 노출로 5단계로 감도를 높입니다.
테스트한 API:
통과: 중앙 10%의 RGB 평균은 감도가 증가할수록 밝아집니다.

test_param_sensitivity_iso=0055.jpg
test_param_sensitivity_iso=1819.jpg
test_param_sensitivity_iso=3583.jpg
test_param_sensitivity_iso=5347.jpg
test_param_sensitivity_iso=7111.jpg
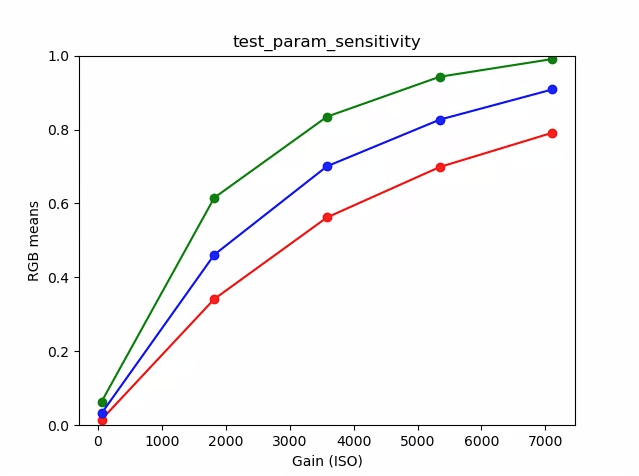
test_param_sensitivity_plot.png
test_param_shading_mode
android.shading.mode 매개변수가 적용되었는지 테스트합니다.
테스트한 API:
-
android.hardware.camera2.CaptureRequest#SHADING_MODE -
android.hardware.camera2.CaptureRequest#STATISTICS_LENS_SHADING_MAP_MODE -
android.hardware.camera2.CaptureResult#STATISTICS_LENS_SHADING_CORRECTION_MAP
통과: 음영 모드가 전환되고 렌즈 음영 맵이 예상대로 수정됩니다.
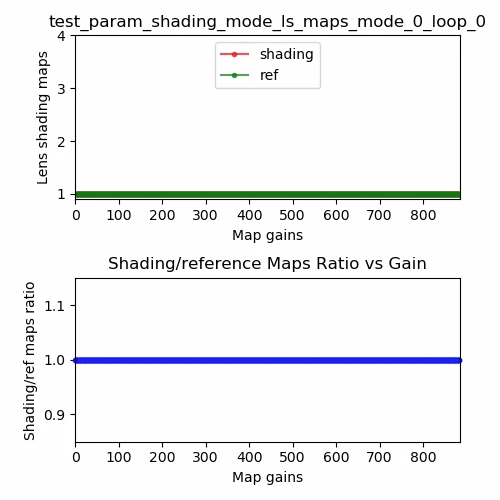
test_param_shading_mode_ls_maps_mode_0_loop_0.png
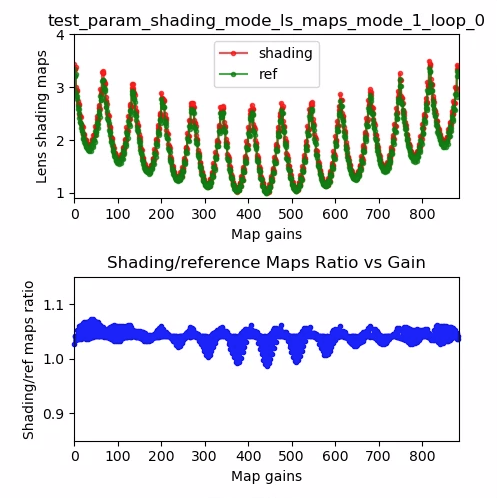
test_param_shading_mode_ls_maps_mode_1_loop_0.png

test_param_shading_mode_ls_maps_mode_2_loop_0.png
test_param_tonemap_mode
android.tonemap.mode 매개변수가 적용되었는지 테스트합니다. 각 R, G, B 채널에 다른 톤맵 곡선을 적용하고 출력 이미지가 예상대로 수정되었는지 확인합니다. 이 테스트는 test1과 test2의 두 가지 테스트로 구성됩니다.
테스트한 API:
-
android.hardware.camera2.CaptureRequest#TONEMAP_CURVE -
android.hardware.camera2.CaptureRequest#TONEMAP_MODE
통과하다:
- test1: 두 이미지 모두 선형 톤맵을 갖지만 n=1은 더 가파른 기울기를 갖습니다. G(녹색) 채널은 n=1 이미지에 대해 더 밝습니다.
- test2: 톤맵은 같지만 길이가 다릅니다. 이미지는 동일합니다.
 |  | |
| test_param_tonemap_mode_n=0.jpg | test_param_tonemap_mode_n=1.jpg |
test_post_raw_sensitivity_boost
RAW 감도 부스트 이후를 확인합니다. 감도가 다른 RAW 및 YUV 이미지 세트를 캡처하고 RAW 감도 부스트 조합을 게시하고 출력 픽셀 평균이 요청 설정과 일치하는지 확인합니다.
테스트한 API:
-
android.hardware.camera2.CameraCharacteristics#CONTROL_POST_RAW_SENSITIVITY_BOOST_RANGE -
android.hardware.camera2.CameraMetadata#REQUEST_AVAILABLE_CAPABILITIES_RAW -
android.hardware.camera2.CaptureRequest#CONTROL_POST_RAW_SENSITIVITY_BOOST -
android.hardware.camera2.CaptureRequest#SENSOR_SENSITIVITY
통과: YUV 이미지는 밝기가 일정하게 유지되는 동안 RAW 이미지는 부스트가 증가함에 따라 어두워집니다.
test_post_raw_sensitivity_boost_raw_s=3583_boost=0100.jpg

test_post_raw_sensitivity_boost_raw_s=1792_boost=0200.jpg

test_post_raw_sensitivity_boost_raw_s=0896_boost=0400.jpg

test_post_raw_sensitivity_boost_raw_s=0448_boost=0800.jpg

test_post_raw_sensitivity_boost_raw_s=0224_boost=1600.jpg

test_post_raw_sensitivity_boost_raw_s=0112_boost=3199.jpg
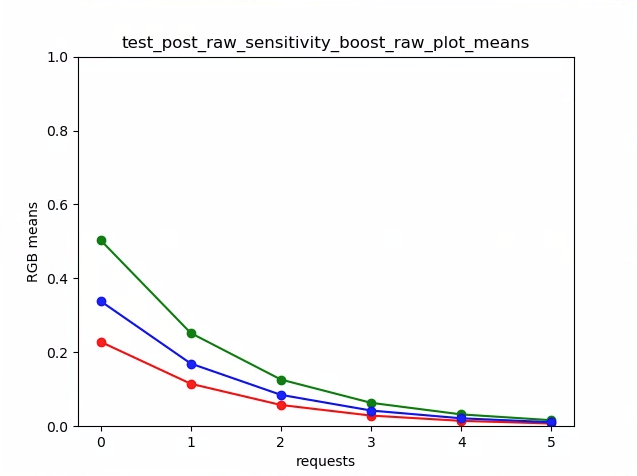
test_post_raw_sensitivity_boost_raw_plot_means.png

test_post_raw_sensitivity_boost_yuv_s=0112_boost=3199.jpg

test_post_raw_sensitivity_boost_yuv_s=0448_boost=0800.jpg

test_post_raw_sensitivity_boost_yuv_s=0896_boost=0400.jpg

test_post_raw_sensitivity_boost_yuv_s=1792_boost=0200.jpg

test_post_raw_sensitivity_boost_yuv_s=3585_boost=0100.jpg
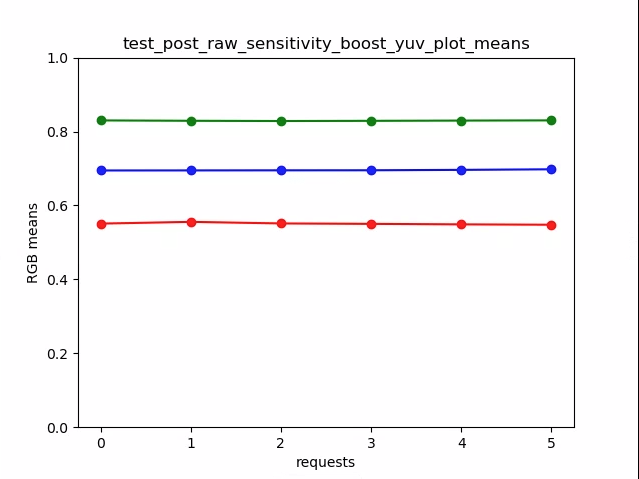
test_post_raw_sensitivity_boost_yuv_plot_means.png
test_raw_burst_sensitivity
게인이 증가하여 원시 이미지 세트를 캡처하고 노이즈를 측정합니다. 버스트에서 원시 전용으로 캡처합니다.
테스트한 API:
-
android.hardware.camera2.CameraCharacteristics#SENSOR_INFO_ACTIVE_ARRAY_SIZE -
android.hardware.camera2.CameraCharacteristics#SENSOR_INFO_SENSITIVITY_RANGE -
android.hardware.camera2.CameraCharacteristics#SENSOR_INFO_WHITE_LEVEL -
android.hardware.camera2.CameraCharacteristics#SENSOR_MAX_ANALOG_SENSITIVITY -
android.hardware.camera2.CameraMetadata#REQUEST_AVAILABLE_CAPABILITIES_RAW
패스: 게인이 증가함에 따라 각 샷이 이전 샷보다 노이즈가 더 커집니다.
중앙 통계 그리드 셀의 분산을 사용합니다.
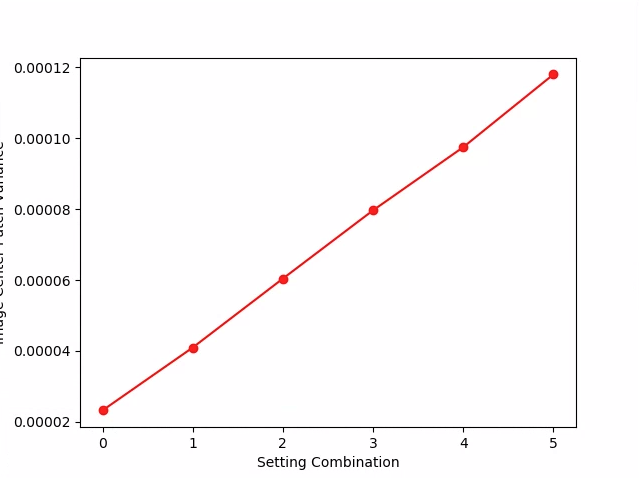
test_raw_burst_sensitivity_variance.png
test_raw_exposure
노출 시간이 증가하면서 일련의 원시 이미지를 캡처하고 픽셀 값을 측정합니다.
테스트한 API:
-
android.hardware.camera2.CameraMetadata#REQUEST_AVAILABLE_CAPABILITIES_RAW -
android.hardware.camera2.CaptureRequest#SENSOR_EXPOSURE_TIME
통과: ISO(게인)를 높이면 픽셀이 빛에 더 민감해져서 플롯이 왼쪽으로 이동합니다.
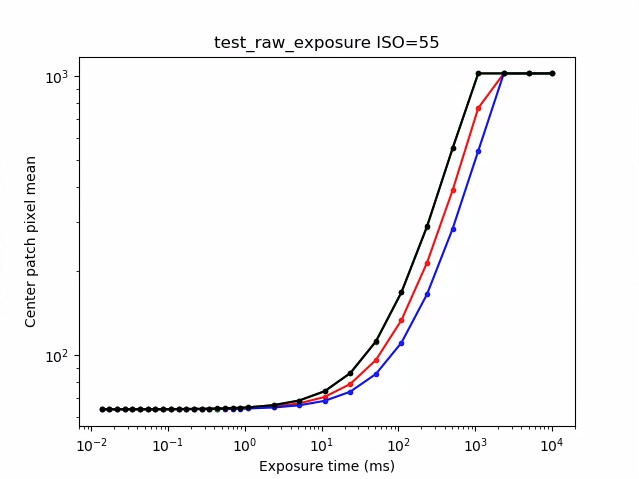
test_raw_exposure_s=55.png
(10⁰은 1ms, 10¹은 10ms, 10⁻¹은 0.1ms)
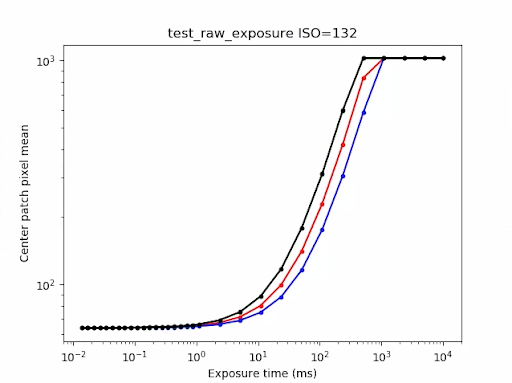
test_raw_exposure_s=132.png
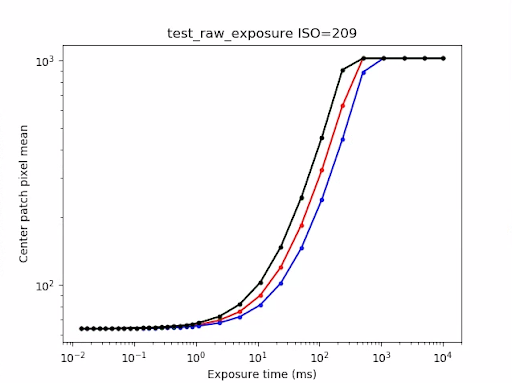
test_raw_exposure_s=209.png
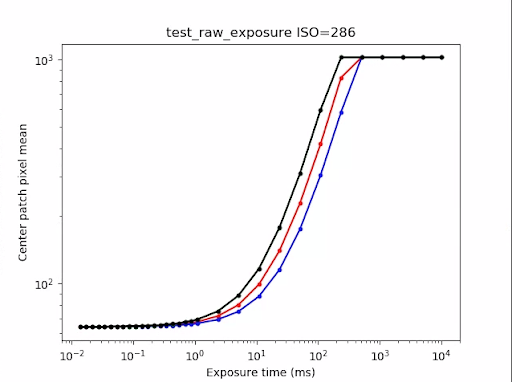
test_raw_exposure_s=286.png
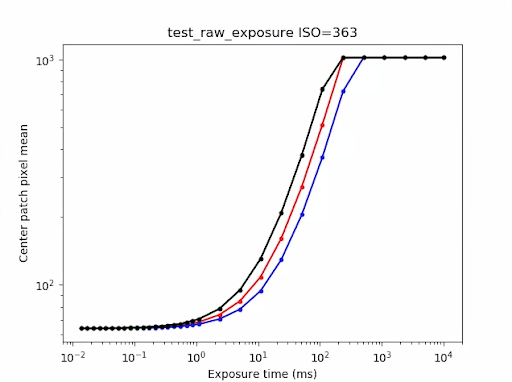
test_raw_exposure_s=363.png
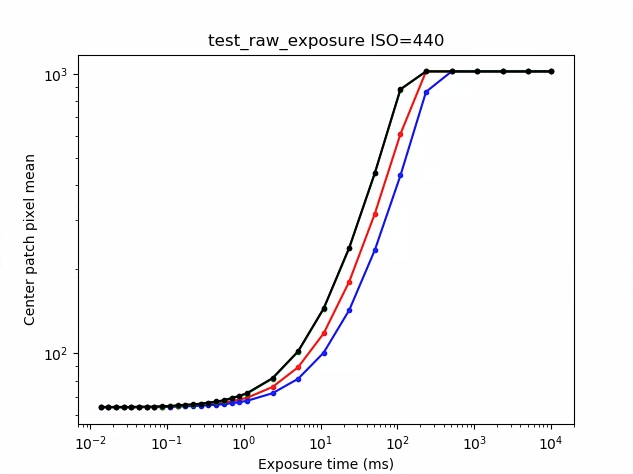
test_raw_exposure_s=440.png
test_raw_sensitivity
감도를 높여 원시 이미지 세트를 캡처하고 이미지의 중앙 10%에서 노이즈(편차)를 측정합니다. 각 샷이 이전 샷보다 노이즈가 더 많은지 테스트합니다.
테스트한 API:
-
android.hardware.camera2.CameraCharacteristics#SENSOR_INFO_PRE_CORRECTION_ACTIVE_ARRAY_SIZE -
android.hardware.camera2.CameraCharacteristics#SENSOR_INFO_SENSITIVITY_RANGE -
android.hardware.camera2.CameraCharacteristics#SENSOR_INFO_WHITE_LEVEL -
android.hardware.camera2.CameraCharacteristics#SENSOR_MAX_ANALOG_SENSITIVITY -
android.hardware.camera2.CameraMetadata#REQUEST_AVAILABLE_CAPABILITIES_RAW
패스: 샷마다 편차가 증가합니다.
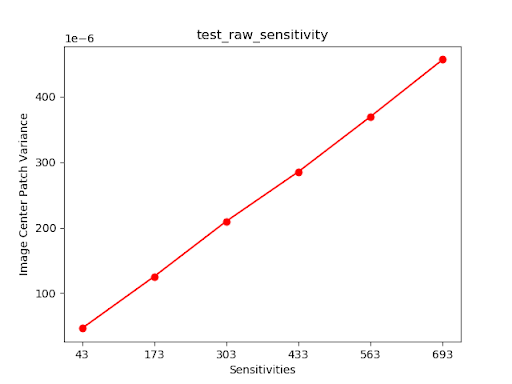
test_raw_sensitivity_variance.png
test_reprocess_noise_reduction
android.noiseReduction.mode 가 재처리 요청에 적용되는지 테스트합니다. 카메라가 희미하게 조명된 상태에서 재처리된 이미지를 캡처합니다. 캡처 이미지에 노이즈가 있는지 확인하기 위해 높은 아날로그 게인을 사용합니다. NR 끄기, "빠른" 및 "고화질"에 대해 3개의 재처리된 이미지를 캡처합니다. 낮은 게인과 NR이 꺼진 재처리된 이미지를 캡처하고 이 차이를 기준선으로 사용합니다.
테스트한 API:
통과: FAST >= OFF, HQ >= FAST, HQ >> OFF
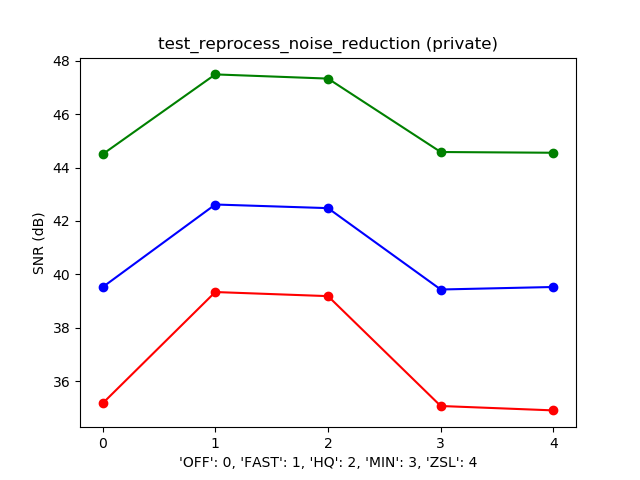
일반적인 SNR 대 NR_MODE 플롯
test_tonemap_sequence
다른 톤맵 곡선을 사용하여 일련의 샷을 테스트합니다. 선형 톤맵으로 3개의 수동 샷을 캡처합니다. 기본 톤맵으로 3개의 수동 샷을 캡처합니다. 각 연속 프레임 쌍 간의 델타를 계산합니다.
테스트한 API:
통과: 3개의 동일한 프레임 다음에 3개의 동일한 프레임의 다른 세트가 있습니다.
test_tonemap_sequence_i=0.jpg
test_tonemap_sequence_i=1.jpg

test_tonemap_sequence_i=2.jpg
test_tonemap_sequence_i=3.jpg
test_tonemap_sequence_i=4.jpg
test_tonemap_sequence_i=5.jpg
test_yuv_jpeg_all
이미지 캡처에 대해 보고된 모든 크기와 형식이 작동하는지 테스트합니다. 선형 톤맵과 함께 수동 요청을 사용하여 its.image 모듈로 변환할 때 YUV와 JPEG가 동일하게 보이도록 합니다. 이미지는 기본적으로 저장되지 않지만 debug_mode 를 활성화하여 저장할 수 있습니다.
테스트한 API:
-
android.hardware.camera2.CaptureRequest#TONEMAP_CURVE -
android.hardware.camera2.CaptureRequest#TONEMAP_MODE -
android.graphics.ImageFormat#JPEG
통과: 모든 이미지 센터는 최고 해상도 YUV 이미지의 3%로 RGB 변환 이미지에서 최대 RMS(신호의 제곱근 값) 차이가 있습니다.
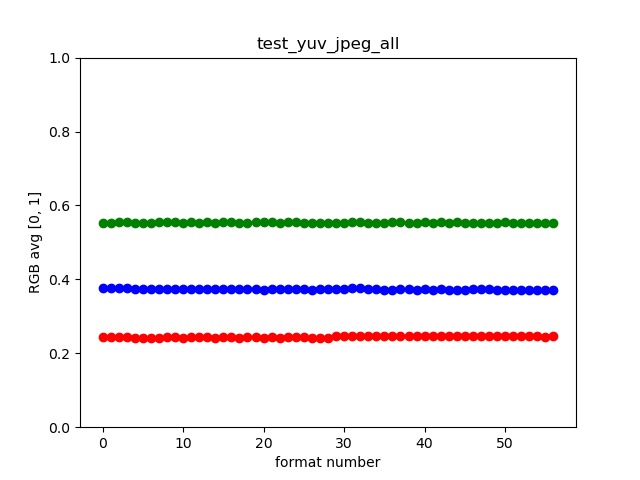
test_yuv_jpeg_all.png
test_yuv_plus_dng
이미지 캡처에 대해 보고된 크기와 형식이 작동하는지 테스트합니다.
테스트한 API:
통과: 테스트가 완료되고 요청된 이미지를 반환합니다.

test_yuv_plus_dng.jpg
test_yuv_plus_jpeg
단일 프레임을 YUV 및 JPEG 출력으로 캡처하는 것을 테스트합니다. YUV와 JPEG가 동일하게 보이도록 선형 톤맵과 함께 수동 요청을 사용합니다( its.image 모듈로 변환할 때).
테스트한 API:
-
android.hardware.camera2.CaptureRequest#TONEMAP_CURVE -
android.hardware.camera2.CaptureRequest#TONEMAP_MODE -
android.graphics.ImageFormat#JPEG
통과: YUV 및 JPEG 이미지는 유사하며 1% RMS(신호의 제곱 평균값) 차이 미만입니다.
 |  | |
| test_yuv_plus_jpg_jpg.jpg | test_yuv_plus_jpeg_yuv.jpg |
test_yuv_plus_raw
RAW 및 YUV 출력으로 단일 프레임 캡처를 테스트합니다. 선형 톤맵과 함께 수동 요청을 사용하므로 RAW와 YUV가 동일할 것으로 예상됩니다. RGB 변환 이미지의 중앙 10% RGB 값을 비교합니다. android.shading.mode 기록합니다.
테스트한 API:
-
android.hardware.camera2.CameraMetadata#REQUEST_AVAILABLE_CAPABILITIES_RAW -
android.hardware.camera2.CaptureRequest#COLOR_CORRECTION_MODE -
android.hardware.camera2.CaptureRequest#COLOR_CORRECTION_GAINS -
android.hardware.camera2.CaptureRequest#COLOR_CORRECTION_TRANSFORM -
android.hardware.camera2.CaptureRequest#CONTROL_AWB_MODE -
android.hardware.camera2.CaptureRequest#CONTROL_MODE -
android.hardware.camera2.CaptureRequest#SHADING_MODE -
android.hardware.camera2.CaptureRequest#TONEMAP_CURVE -
android.hardware.camera2.CaptureRequest#TONEMAP_MODE
통과: YUV 및 JPEG 이미지는 유사하며 RMS(신호의 제곱 평균값) 차이가 3.5% 미만입니다.
 |  | |
| test_yuv_plus_raw_shading=1_raw.jpg | test_yuv_plus_raw_shading=1_yuv.jpg |
test_yuv_plus_raw10
RAW10 및 YUV 출력 모두로 단일 프레임 캡처를 테스트합니다. 선형 톤맵과 함께 수동 요청을 사용하므로 RAW와 YUV가 동일할 것으로 예상됩니다. RGB 변환 이미지의 중앙 10% RGB 값을 비교합니다. android.shading.mode 기록합니다.
테스트한 API:
-
android.hardware.camera2.CameraMetadata#REQUEST_AVAILABLE_CAPABILITIES_RAW -
android.hardware.camera2.CaptureRequest#COLOR_CORRECTION_MODE -
android.hardware.camera2.CaptureRequest#COLOR_CORRECTION_GAINS -
android.hardware.camera2.CaptureRequest#COLOR_CORRECTION_TRANSFORM -
android.hardware.camera2.CaptureRequest#CONTROL_AWB_MODE -
android.hardware.camera2.CaptureRequest#CONTROL_MODE -
android.hardware.camera2.CaptureRequest#SHADING_MODE -
android.hardware.camera2.CaptureRequest#TONEMAP_CURVE -
android.hardware.camera2.CaptureRequest#TONEMAP_MODE -
android.hardware.graphics.ImageFormat#RAW10
통과: RAW10 및 YUV 이미지는 유사하고 RMS(신호의 제곱 평균값) 차이가 3.5% 미만입니다.
 |  | |
| test_yuv_plus_raw10_shading=1_raw.jpg | test_yuv_plus_raw10_shading=1_yuv.jpg |
test_yuv_plus_raw12
RAW12 및 YUV 출력으로 단일 프레임 캡처를 테스트합니다. 선형 톤맵과 함께 수동 요청을 사용하므로 RAW와 YUV가 동일할 것으로 예상됩니다. RGB 변환 이미지의 중앙 10% RGB 값을 비교합니다. android.shading.mode 기록합니다.
테스트한 API:
-
android.hardware.camera2.CameraMetadata#REQUEST_AVAILABLE_CAPABILITIES_RAW -
android.hardware.camera2.CaptureRequest#COLOR_CORRECTION_MODE -
android.hardware.camera2.CaptureRequest#COLOR_CORRECTION_GAINS -
android.hardware.camera2.CaptureRequest#COLOR_CORRECTION_TRANSFORM -
android.hardware.camera2.CaptureRequest#CONTROL_AWB_MODE -
android.hardware.camera2.CaptureRequest#CONTROL_MODE -
android.hardware.camera2.CaptureRequest#SHADING_MODE -
android.hardware.camera2.CaptureRequest#TONEMAP_CURVE -
android.hardware.camera2.CaptureRequest#TONEMAP_MODE -
android.hardware.graphics.ImageFormat#RAW12
통과: RAW12 및 YUV 이미지는 유사하며 RMS(신호의 제곱 평균값) 차이가 3.5% 미만입니다.
 |  | |
| test_yuv_plus_raw12_shading=1_raw.jpg | test_yuv_plus_raw12_shading=1_yuv.jpg |
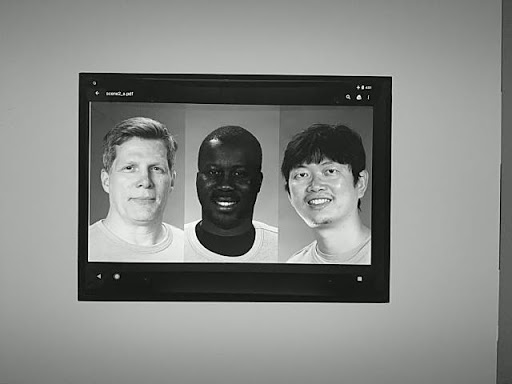
장면2_a
scene2_a는 회색 배경과 중성 옷을 가진 세 개의 얼굴을 가지고 있습니다. 얼굴은 피부색이 다양하도록 선택됩니다.
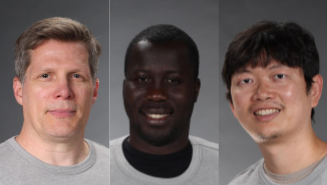
장면2_a
테스트 효과
지원되는 카메라 효과에 대한 프레임을 캡처하고 올바르게 생성되었는지 확인합니다. 테스트는 효과 OFF 및 MONO 만 확인하지만 지원되는 모든 효과에 대한 이미지를 저장합니다.
테스트한 API:
-
android.hardware.camera2.CameraCharacteristics#CONTROL_AVAILABLE_EFFECTS -
android.hardware.camera2.CaptureRequest#CONTROL_EFFECT_MODE
통과: 효과가 OFF 인 장면 이미지와 효과가 MONO 로 설정된 모노크롬 이미지를 캡처합니다.
test_effects_MONO.jpg
test_faces
얼굴 감지를 테스트합니다. 이미지는 저장되지만 상자 및 랜드마크 정보는 test_faces_stdout.txt 에 표로 만들어집니다.
테스트한 API:
-
android.hardware.camera2.CaptureResult#STATISTICS_FACES -
android.hardware.camera2.CaptureResult#STATISTICS_FACE_DETECT_MODE
통과: 이미지에서 적어도 하나의 얼굴을 감지합니다.
test_format_combos
다양한 출력 형식 조합을 테스트합니다.
테스트한 API:
android.hardware.camera2.CameraCharacteristics#SCALER_STREAM_CONFIGURATION_MAPandroid.hardware.camera2.params.StreamConfigurationMap#getOutputSizes()android.hardware.camera2.CameraCaptureSession#captureBurst()
통과: 모든 조합이 성공적으로 캡처되었습니다.
test_jpeg_quality
카메라 JPEG 압축 품질을 테스트합니다. android.jpeg.quality 를 통해 JPEG 품질을 설정하고 양자화 테이블이 올바르게 변경되도록 합니다.
테스트한 API:
통과: 품질이 증가함에 따라 양자화 매트릭스가 감소합니다. (행렬은 나눗셈 계수를 나타냅니다.)
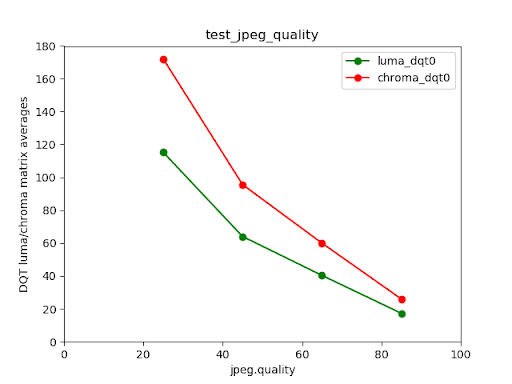
Pixel 4 후면 카메라 루마/크로마 DQT 매트릭스 평균과 JPEG 품질 비교
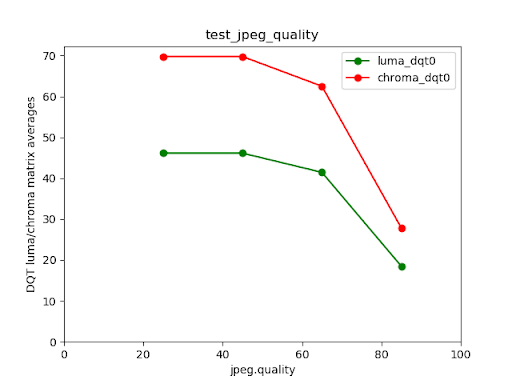
실패한 테스트 예
매우 낮은 품질의 이미지(jpeg.quality < 50)의 경우 양자화 행렬의 압축이 증가하지 않습니다.
test_num_faces
얼굴 감지를 테스트합니다.
테스트한 API:
-
android.hardware.camera2.CaptureResult#STATISTICS_FACES -
android.hardware.camera2.CaptureResult#STATISTICS_FACE_DETECT_MODE
통과: 세 개의 얼굴을 찾습니다.
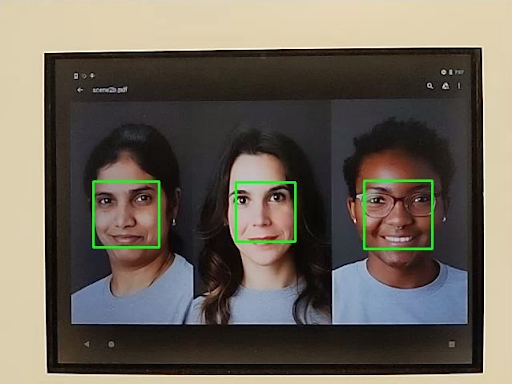
test_num_faces_fd_mode_1.jpg
장면2_b
test_auto_per_frame_control
자동 캡처 요청에 대한 PER_FRAME_CONTROL 속성을 테스트합니다.
테스트한 API:
-
android.hardware.camera2.CaptureRequest#COLOR_CORRECTION_GAINS -
android.hardware.camera2.CaptureRequest#COLOR_CORRECTION_TRANSFORM -
android.hardware.camera2.CaptureResult#CONTROL_AE_STATE -
android.hardware.camera2.CaptureResult#CONTROL_AWB_STATE -
android.hardware.camera2.CaptureRequest#CONTROL_POST_RAW_SENSITIVITY_BOOST -
android.hardware.camera2.CaptureRequest#LENS_FOCUS_DISTANCE -
android.hardware.camera2.CaptureRequest#SENSOR_EXPOSURE_TIME -
android.hardware.camera2.CaptureRequest#SENSOR_SENSITIVITY -
android.hardware.camera2.CaptureRequest#STATISTICS_LENS_SHADING_MAP_MODE -
android.hardware.camera2.CaptureResult#STATISTICS_LENS_SHADING_CORRECTION_MAP -
android.hardware.camera2.CaptureRequest#TONEMAP_CURVE -
android.hardware.camera2.CaptureRequest#TONEMAP_MODE
통과: 모든 PER_FRAME_CONTROL 속성이 있습니다.
test_auto_per_frame_control_frame_1.jpg
test_auto_per_frame_control_frame_10.jpg
test_auto_per_frame_control_frame_29.jpg
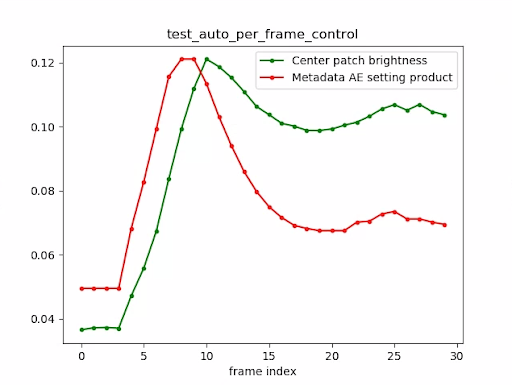
test_auto_per_frame_control_plot.png
test_num_faces
얼굴 장면에서 증가된 피부 톤 다양성으로 얼굴 감지를 테스트합니다.
테스트한 API:
-
android.hardware.camera2.CaptureResult#STATISTICS_FACES -
android.hardware.camera2.CaptureResult#STATISTICS_FACE_DETECT_MODE
통과: 3개의 얼굴을 찾습니다.
test_num_faces_fd_mode_1.jpg
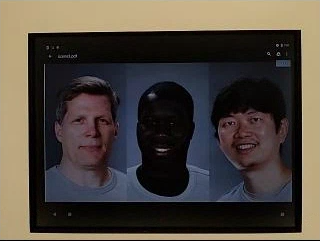
장면2_c
test_num_faces
얼굴 장면에서 증가된 피부 톤 다양성으로 얼굴 감지를 테스트합니다.
테스트한 API:
-
android.hardware.camera2.CaptureResult#STATISTICS_FACES -
android.hardware.camera2.CaptureResult#STATISTICS_FACE_DETECT_MODE
통과: 3개의 얼굴을 찾습니다.
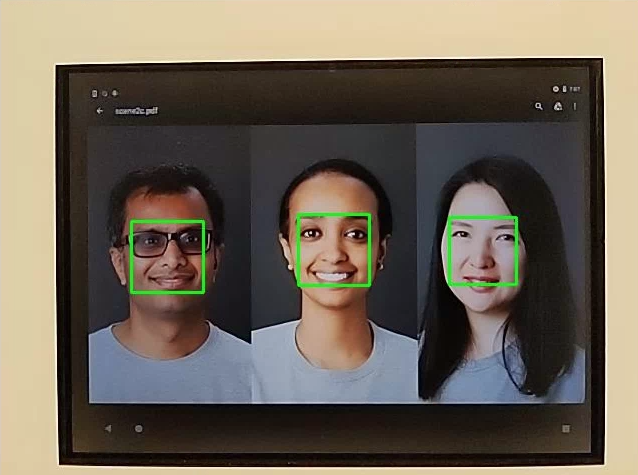
test_num_faces_fd_mode_1.jpg
test_jpeg_capture_perf_class
CDD의 섹션 2.2.7.2 카메라 에 지정된 대로 S 성능 클래스에 대한 JPEG 캡처 대기 시간을 테스트합니다.
통과: 두 기본 카메라의 ITS 조명 조건(3000K)에서 CTS 카메라 PerformanceTest로 측정한 1080p 해상도에 대해 카메라2 JPEG 캡처 대기 시간이 1000ms 미만이어야 합니다(MUST).
test_camera_launch_perf_class
CDD의 섹션 2.2.7.2 카메라 에 지정된 대로 S 성능 클래스에 대한 카메라 시작 대기 시간을 테스트합니다.
통과: 두 기본 카메라에 대해 ITS 조명 조건(3000K)에서 CTS 카메라 PerformanceTest로 측정했을 때 카메라 2 시작 대기 시간(첫 번째 미리 보기 프레임에 대한 카메라 열기) < 600ms가 있어야 합니다(MUST).
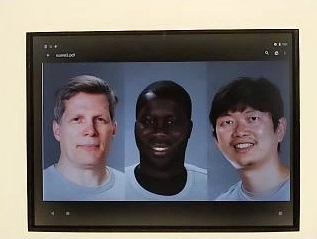
장면2_d
test_num_faces
얼굴 장면에서 증가된 피부 톤 다양성으로 얼굴 감지를 테스트합니다.
테스트한 API:
-
android.hardware.camera2.CaptureResult#STATISTICS_FACES -
android.hardware.camera2.CaptureResult#STATISTICS_FACE_DETECT_MODE
통과: 3개의 얼굴을 찾습니다.
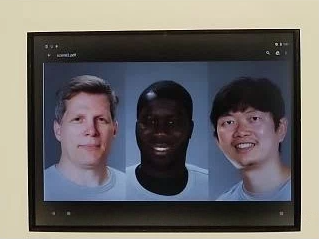
장면2_e
test_continuous_picture
50 VGA 해상도 프레임은 캡처 요청 첫 번째 설정 android.control.afMode = 4 (CONTINUOUS_PICTURE).
테스트한 API:
android.hardware.camera2.CaptureRequest#CONTROL_CAPTURE_INTENTandroid.hardware.camera2.CaptureResult#CONTROL_POST_RAW_SENSITIVITY_BOOST
통과: 3A 시스템은 50프레임 캡처가 끝나면 안착합니다.
test_num_faces
얼굴 장면에서 증가된 피부 톤 다양성으로 얼굴 감지를 테스트합니다.
테스트한 API:
-
android.hardware.camera2.CaptureResult#STATISTICS_FACES -
android.hardware.camera2.CaptureResult#STATISTICS_FACE_DETECT_MODE
통과: 3개의 얼굴을 찾습니다.
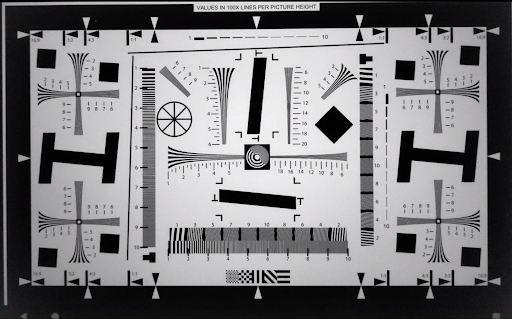
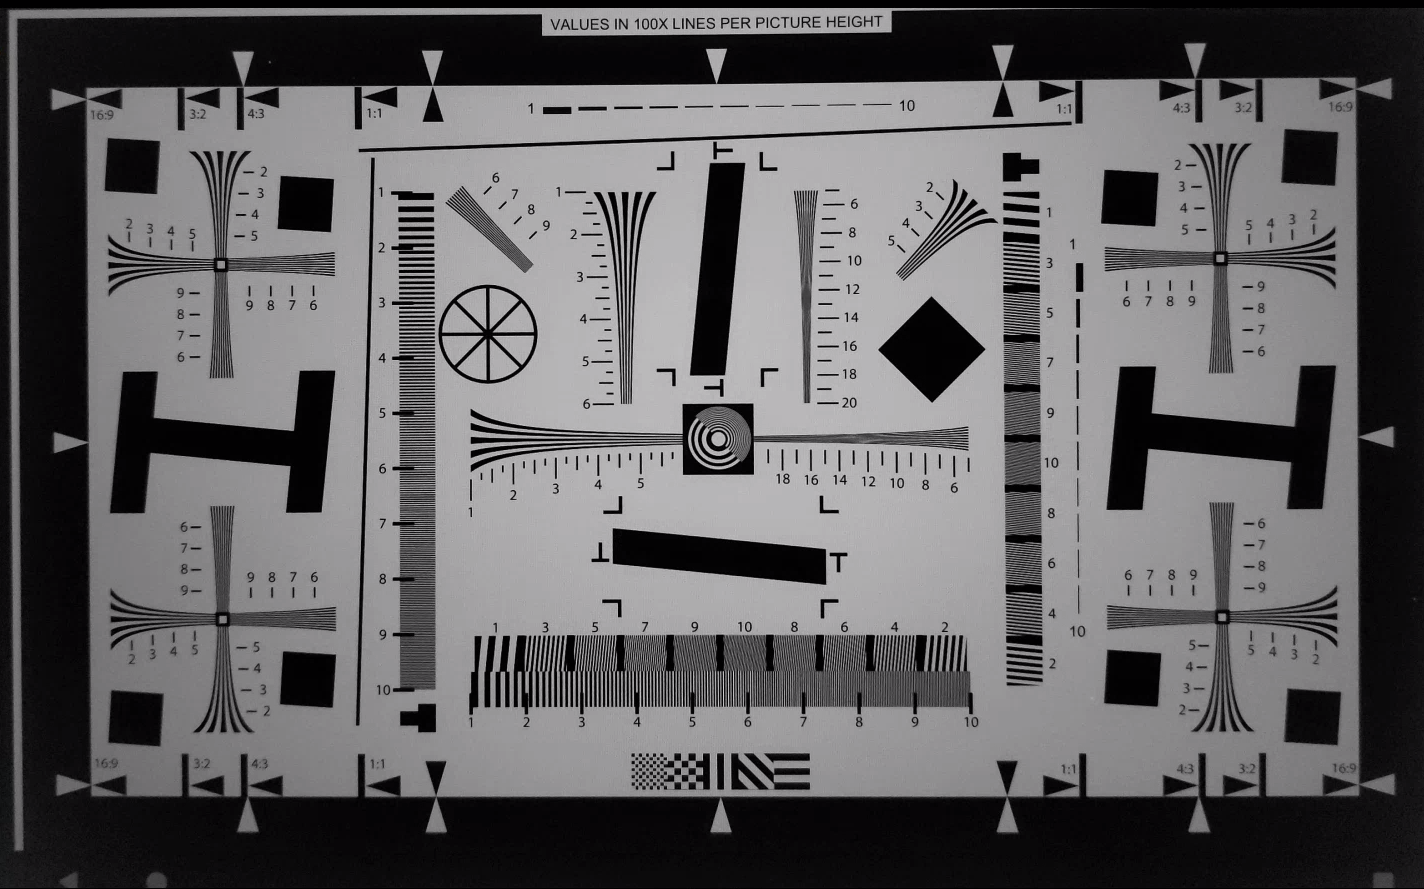
장면3
Scene3은 ISO12233 차트를 사용하며 대부분의 테스트는 차트 추출기 방법을 사용하여 장면에서 차트를 찾습니다. 이 때문에 대부분의 저장된 이미지에는 1, 2, 4 장면의 이미지처럼 테두리가 없고 차트만 있습니다.
test_3a_일관성
3A 일관성 테스트.
테스트한 API:
-
android.hardware.camera2.CaptureRequest#COLOR_CORRECTION_GAINS -
android.hardware.camera2.CaptureRequest#COLOR_CORRECTION_TRANSFORM -
android.hardware.camera2.CaptureRequest#LENS_FOCUS_DISTANCE -
android.hardware.camera2.CaptureResult#SENSOR_EXPOSURE_TIME -
android.hardware.camera2.CaptureResult#SENSOR_SENSITIVITY
통과: 3A는 허용 범위 내에서 노출, 게인, awb(자동 화이트 밸런스) 및 fd(초점 거리)에 대해 세 번 수렴합니다.
test_edge_enhancement
android.edge.mode 매개변수가 올바르게 적용되었는지 테스트합니다. 각 에지 모드에 대해 재처리되지 않은 이미지를 캡처하고 출력 이미지의 선명도와 캡처 결과 메타데이터를 반환합니다. 주어진 에지 모드, 감도, 노출 시간, 초점 거리 및 출력 표면 매개변수로 캡처 요청을 처리합니다.
패스: 고속 모드는 HQ(고화질) 모드보다 선명하지 않습니다.
테스트한 API:
영향을 받는 카메라 매개변수:
-
EDGE_MODE
test_edge_enhancement_edge=0.jpg
test_edge_enhancement_edge=1.jpg(빠른 모드)

test_edge_enhancement_edge=2.jpg(고화질 모드)
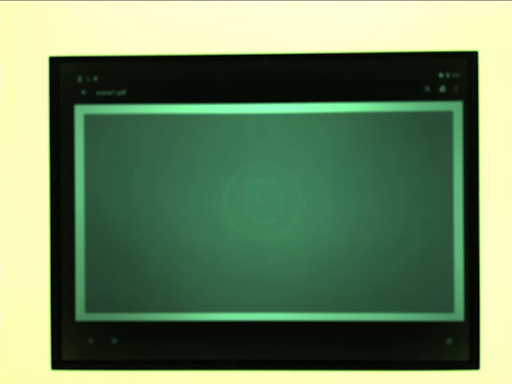
test_flip_mirror
CDD 섹션 7.5.2 전면 카메라 [C-1-5]에 따라 이미지의 방향이 올바른지 테스트합니다.
미러링된 이미지, 뒤집힌 이미지 또는 회전된 이미지는 중앙 근처의 다이아몬드 모양으로 식별할 수 있습니다.
통과: 이미지가 뒤집히거나 미러링되거나 회전되지 않습니다.
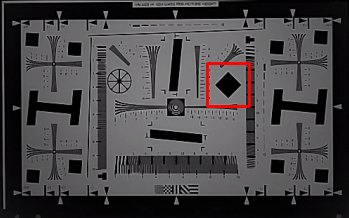
test_flip_mirror_scene_patch.jpg
test_lens_movement_reporting
렌즈 이동 플래그가 제대로 보고되는지 테스트합니다. 최적 초점 거리(3A에서 확인)에서 처음 12개 프레임과 최소 초점 거리에서 마지막 12개 프레임으로 24개 이미지의 버스트를 캡처합니다. 프레임 12 주변에서 렌즈가 이동하여 선명도가 떨어집니다. 렌즈가 최종 위치로 이동함에 따라 선명도가 결국 안정화됩니다. The lens movement flag should be asserted in all frames where the sharpness is intermediate to sharpness in the first 10 frames with the lens stationary at optimum focal distance, and the final 10 frames where the lens is stationary in the minimum focal distance. The exact frame the lens moves isn't important: what is checked is that the movement flag is asserted when the lens is moving.
APIs tested:
-
android.hardware.camera2.CameraCharacteristics#LENS_INFO_MINIMUM_FOCUS_DISTANCE -
android.hardware.camera2.CaptureResult#LENS_STATE -
android.hardware.camera2.CaptureResult#LENS_FOCUS_DISTANCE -
android.hardware.camera2.CaptureResult#SENSOR_TIMESTAMP -
android.hardware.camera2.CaptureRequest#LENS_FOCUS_DISTANCE
Pass: Lens movement flag is True in the frame with sharpness change.
test_lens_position
Tests if the focus position is properly reported for moving lenses.
APIs tested:
-
android.hardware.camera2.CameraCharacteristics#LENS_INFO_HYPERFOCAL_DISTANCE -
android.hardware.camera2.CameraCharacteristics#LENS_INFO_MINIMUM_FOCUS_DISTANCE -
android.hardware.camera2.CaptureResult#LENS_STATE -
android.hardware.camera2.CaptureResult#SENSOR_TIMESTAMP
Pass: Correct focus positions are reported.
test_reprocess_edge_enhancement
Returns sharpness of the output images and the capture result metadata. Processes a capture request with a given edge mode, sensitivity, exposure time, focus distance, output surface parameter, and reprocess format.
APIs tested:
-
android.hardware.camera2.CaptureRequest#EDGE_MODE -
android.hardware.camera2.CaptureRequest#REPROCESS_EFFECTIVE_EXPOSURE_FACTOR
Pass: Sharpness for the different edge modes is correct.
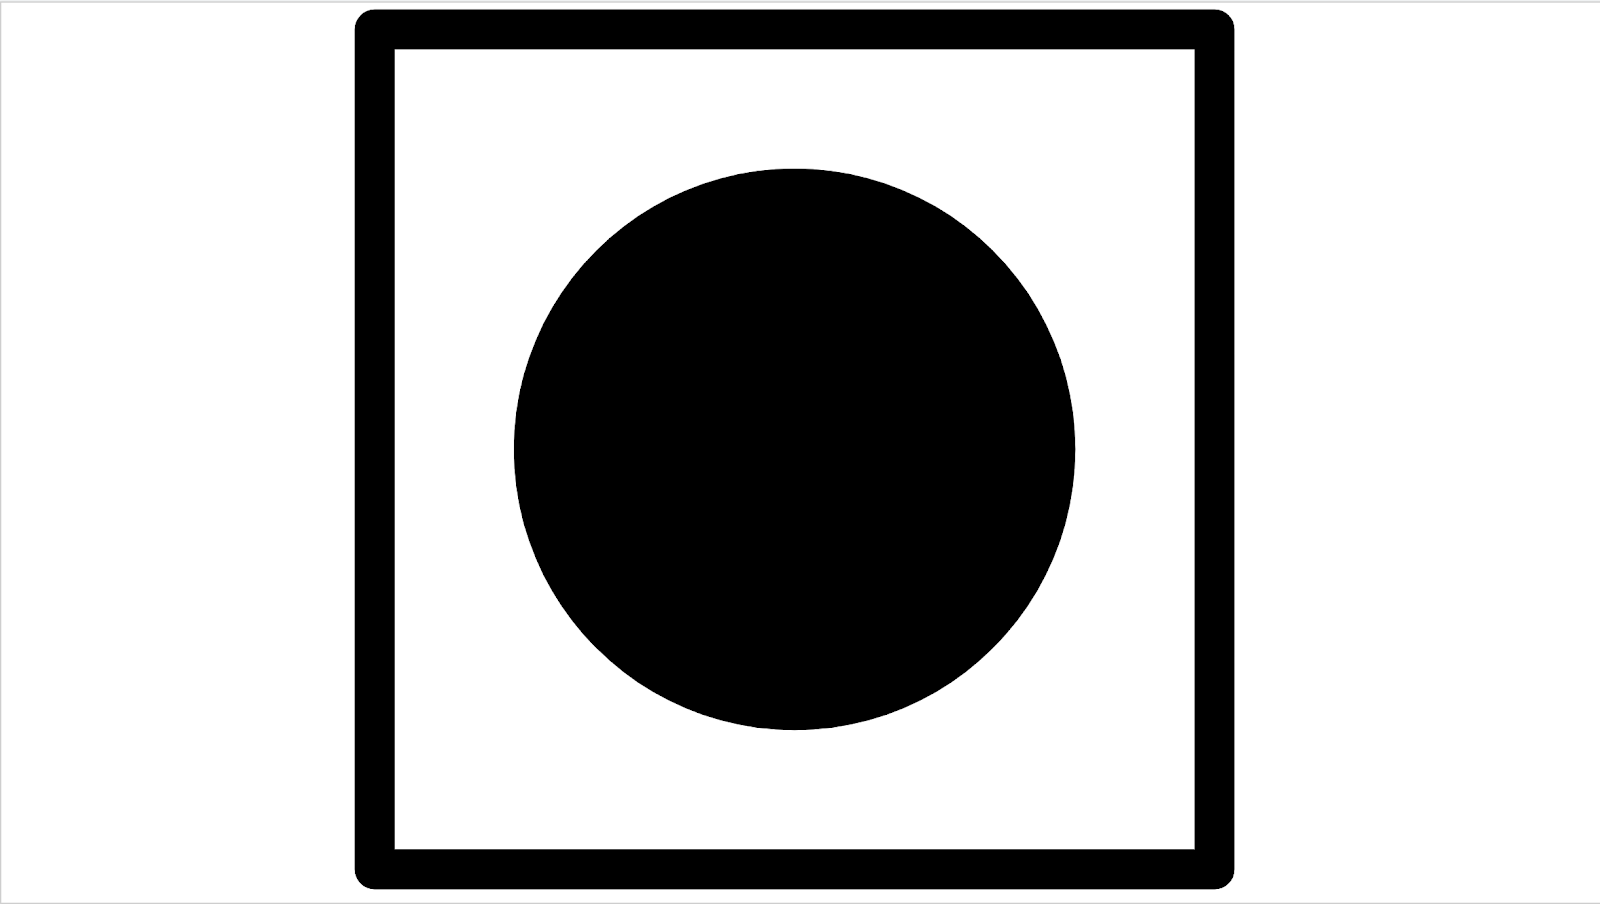
scene4
Scene4 consists of a black circle on a white background inside a square.
scene4
test_aspect_ratio_and_crop
Takes pictures of a circle inside of a square over all formats. Verifies that the aspect ratio of the circle doesn't change, the cropped images keep the circle in center, and the circle size doesn't change for a constant format or with different resolution (field of view check).
APIs tested:
-
android.hardware.camera2.CaptureResult#LENS_DISTORTION -
android.hardware.camera2.CaptureResult#LENS_FOCAL_LENGTH -
android.hardware.camera2.CaptureResult#LENS_INTRINSIC_CALIBRATION
Pass: Images aren't stretched, the center of images don't differ by more than 3%, and the maximum possible FOV (field of view) is preserved.
test_multi_camera_alignment
Tests the multi camera system parameters related to camera spacing. Using the multi-camera physical sub-cameras, takes a picture with one of the physical cameras. Finds the circle center. Projects the circle center to the world coordinates for each camera. Compares the difference between the cameras' circle centers in world coordinates. Reprojects the world coordinate back to pixel coordinates and compares against originals as a validity check. Compares the circle sizes checking if the focal lengths of the cameras are different.
APIs tested:
-
android.hardware.camera2.CameraCharacteristics#getPhysicalCameraIds() -
android.hardware.camera2.CameraCharacteristics#LENS_DISTORTION -
android.hardware.camera2.CameraCharacteristics#LENS_INTRINSIC_CALIBRATION -
android.hardware.camera2.CameraCharacteristics#LENS_POSE_ROTATION -
android.hardware.camera2.CameraCharacteristics#LENS_POSE_TRANSLATION -
android.hardware.camera2.CameraMetadata#REQUEST_AVAILABLE_CAPABILITIES_LOGICAL_MULTI_CAMERA -
android.hardware.camera2.CaptureRequest#SCALER_CROP_REGION -
android.hardware.camera2.CaptureRequest#DISTORTION_CORRECTION_MODE
Pass: Focal lengths and circles sizes are consistent.
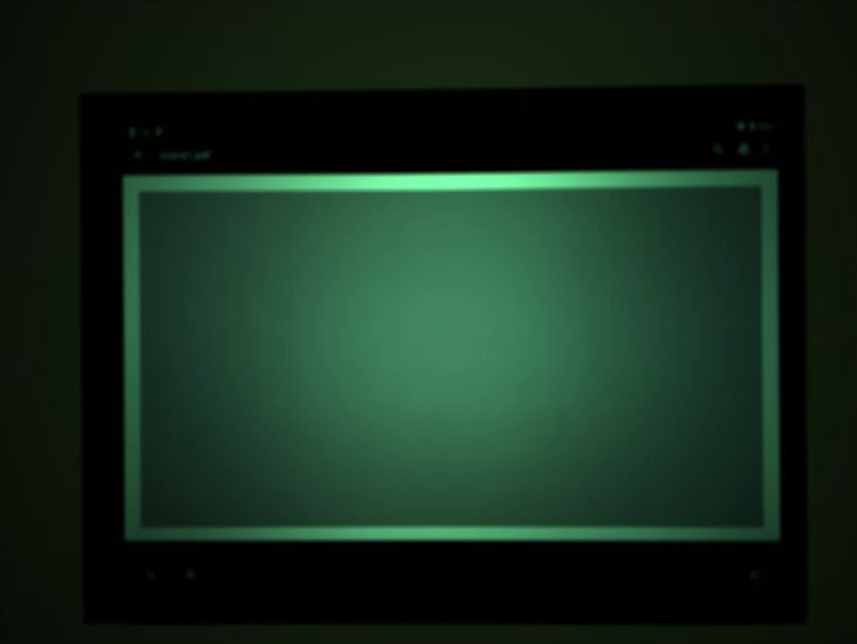
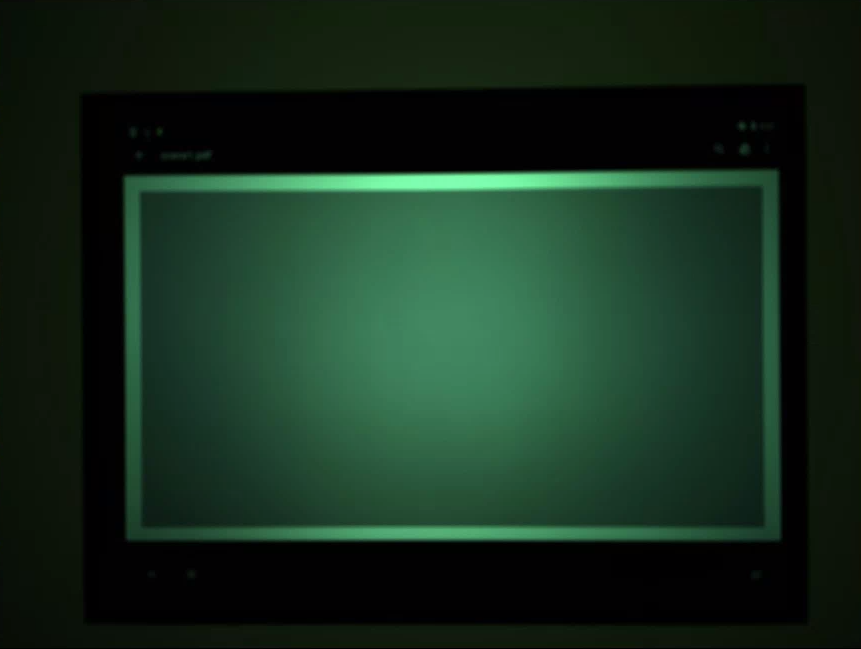
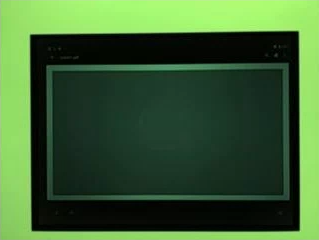
scene5/diffuser
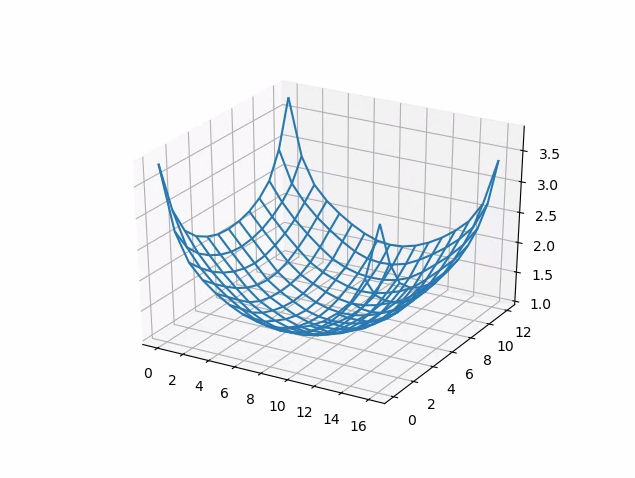
test_lens_shading_and_color_uniformity
Tests that the lens shading correction is applied appropriately, and color of a monochrome uniform scene is evenly distributed. Performs this test on a YUV frame with auto 3A. Lens shading is evaluated based on the y channel. Measures the average y value for each sample block specified, and determines pass or fail by comparing with the center y value. The color uniformity test is evaluated in r/g and b/g space.
APIs tested:
-
android.hardware.camera2.CaptureRequest#CONTROL_AE_MODE -
android.hardware.camera2.CaptureRequest#CONTROL_AWB_MODE
Pass: At the specified radius of the image, the variance of r/g and b/g value must be less than 20% to pass the test.
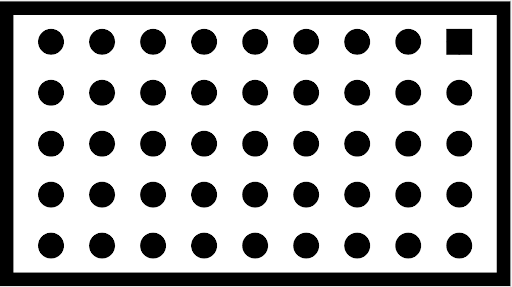
scene6
Scene6 is a grid of small circles with a square in one corner to indicate orientation. The small circles are needed to test zoom function over a large range.
scene6
test_zoom
Tests the camera zoom behavior. Takes captures over the zoom range and checks if the circles get bigger as the camera zooms in.
APIs tested:
-
android.hardware.camera2.CameraCharacteristics#CONTROL_ZOOM_RATIO_RANGE -
android.hardware.camera2.CameraCharacteristics#LENS_INFO_AVAILABLE_FOCAL_LENGTHS -
android.hardware.camera2.CaptureRequest#CONTROL_ZOOM_RATIO -
android.hardware.camera2.CaptureResult#LENS_FOCAL_LENGTH
Pass: Relative size of captured circle is accurate against requested zoom ratio to ensure camera is zooming correctly.
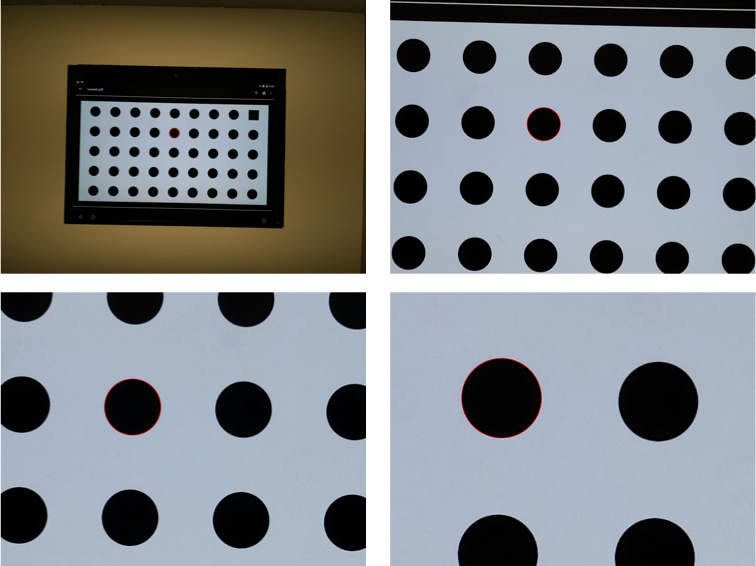
test_zoom to find the contour of the circle closest to the center.
scene_change
test_scene_change
The scene change makes use of the tablet displaying a face scene and then turns the tablet on and off to create a scene change. The scene reuses scene2_e, but is in a separate scene because of the required tablet control. Additionally, for manual testing, the scene change can be accomplished by waving your hand in front of the camera.
APIs tested:
Pass: The android.control.afSceneChange flag is asserted with a scene change.
sensor_fusion
Sensor fusion tests require specific phone movement in front of a checkerboard pattern. The sensor_fusion tests can be automated with the Sensor Fusion Box .
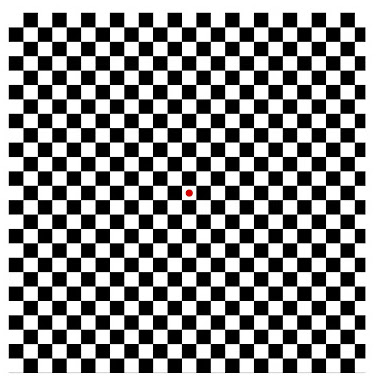
Image of checkerboard
test_multi_camera_frame_sync
Tests that frame timestamps captured by logical camera are within 10 ms by computing angles of squares within the checkerboard to determine the timestamp.
APIs tested:
-
android.hardware.camera2.CameraCharacteristics#LOGICAL_MULTI_CAMERA_SENSOR_SYNC_TYPE -
android.hardware.camera2.CameraCharacteristics#getPhysicalCameraIds() -
android.hardware.camera2.CameraMetadata#REQUEST_AVAILABLE_CAPABILITIES_LOGICAL_MULTI_CAMERA -
android.hardware.camera2.params.OutputConfiguration#setPhysicalCameraId()
Pass: Angle between images from each camera doesn't change appreciably as phone is rotated.
test_sensor_fusion
Tests the timestamp difference between the camera and the gyroscope for AR and VR applications. Phone is rotated 90 degrees 10 times in front of the checkerboard pattern. Motion is about 2 s round trip. This test is skipped if no gyroscope is included or if the REALTIME parameter is not enabled.
The test_sensor_fusion test generates a number of plots. The two most important plots for debugging are:
test_sensor_fusion_gyro_events: Shows the gyroscope events for the phone during the test. Movement in the x and y direction implies the phone isn't securely mounted on the mounting plate, reducing the probability of the test passing. The number of cycles in the plot depends on the write speed for saving frames.
test_sensor_fusion_gyro_events
test_sensor_fusion_plot_rotations: Shows the alignment of the gyroscope and camera events. This plot must show matching movement between camera and gyroscope to +/-1 ms.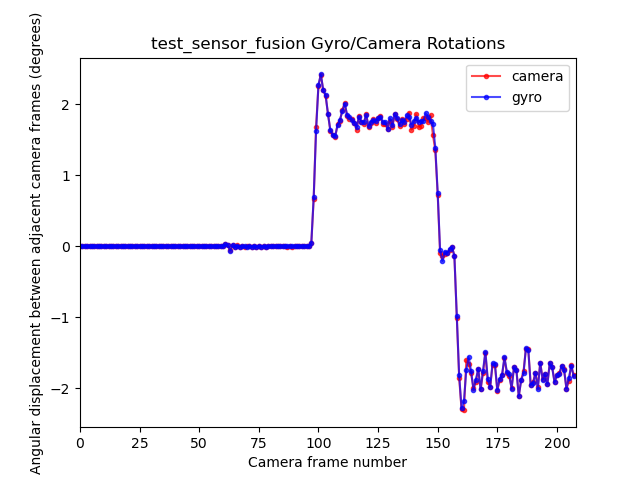
test_sensor_fusion_plot_rotations
APIs tested:
-
android.hardware.camera2.CameraCharacteristics#LENS_FACING -
android.hardware.camera2.CaptureRequest#CONTROL_AE_TARGET_FPS_RANGE -
android.hardware.camera2.CaptureRequest#SENSOR_FRAME_DURATION -
android.hardware.camera2.CaptureRequest#SENSOR_TIMESTAMP -
android.hardware.camera2.CaptureResult#SENSOR_ROLLING_SHUTTER_SKEW
Pass: Camera and gyroscope timestamps' offset is less than 1 ms as per CDD section 7.3.9 High Fidelity Sensors [C-2-14] .