
本指南分步说明了如何下载、编译和刷写自定义 Pixel 内核以用于开发。得益于 GKI,现在可以在独立于 Android 平台 build 的情况下更新内核。这些步骤仅适用于 Pixel 6 及更新型号的 Pixel 设备。这是因为 Pixel 5 及更低版本的设备需要更新 vendor 分区上的内核模块,而该分区依赖于针对这些设备的 Android 平台 build。GKI 支持的 Pixel 内核分支表包含 GKI 支持的每个 Pixel 设备的内核仓库清单分支。如需了解 Pixel 5 及更早版本的内核清单分支,请参阅旧版 Pixel 内核部分。
GKI 支持的 Pixel 内核分支
| 设备 | AOSP 树中的二进制文件路径 | 仓库分支 | GKI 内核 |
|---|---|---|---|
| Pixel 9 Pro Fold (comet) | device/google/comet-kernels/6.1 | android-gs-comet-6.1-android15-qpr1 | android15-6.1 |
| Pixel 9 (tokay) Pixel 9 Pro (caiman) Pixel 9 Pro XL (komodo) |
device/google/caimito-kernels/6.1 | android-gs-caimito-6.1-android15-qpr1 | android15-6.1 |
| Pixel 8a (akita) | device/google/akita-kernels/5.15 | android-gs-akita-5.15-android15-qpr1 | android15-5.15 |
| Pixel 8 (shiba) Pixel 8 Pro (husky) |
device/google/shusky-kernels/5.15 | android-gs-shusky-5.15-android15-qpr1 | android15-5.15 |
| Pixel Fold (felix) | device/google/felix-kernels/5.10 | android-gs-felix-5.10-android15-qpr1 | android15-5.10 |
| Pixel Tablet (tangorpro) | device/google/tangorpro-kernels/5.10 | android-gs-tangorpro-5.10-android15-qpr1 | android15-5.10 |
| Pixel 7a (lynx) | device/google/lynx-kernels/5.10 | android-gs-lynx-5.10-android15-qpr1 | android15-5.10 |
| Pixel 7 (panther) Pixel 7 Pro (cheetah) |
device/google/pantah-kernels/5.10 | android-gs-pantah-5.10-android15-qpr1 | android15-5.10 |
| Pixel 6a (bluejay) | device/google/bluejay-kernels/5.10 | android-gs-bluejay-5.10-android15-qpr1 | android15-5.10 |
| Pixel 6 (oriole) Pixel 6 Pro (raven) |
device/google/raviole-kernels/5.10 | android-gs-raviole-5.10-android15-qpr1 | android15-5.10 |
除了出厂支持的内核之外,Pixel 6 和 Pixel 6 Pro 设备仅在受支持的 Pixel 6/Pixel 6 Pro Android 平台和内核组合表中包含的 Android 通用内核分支上支持用于 GKI 开发。由于 Android 平台 HAL 和 Pixel 内核驱动程序之间的供应商 UAPI 差异,下表提供了受支持的 build 组合。
受支持的 Pixel 6/Pixel 6 Pro Android 平台和内核组合
| Pixel 内核清单分支 | GKI 分支 | Android 平台 build | aosp-main 支持? |
|---|---|---|---|
| gs-android-gs-raviole-mainline | android-mainline (v6.12) | BP11.241025.006 (12620009) | 是 |
| android-gs-raviole-6.1-android15-qpr2-beta | android14-6.1 | BP11.241025.006 (12620009) | 是 |
| gs-android13-gs-raviole-5.15 | android13-5.15 | TQ1A.230205.002 (9471150) | 否 |
准备您的 Pixel 设备
以下流程图介绍了在 Pixel 6 及更新型号的 Pixel 设备上更新内核的流程:
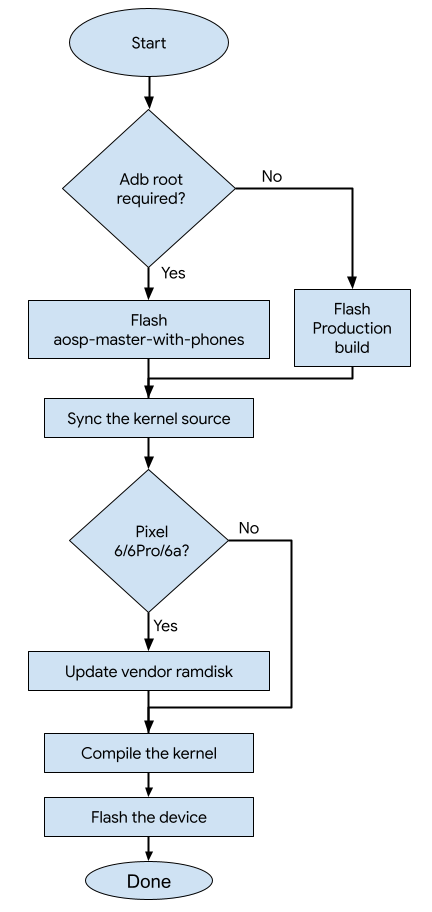
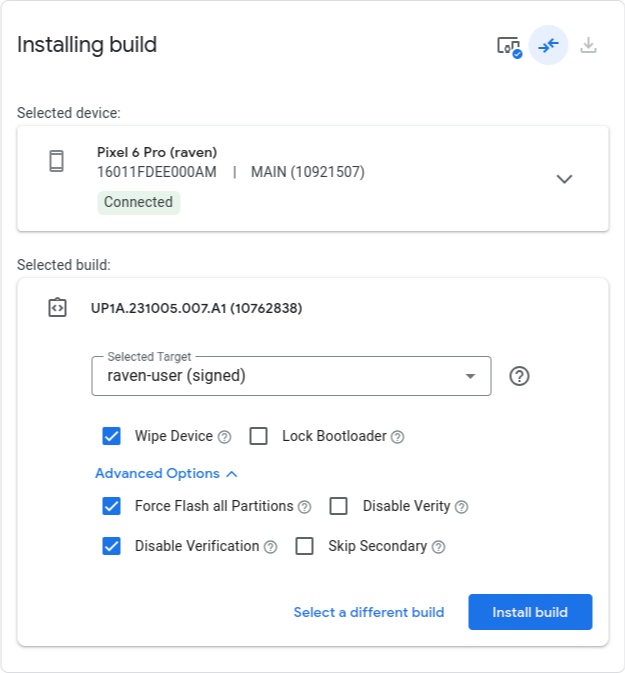
使用 flash.android.com 刷写设备
- 前往 flash.android.com
- 根据支持的 Android 平台和内核组合选择 Android build。
- 选择以下选项:
- 擦除设备
- 强制刷写所有分区
- 停用验证
- 按 Install build(安装 build)按钮刷写设备。
下载并编译内核
同步内核仓库
您可以运行以下命令来下载内核源代码。请参阅适用于 Pixel KERNEL_MANIFEST_BRANCH 的受支持的 Pixel 6/Pixel 6 Pro Android 平台和内核组合表。
repo init -u https://android.googlesource.com/kernel/manifest -b KERNEL_MANIFEST_BRANCH
repo sync -c --no-tags
更新供应商 ramdisk
更新内核仓库中的文件 vendor_ramdisk-DEVICE.img,以匹配在设备上刷写的 Android 平台 build。您可以通过以下几种方法更新 vendor_ramdisk-DEVICE.img 文件。如果您使用的是 Android 15 QPR2 (BP11.241025.006) 或更高版本,请使用方法 (1)。否则,请使用方法 (2)。
方法 1) 仅更新 vendor_boot 分区的 DTB 和 DLKM ramdisk 位
从 fastboot 版本 35.0.2-12583183 开始,您可以直接在
vendor_boot分区上刷写 DTB 和 DLKM ramdisk。从 v35.0.2-12583183 制品下载并提取sdk-repo-HOST_OS-platform-tools-12583183.zip到主机环境中以供使用。请按照刷写内核映像中的说明刷写 DTB 和
vendor_boot:dlkm。选项 2) 从 Pixel 出厂映像中提取供应商 ramdisk 映像。
从 https://developers.google.com/android/images 下载设备支持的出厂映像。
解压缩
vendor_boot.img:下述命令以 Pixel 6 Pro AP1A.240505.004 为例。将 zip 文件名替换为所下载出厂映像的文件名。
unzip raven-ap1a.240505.004-factory-9d783215.zipcd raven-ap1a.240505.004unzip image-raven-ap1a.240505.004.zip vendor_boot.img解压缩
vendor_boot.img以获取供应商 ramdisk。KERNEL_REPO_ROOT/tools/mkbootimg/unpack_bootimg.py --boot_img vendor_boot.img \ --out vendor_boot_out将解压缩的
vendor-ramdisk-by-name/ramdisk_文件复制到 Pixel 内核仓库。设备 DEVICE_RAMDISK_PATH Pixel 6 (oriole)
Pixel 6 Pro (raven)prebuilts/boot-artifacts/ramdisks/vendor_ramdisk-oriole.img Pixel 6a (bluejay) private/devices/google/bluejay/vendor_ramdisk-bluejay.img cp vendor_boot_out/vendor-ramdisk-by-name/ramdisk_ \ KERNEL_REPO_ROOT/DEVICE_RAMDISK_PATH
编译内核 (Kleaf)
在 Android 13 中,build.sh 脚本已替换为 Kleaf 的新内核构建系统。对于搭载 android13-5.15 及更高版本的设备,应使用 Kleaf 构建内核。
对于搭载 android13-5.15 内核的 Pixel 6 和 Pixel 6 Pro,请运行 Kleaf 构建命令:
tools/bazel run --lto=thin //gs/google-modules/soc-modules:slider_dist
对于所有其他 Pixel 内核,请运行 KERNEL_REPO_ROOT 中的 build_DEVICE.sh 脚本。在大多数情况下,DEVICE 所用的代号需与 GKI 支持的 Pixel 内核分支表格 AOSP 树中的二进制文件路径列中所用的代号保持一致。该字符串可以是一个设备的代号,例如“akita”(Pixel 8a),也可以是代表一组共用内核的相关设备的代号,例如“caimito”(表示 Pixel 9 [tokay]、Pixel 9 Pro [caiman] 和 Pixel 9 Pro XL [komodo])。对于 android14 及更早版本,请对 Pixel 6 和 Pixel 6 Pro 使用 build_slider.sh,对 Pixel 7 和 Pixel 7 Pro 使用 build_cloudripper.sh。
例如,如需在分支 android-gs-raviole-5.10-android14 上为 Pixel 6 构建内核,您应运行以下命令:
build_slider.sh
默认情况下,在生产内核分支上,build_DEVICE.sh 脚本使用预构建的 GKI 内核来加速构建流程。如果要修改核心内核,请设置环境变量 BUILD_AOSP_KERNEL=1 以改为从本地源代码构建内核。默认情况下,开发内核分支会直接构建内核源代码。
如需详细了解内核构建系统以及如何自定义 build,请参阅 Kleaf - 使用 Bazel 构建 Android 内核。
刷写内核映像
注意:如果您尚未停用验证,则需要在刷写自定义内核之前停用。用于执行此操作的命令如下:fastboot oem disable-verification
警告:如果您要在平台 build 之上刷写自定义内核,并且存在与新内核相关联的安全补丁级别 (SPL) 降级,则可能需要擦除设备。 此过程会清除您的所有个人数据。擦除前请务必备份您的数据。fastboot -w
如需刷写内核映像,请针对为设备列出的每个内核分区运行 fastboot flash 命令。对于动态分区,您需要重新启动,进入 fastbootd 模式,才能刷写。
| 设备 | 内核分区 |
|---|---|
| Pixel 6
(oriole) Pixel 6 Pro (raven) Pixel 6a (bluejay) |
boot dtbo vendor_boot vendor_dlkm(动态分区) |
| Pixel 8 (shiba) Pixel 8 Pro (husky) Pixel Fold (felix) Pixel Tablet (tangorpro) Pixel 7a (lynx) Pixel 7 (panther) Pixel 7 Pro (cheetah) |
boot dtbo vendor_kernel_boot vendor_dlkm(动态分区) system_dlkm(动态分区) |
对于 Pixel 6/6 Pro/6a,如果您跳过了更新供应商 ramdisk 部分中的 vendor_ramdisk 下载步骤,请使用以下命令更新 DTB 和 DLKM ramdisk,而不是刷写 vendor_boot.img 映像:
fastboot flash --dtb out/DEVICE/dist/dtb.img vendor_boot:dlkm out/slider/dist/initramfs.img
以下是在 android-mainline 上适用于 Pixel 6 的刷写命令:
fastboot flash boot        out/slider/dist/boot.img
fastboot flash dtbo        out/slider/dist/dtbo.img
fastboot flash vendor_boot out/slider/dist/vendor_boot.img
fastboot reboot fastboot
fastboot flash vendor_dlkm out/slider/dist/vendor_dlkm.img
您可以在 DIST_DIR 中找到内核映像。
| 内核分支 | DIST_DIR |
|---|---|
| v5.10 | out/mixed/dist |
| v5.15 及更高版本 | out/DEVICE/dist |
注意:如果您有串行加密狗并且想要启用串行日志,请使用以下命令:从主机进行连接的示例命令: fastboot oem uart enablefastboot oem uart config 3000000screen -fn /dev/ttyUSB* 3000000
恢复出厂映像
如需将设备恢复为出厂映像,您可以使用 flash.android.com。
旧版 Pixel 内核
旧版 Pixel 内核分支表提供了适用于 Pixel 5 及更低版本设备的内核仓库分支,以供参考。这些是非 GKI 支持的设备。
旧版 Pixel 内核分支
| 设备 | AOSP 树中的二进制文件路径 | 仓库分支 |
|---|---|---|
| Pixel 5a (barbet) Pixel 4a (5G) (bramble) Pixel 5 (redfin) |
device/google/redbull-kernel | android-msm-redbull-4.19-android14-qpr3 |
| Pixel 4a (sunfish) | device/google/sunfish-kernel | android-msm-sunfish-4.14-android13-qpr3 |
| Pixel 4 (flame) Pixel 4 XL (coral) |
device/google/coral-kernel | android-msm-coral-4.14-android13 |
| Pixel 3a (sargo) Pixel 3a XL (bonito) |
device/google/bonito-kernel | android-msm-bonito-4.9-android12L |
| Pixel 3 (blueline) Pixel 3 XL (crosshatch) |
device/google/crosshatch-kernel | android-msm-crosshatch-4.9-android12 |
| Pixel 2 (walleye) Pixel 2 XL (taimen) |
device/google/wahoo-kernel | android-msm-wahoo-4.4-android10-qpr3 |
| Pixel (sailfish) Pixel XL (marlin) |
device/google/marlin-kernel | android-msm-marlin-3.18-pie-qpr2 |