
本页面介绍了向 Android 开源项目 (AOSP) 提交代码更改的全过程,包括如何请求审核并跟踪您所做的更改。
AOSP 依赖于 Gerrit,这是一个基于网页的代码审核系统,适用于使用 Git 的项目。Gerrit
签署贡献者许可协议
在为 AOSP 贡献任何代码更改之前,您必须阅读贡献者许可协议和标头并签署以下协议之一:
- 如果您是仅代表自己做出贡献的个人贡献者,请签署《个人贡献者许可协议》。
- 如果您是某家公司的员工,请确保贵公司已签署《企业贡献者许可协议》,授权您代表其提交贡献。
启动分支
对于您要进行的每项代码更改,请执行以下步骤:
在相关 Git 仓库中启动一个新分支。分支不是原始文件的副本;它一个指针,指向某一项提交内容,可以简化创建本地分支以及在本地分支之间进行切换的操作。通过使用分支,您可以区分不同的更改。运行以下命令以启动分支:
repo start BRANCH_NAME您可以在同一代码库中同时启动多个独立的分支。BRANCH_NAME 分支位于工作区本地,且既不含在 Gerrit 中也不含在最终源代码树中。 分支也特定于您所在的项目,因此如果您要在同一个更改中修改不同项目中的文件,您就需要在每个项目中创建一个分支来修改文件。
(可选)验证分支是否已创建:
repo status .您应该会看到新创建的分支。例如:
project frameworks/native/ branch mynewbranch
进行更改并对其进行测试
请按照以下步骤进行更改并对其进行测试:
为了确保您使用的是最新的代码库,请同步整个代码库:
repo sync如果您在同步期间遇到任何冲突,请参阅解决同步冲突的第 2-4 步。
找到要更改的代码。要查找代码,您可以使用 Android 代码搜索。您可以使用 Android 代码搜索来查看 AOSP 源代码,就像实际使用时的布局一样。如需了解详情,请参阅代码搜索使用入门。要在 Android 代码搜索中查看
main分支中的所有代码,请导航至https://cs.android.com/android/platform/superproject/main。修改或添加源文件。对于所做的任何更改:
确定您是否需要使用功能发布标志,如果需要,请为您的新代码实现这些标志。
请遵循添加许可标头中的最佳实践。
对于 Java 代码,请遵循面向贡献者的 AOSP Java 代码样式。
AOSP 的某些部分是用 Kotlin (
.kt) 编写的,您可以在平台中已使用 Kotlin 编写的部分使用 Kotlin。如需详细了解 Android 中的 Kotlin,请参阅面向 Android 开发者的 Kotlin 样式指南和 Kotlin-Java 互操作指南。如需获得更全面的 Kotlin 指南,请参阅 Kotlin 语言网站。写入 API 时,请遵循 Android API 准则。可通过这些准则了解 Android 的 API 决策背后的背景信息。平台 API 的添加和修改均经过 Metalava 验证。
暂存并提交您的更改
在 Git 中,“提交”是修订版本控制的基本单位,包含目录结构的快照以及整个项目的文件内容。请按照以下步骤提交您的更改:
默认情况下,Git 会检测到您所做的更改,但不会跟踪这些更改。如需让 Git 跟踪您的更改,您必须标记或暂存这些更改,以将其纳入到提交中。运行以下命令以暂存更改:
git add -A此命令会跟踪您对任何文件所做的更改。
获取暂存区中的文件,并将其提交或存储到本地数据库中:
git commit -s默认情况下,系统会打开文本编辑器,并提示您提供提交消息。
请提供以下格式的提交消息:
第 1 行:标题。提供一行有关更改的摘要(最多 50 个字符)。建议您使用前缀来描述您更改的区域,随后描述您在此提交中所做的更改,例如下方这个包含界面更改的示例:
ui: Removes deprecated widget第 2 行:空白行。在标题后添加空白行。
第 3 行:正文。提供长篇幅描述,最多可包含 72 个字符。描述更改所解决的问题及其解决方式。虽然正文是可选的,但对于需要回顾更改的其他人员来说,这非常有用。请务必添加简要说明,描述对于处理此功能的其他贡献者而言可能非常重要的任何假设或背景信息。
要想阅读关于优秀提交说明(有示例)的博客,请参阅博文 How to Write a Git Commit Message(如何撰写 Git 提交消息)。
保存提交内容。
repo init 期间提供的唯一更改 ID 以及您的姓名和电子邮件地址会自动添加到您的提交消息中。
上传更改以备审核
将您所做的更改提交到您的个人历史记录后,将其上传到 Gerrit:
运行以下命令,上传所有项目中的所有提交内容:
repo upload所有项目中的所有更改都包含在上传范围内。
系统会提示您运行钩子脚本。
按 a,然后按 Enter 键。
系统会提示您批准上传:
Upload project frameworks/native/ to remote branch main: branch BRANCH_NAME ( 1 commit, Wed Aug 7 09:32:33 2019 -0700): ff46b36d android codelab change to https://android-review.googlesource.com/ (y/N)?按 y,然后按 Enter 键批准上传。
您应该会收到一条消息,类似于 remote: SUCCESS。
请求审核
上传成功后,Repo 会向您提供指向 Gerrit 中您所做更改的链接。点击该链接可在审核服务器上查看更改、添加备注,或申请由特定审核者来审核您的更改。对代码的所有更改都必须由相应的代码所有者审核。
要请求审核,请执行以下操作:
在 Gerrit 中,点击 SUGGEST OWNERS:
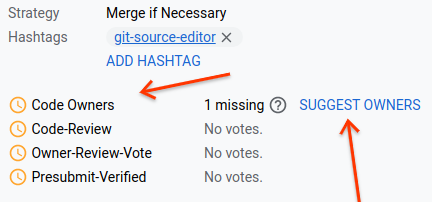
图 1. Gerrit 中的“SUGGEST OWNERS”链接。
系统会显示审核者对话框。此对话框包含可审核您更改的代码所有者列表。
点击代码所有者将其添加到您的审核中。
发送按钮已启用。
(可选)输入您希望审核更改的其他人的电子邮件地址。
(可选)点击“Autosubmit”旁边的 +1,以便在您获得批准后自动提交更改。如果您没有点击此按钮,则必须由 Google 员工为您提交更改。
点击发送,发送更改以供审核。
代码所有者会审核您的代码更改,并提供反馈以帮助您解决问题,或者批准更改。
确定更改状态
如需确定您的更改中文件的状态,请查看更改中文件旁边的以下图标:
- (对勾标记图标):已经过代码所有者批准
- (叉号图标):未经过代码所有者批准
- (时钟图标):正等待代码所有者审批
下图显示了这些状态图标在更改中的文件上的应用:
![]()
图 2. 一个带有显示代码所有者审批状态图标的文件示例
解决反馈并上传替换更改
如果审核者要求您修改更新,您可以在 Git 中修改提交内容,这会导致在同一更改中生成一个新的补丁集。
要解决反馈并修改您的更改,请执行以下操作:
请按照进行更改并对其进行测试中的第 2-4 步操作。
运行以下命令以修改更改:
git add -A git commit --amend上传更改。
当您上传修改的更改时,它会替换 Gerrit 上和您本地 Git 历史记录中的原始更改。
解决同步冲突
如果提交到源代码树的其他更改与您的更改存在冲突,您会收到一条消息提示您存在冲突。如需解决冲突,请执行以下操作:
确保您使用的是最新代码:
repo sync .repo sync命令会从源服务器获取更新,然后尝试自动将您的HEAD到新的远程HEAD上。如果自动 rebase 操作不成功,请执行手动 rebase 操作:
repo rebase .解决合并冲突。如果您没有解决合并冲突的首选方法,可以使用
git mergetool手动解决文件之间的冲突。在成功修复冲突的文件后,请运行以下命令以应用新的提交内容:
git rebase --continue
提交更改
在提交内容通过审核和验证流程后,Google 审核人员必须为您提交相应代码。其他用户可以运行 repo sync 将更新提取到他们各自的本地客户端。
提交内容合并后,您可以访问 Android 持续集成信息中心,以查看提交内容何时会集成到源代码树中。